Watch the video here.
I
decided to make another cookie jar this week for the dollhouse
kitchen. I am kind of envisioning a collection of cookie jars that
can be displayed in the dollhouse kitchen. I will probably stage them
on top of the top run of kitchen cabinets. The more I think about the
idea the more ideas I have for themes.
If
you are wondering why we still aren't working on the Beachside
Bungalow kitchen be sure to check out the dedicated blog post about
that (you can find it here)
Once
again I am using a wooden form to wrap some heavy white card stock
around to form the interior of my cookie jar. I love the neat finish
this gives the finished cookie jar.
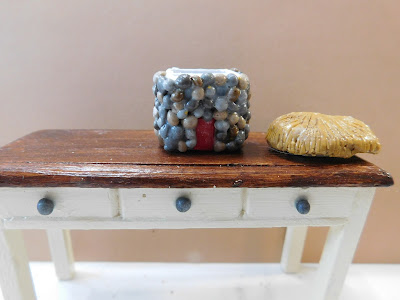
This
week since I wanted this cookie jar to be either rectangular or
square I dug through my stash of wooden bits and bobs and came up
with one of the Tumbling Tower Block game pieces from Dollar Tree. It
measures ⅜” by ⅝”. If you don't have any of these little
pieces just pick something of similar size. The paper strip was cut
¾” by just a bit longer than 4”. It was then wrapped and glued
around the wood piece ans slid off to dry.
Once
the glue is dry add a base layer of white clay. I used some Original
Sculpey for white clay this week. Very little of this layer will show
when we are finished so what clay you use won't really matter. Be
sure to use a layer of TLS (Translucent Liquid Sculpey) as a “glue”
between the paper layer and the clay. Also between all areas as we
add fresh clay to the project.
I
also formed the little base for the lid but cutting a slap of clay
the same size as the end of the wood piece I used to form the cookie
jar around.
Bake
these pieces for 10 minutes at 250°F
(up to 275°F) and allow to cool.
Next
I added the front door to my cottage with some red clay and some
windows with some blue. These are added again with TLS and baked as
above.
While
this baking was going on I gathered some grey clay (Sculpey II in
Elephant), some brown clay (Sculpey III in Hazelnut), a tiny bit of
black, and some of the Original Sculpey.
I
used these clays to mix colors for my stones to cover the cottage. I
then make snakes, cut these snakes into small pieces and rolled a lot
of really small balls of clay in the various “stone” colors. You
are going to need a lot of these little balls to cover the outside of
your cottage.
Working
in small areas add some TLS to the surface of the baked cookie jar
and add the tiny balls to cover. Bake often at 250°F
(up to 275°F) for 10 minutes. Trying to work on too large an area at
one time will be very messy.
I
did start by going around the door and windows. Do note that I wish I
had left a larger area open for the windows, and maybe should have
lined the window area with some plain snakes of clay to make them
stand out a bit better.
Once
the entire outside of the cookie jar is covered with stone it is time
to create the lid which is the roof to our cottage. For this add some
Fimo Yellow Ocher clay to the small slab you made earlier. Cutting to
fit the contours of the cookie jar at least somewhat, and using TLS
to make sure it sticks. Bake as before.
Next
add some TLS to the top of the lid and using more of the yellow clay
form the basic shape of the roof. Cutting off excess clay and molding
until it is the shape you like. I found it best to work with the lid
both on and off the cookie jar to be sure the roof was fitting the
way I wanted. Once you are happy with the roof add some texture using
a pointy tool. Then bake once again at 250°F
(up to 275°F) for 15 minutes.
Once
the clay cooled again I added a thin wash of a brown paint to the
roof then wiped it away leaving just a hint in the texture lines of
the roof. This will help the lines you etched in to show up a lot
more.
Once
cooled apply a thin coat of Gloss Mod Podge and once completely dry
your cookie jar is ready to display in the dollhouse.
As
always I do want to sincerely thank all of you for watching my videos
and reading my blog posts. It means so much to me that you are
supporting me in this way. If I could ask you all to do just a bit
more by subscribing to the channel and liking the videos and leaving
comments. Those help more than you can imagine. Also if you could
pass the links on to your friends I would appreciate it so much.


No comments:
Post a Comment