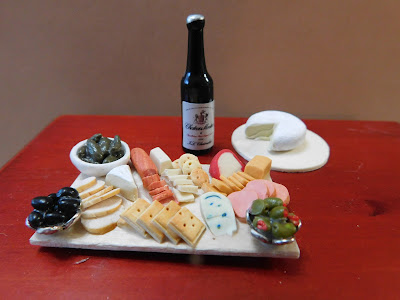
This week I am taking all those parts we have been making for the last several weeks and putting them together for meat and cheese board. I knew this project was going to be really cool when I started but I have to say it turned out even better than I thought it would.
So I started by making a board for the display to be adhered to. I had thought when I started that I was going to use the tray we made a while back but the more I played around with the pieces as I made them the more I liked them on a plain board. Fell free to put yours together on whatever surface/container you wish.


Next
I added the olives to the bead caps that I am using as bowls for them
in the same way. Do be careful as there is a hole at the top of the
bead cap/bottom of the bowl and the TLS will ooze out a bit. Be sure
to put the piece only on clay safe surfaces until it is baked.


Next
I used TLS to make fanned out displays of the meats we had made in a
previous video. Do this on a non-stick baking surface so that you
won't have to move it once you get all the pieces placed just the way
you want them.
Once all these pieces were put together I did a first baking at 250°F for 10 minutes. I have been baking my clay projects at 250°F instead of the recommended 275°F lately because I have noticed that my current oven tends to drift in temperature when I use it. At the slightly lower temperature I notice although it still drifts up in temperature it stays in what I consider the safe zone for baking my polymer clay. When set at 275°F it goes over the safe temperatures and into high enough temperatures that I feel the clay could give off some toxic fumes. Best to stay safe. This is one of the reasons I keep a thermometer in my oven at all times and keep track of the temperatures when I am using it.
Once the clay pieces were baked it was time to start my favorite part of this entire project, putting everything onto the board.
The
first step was to try the pieces on with no TLS just to get a feel
for how everything was going to fit. This also gave me a better idea
of how much room I would have the for cheese to be placed so I could
make some display fans of the sliced cheese. I could have done these
when I did the meats but I wasn't sure how much room was going to be
left for them and I wanted have a better idea of how much cheese I
wanted on the final board.

I made these cheese fans (I have no idea what else to call them LOL) the same way I did the meat ones. And again baked them for 250°F for 10 minutes.
Once cooled it was time get use the TLS and permanently adhere everything in place.

I started with the 3 bowls, since I knew which corners I wanted them. Then I added the meats and some of the cheeses.
I decided to bake at this point so that the things I had placed would not be bumped out of place as I continued. So again I baked the board at 250°F for 10 minutes.

Now I felt safe adding the rest of the cheeses. Since everything was nicely stable I didn't have worry about messing up what I had just done.
Once
all the cheese was in place it was time to bake it again at 250°F
for 10 minutes.
Now I was ready to place the crackers. Off camera I had tried several different placements (actually I did that all the way through the project with pretty much every step) No matter how hard I tried to fit in the third type of cracker the board just seemed to be too crowded and cluttered with that many different things on it. I found I liked it so much better when I just use the two types of crackers so that was the route I chose to go.

I did place the crackers with the TLS in place on the board and used them to fill the largest open areas. I did my best to leave some blank areas on the board so that each item can be seen and appreciated without getting lost in the mass of items covering the board.
Once
the crackers were in place it was time for a final bake at 250°F
for 10 minutes.

Once
cooled I added just a very thin coat of Satin Mod Podge to the
pickles and olives since I felt they looked a bit flat and lifeless.
Once the Mod Podge dried the board was ready for display. I do love how this turned out.
I do want to talk just moment about my decision to use TLS instead of glue to do the assembly. You can use either the TLS like I did or if you have a polymer clay safe glue that you are sure will work well you can use that for your project. At the moment I don't have a glue I really love for polymer clay projects. While Tacky glue is safe to use I find it doesn't hold up very well in the long run. I know with TLS that the project will hold together long term with no problems. If you do use glue I do strongly suggest that you stop at each point where I baked the pieces/board and allow your glue to dry. This will make working on the board much easier and you won't be so apt to dislodge your hard work. That being said one other advantage of TLS is that it stays workable until you do bake it so if you have to leave your project before you are ready to bake it will still be moveable whenever you come back.
As always I do want to sincerely thank all of you for watching my videos and reading my blog posts. It means so much to me that you are supporting me in this way. If I could ask you all to do just a bit more by subscribing to the channel and liking the videos and leaving comments. Those help more than you can imagine. Also if you could pass the links on to your friends I would appreciate it so much.
No comments:
Post a Comment