Check back often

Have you checked out all my blogs?


Dollhouse Minis: http://joannesminis.blogspot.com


18” Dolls: http://joannes18dolls.blogspot.com/


General Crafts: http://joannes-place.blogspot.com/


Cooking: http://joanne-kitchen.blogspot.com/


Also if for some reason I can't post I will try to give a head's up on the Facebook page so check there too.

Sunday, June 26, 2022

Dollhouse Miniature Decorative Basket


Watch the video here.


One of the YouTube channels I watch that is a combination of crafting and home decorating had a recent video using tobacco baskets and I loved all the ways that they could be used. She placed them on tables as well as hung them on the walls. She added floral decorations to some of them these can be used so many ways.  I also loved the lines and overall look of the baskets so I knew I had to make some mini ones.


I did take a few liberties with the design. On most the real size ones I saw online there were diagonal pieces of the woven base in addition to the open weave that I used. When I tried to add the add the additional pieces and it just looked too busy in this scale. I think if you are making one of these in Barbie scale (1/6) you would be fine adding them. I mean if you really want to you could add them in this scale but my opinion was they were just too much.


So to start you need to pick something to use as a form to help build your basket. Since I especially love the square version of these I used a square nail polish bottle. Mine was about 1” across. You can make these baskets square, round or oval. So check around and see what you have that can be use.


You will need some card-stock to make your basket from look for the kind that is heavy enough to make greeting cards out of. Most craft stores have loads of this paper in either pads or packs and it comes in every color you can imagine. Even though we will be painting our basket later I do recommend using a card-stock that is close to the color you want your finished basket to be. This will save you time in painting later.


My card-stock was 12”x12” and I cut 5 strips that were 1/8” wide. Cut one of these into two pieces that will wrap around your form and overlap enough to glue together (my overlap was close to ½”) These will be your basket inner and outer rims. Cut the other 4 pieces in half so you 8 pieces that are around 6”. (this is all based on using a form similar to mine. If you use something smaller you will need less strips if it is bigger you will need more.


Start by forming the inner rim by wrapping one of the strips around your form and gluing the ends. All this to dry off the form.


While it dries lay out 4 of the 6” strips spacing them evenly and tape down (or secure in some other way) now weave the remaining 6” strips into them forming a woven area that is very open that is smaller than the base of the form you are using.


Carefully add dots of glue to the intersections on the outer edge of this woven piece and allow to dry.


Add glue to outside of the inner rim, slip it back onto the form place it so that it will form the depth of basket you wish to make and add the woven part of the basket. Make sure all the pieces are where you want them and are running straight.


Hold in place until the glue grips on its own. Allow to dry in place.


Once dry use a small pair of scissors to trim off the excess of the strips you wove the bottom of the basket with. I like to angle the basket so I am cutting from the inside so I can be sure that I am cutting all the strips even with the top of the inner rim.


Put the basket back on the form and add the outer rim being sure to line it up with the inner rim. Allow the glue to dry.


Use some craft paint to coat the basket to hide any glue that might be showing. It will also help make the basket look like a real basket and take away some or the “paper” look.


Once the paint is dry give the basket a coat of mat Mod Podge and allow to dry.


I love how these look and it really is hard to stop at just one.


A big thank you to the folks at Plaid for supplying the paint, brushes, and Mod Podge used in this tutorial.


As always I do want to sincerely thank all of you for watching my videos and reading my blog posts. It means so much to me that you are supporting me in this way. If I could ask you all to do just a bit more by subscribing to the channel and liking the videos and leaving comments. Those help more than you can imagine. Also if you could pass the links on to your friends I would appreciate it so much.


Saturday, June 25, 2022

Dollhouse Miniature Hummus & Pita Bread


Watch the video here.


This week we are making a snack that I served my kids growing up, hummus and pita bread. My daughter especially loved this and she ate it for lunch many times also.


We need to start by making a bowl to serve the hummus in. For this I uses some of my pre-mixed white/translucent clay. I use this clay mixture so much that I almost always have it pre-mixed to save me time. It is simply equal parts white and translucent clays. Any brand will do for this.


Roll this clay out into an even sheet of clay and cut with a round cutter. I used some craft-sticks to make sure my clay was a consistent thickness and cut with my ¾” round cutter.


Then carefully place the clay round over a marble, be careful to center it so that your bowl is nice and even. Then press the bowl down on your work surface to give it a flat bottom so it will stand nicely when you are done. Bake this at the temperature recommended for your clay for 10 minutes. 


Allow it to almost cool and carefully remove the marble. This will work best if the clay is a little warm. If yours seems to be stuck put it in a warm oven for a few minutes and try again.


Place the bowl upside down on a piece of fine sandpaper and even out the top edges.


Now we need to make the hummus. For this we are going to start by baking off a blob of clay, I used Sculpey III in Beige. Try to get close to the color you want your finished hummus to be. Bake this piece of clay for 25 minutes to be sure it cures all the way through and cool to room temperature.


Now use something like a nutmeg grater or the grater thing from a pedicure set like I used to make a pile of clay dust from the blog of clay.


Now I have 2 ways for you to make your Hummus. The first way I really think is the best one and I know it will hold up since I have been using this method to make mashed potatoes for years. The second one uses Mod Podge in place of the TLS and I am not sure how well it will hold up over time.


The first method
: Mix up some white and yellow ocher oil paint to make a creamy color and mix just a tiny bit of this into some TLS (Translucent Liquid Sculpey) then mix this mixture into some of the clay dust. I did use a bit of the beige clay to fill the bottom of my dish so I didn’t need to use quite as much of the TLS mixture. Mix in enough of the TLS mixture to make something that has about the same consistency as real hummus. 


Then spread it into your bowl (or whatever serving container you wish to use). Be patient, and work with the top to make it just the way you want it. You could get really fancy with your swirls on the top. Then bake at the recommend temperature for 10 minutes.


Once cooled give the top of the Hummus a thin coat of Satin Mod Podge and allow to dry.


Now lets add some olive oil to the top of our hummus. For this I am showing some thing I have been working on for a while. In years past I would have most likely used something like Gallery Glass paint or another glass paint to make the oil. Since these paints are getting so much harder to find I decided a few months ago to work on coming up with something we could use on our clay that would give us that same wonderful clear liquid look.


If you have some alcohol ink in the correct color for your olive oil you can skip this first step. Since I don’t have any alcohol ink in the correct color I show you how to create it. First using any alcohol marker (I am using my Bic one) color on a white ceramic surface with a yellow marker and some green ones. You might need to experiment with the markers you have to get the color you want. Then add a few drops of Isopropyl Alcohol and mix it really well. The alcohol will dissolve the ink and mix with it forming essentially alcohol ink. (like I said if you have the bottles of ink in the right colors you can skip this step)


Now mix in some gloss Mod Podge to the alcohol mixture and add it to your project. You will need to work pretty quickly since the alcohol evaporates pretty quickly. Also the two will not want to mix together but will if you keep at it. Now just add it to your project and allow to dry. Just like with plain Mod Podge it will become clear as it dries and I love the way it looks. 


Now for Method 2
- for this method I mixed some cream and golden yellow craft-paint paints with some mat Mod Podge and mixed that with the clay dust. This makes a much wetter mixture that you will have to come back and work with for a while as it dries but if you don’t have TLS it is an alternative. 


Follow the instructions above for the olive oil.


The bread- for this project I wanted what I usually see labeled as Greek pita bread. The kind with no pocket. This is a really simple bread. I used some Original Sculpey and it worked nicely. Even though this is a white clay it is not as white as other white clays.


Just roll the clay into a snake (about ¼” in diameter) cut into ¼” segments. Roll each one into a ball, then flatten slightly with your fingertip. Then use the soft side of some Velcro to texture the top.


Now using a mixture of yellow ocher and white chalk give the tops a light brushing, don’t try to color the entire top just part of it. Then follow up with a reddish brown chalk on a very tiny paint brush to just hit a few spots on the top of each piece of bread.


If you want to display the bread cut texture the cut side with a pointed tool but just teasing the surface lightly. Since my kids (especially my daughter) wanted the bread left whole that is how I left most of mine.


Bake the bread at the recommended temperature for your clay for 10 minutes and allow to cool.


Now all you need to do is pick how you want to display your hummus and pita bread.


As always I do want to sincerely thank all of you for watching my videos and reading my blog posts. It means so much to me that you are supporting me in this way. If I could ask you all to do just a bit more by subscribing to the channel and liking the videos and leaving comments. Those help more than you can imagine. Also if you could pass the links on to your friends I would appreciate it so much.


Tuesday, June 21, 2022

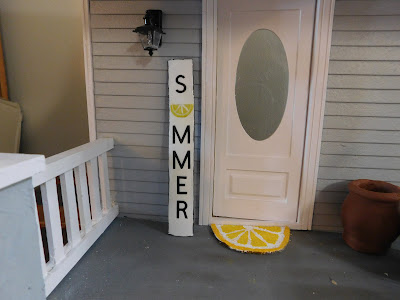
Dollhouse Miniature Lemon Porch Sign


Watch the video here.


The day I filmed this was one of those days where more went wrong than right but in the end I am okay with the finished porch sign.


So I didn’t film this until the day before it was going to be posted which I try to never do. I try to have all my videos finished, uploaded and scheduled for release at least 2 days ahead. This time I was running late and I even though I knew I would have to rush on Monday to get this done I took a rare day off from working on YouTube (mostly off anyway) on Sunday. The weather guessers were telling us it was going to be the first day of a heat wave and I really just wanted to take it easy.


First thing Monday morning I went to my bin of wood pieces that I have collected for many years to make the sign I had decided on several days before. I knew I had this particular shape of wood in the right size and the sign was going to be a fairly easy and quick project. I searched through that bin multiple times and the piece I needed was no where to be seen. I was so sure I had it. Okay, time for a new plan.


I got online and found another sign design I liked. So I grabbed the materials I needed. And got to work.


I used the first craft-stick I came too, even though it was a bit warped. I figured it would be fine. That was a mistake, it was already showing me it had a tendency to warp. I should have grabbed another one.


I cut my jumbo craft-stick to 6” long (it was ¾” wide) and painted it white. I did paint both sides to help prevent further warping but it was not enough. What I should have done was cut some short pieces (about ½”long) of skinny stick and glued them crosswise on the back of the wood. The grain of those going across the grain of the stick and glued firmly would have helped to keep the sign flatter.


After the white paint dried I added a black edge. I was only planning to paint the sides and not come onto the front. By painting from the back with a flat brush I should have been able to keep the paint where I wanted it. But I was trying to hurry and got paint on the front. Instead of doing what I should have, just leave it and cover the small mistake later with white paint I decided it would be faster to add a narrow border around the front to try to hide it. Big mistake I hated it.


So I ended up repainting the front white and repainting the black edge the way I was going to in the first place. Since I was in a hurry I did something I very rarely do. I used my heat gun to try to speed up the dry time. This was a huge mistake because the already warped board really warped with the heat and the uneven drying of the moisture in the paint.


So my sign has a definite warp to it. I might be able to fix it, I haven’t yet decided if I am going to try. If I do I will take pictures and do a blog post about how I fixed it.


For the lemon slice I decided to use my Bic Mark-It pen (any alcohol marker will work) to make the design. I used one of my circle templates so I could make really round circles. I like how it came out. If you have a lemon slice sticker that would also work really well here.


Now onto the lettering. I decided I didn’t want to paint the letters on the font of the sign so I dug out my Cricut and did a quick cut of the letters for the word summer minus the letter u. I wanted to use a lemon slice in place of the u. I did this off camera but if there is enough interest I could put together some tutorials for using the Cricut to make minis.


 0nce the paint was dry I added my word to the front of the sign doing my best to get it centered. I used some Mat Mod Podge to add the half lemon slice to complete the word. I then gave the entire sign a good coat of the Mod Podge and allowed it to dry.


After the Mat Mod Podge dried I added a bit more detail to the lemon slice with white paint and touched up the white on the front of the sign. Since the Mat Mod Podge had sealed the card-stock I used to make the lemon I knew I could wipe away any mistakes I made with the paint. That took a lot of pressure off getting those tiny lines in the right places.


Once dry a final coat of Satin Mod Podge gave the sign a nice finish.


A huge thank you to Plaid for supplying the paint brushes, paints, and Mod Podge used in this project.


As always I do want to sincerely thank all of you for watching my videos and reading my blog posts. It means so much to me that you are supporting me in this way. If I could ask you all to do just a bit more by subscribing to the channel and liking the videos and leaving comments. Those help more than you can imagine. Also if you could pass the links on to your friends I would appreciate it so much.

Sunday, June 19, 2022

Polymer Clay 101 pt 3 Conditioning & Beyond


Watch the video here.


Since everyone seems to be enjoying the clay 101 series so far I decided to give you the next one today. So today we are talking about the consistency of the clay you are working with. From conditioning the clay to prepare it to work with to how to fix too soft or too hard clay. Along with some of a little about why you might want clay that is softer or firmer. And then finally I talk a bit about reviving old crumbly clay.


So what is conditioning and why do we need to do this? Just like an athlete our clay needs to stretch and warm up a bit before we put it to work. There are several reasons for this. One being that while the clay is not being worked with it can stiffen up and become more firm than it normally is. You won’t know how soft/firm your clay is until you condition/warm it up. Also clay can have air pockets hidden in it and these need to be worked out before you go to the work of creating your masterpiece. Clay that has sat for a while can also develop an inconsistent texture. It might be softer in one area but firmer in another. To condition just work with the clay in your hands, knead it, roll it into a snake and fold it and repeat that. Just work with it until it becomes flexible. The goal is to be able to make a snake, fold that snake and see no cracks or tears. Some clays will condition much quicker than others for many reasons.


Too soft clay. While a really soft clay is much easier on the hands it is very difficult to get fine details with really soft clay. It just can’t hold the finer details we many times need working in smaller scales.


To remedy this there are several simple things you can do. First off try cooling your hands and work surface. Sometimes giving your hands a quick wash with cold water is all that 9is needed. You can also chill your work surface (if possible) and this can go a long way with just slightly soft clay.


If you are going to be mixing your clay with another clay to achieve a different color picking a firmer clay to mix with will go a long way.


Another of my favorite tricks is to flatten out the clay and place it on a clan sheet of white paper overnight. This will draw out some of the oils in the clay and really makes a big difference.


If your clay gets too soft while working with it stick it in the freezer for 15 or 290 minutes and you will see an improvement also.


What if your clay is really firm? I do prefer to work with a firmer clay because I can get much better details in what I make. That being said a clay that is too firm is painful to work with and even I get discouraged. Another to thing I want to say is that I found in my experience that clays that are firmer seem to be more durable after baking, the finished items seem to not be quite as fragile so something to keep in mind.


If a clay is really firm the first thing I usually do is stick the bag containing the clay into my pocket or into my clothing against my body. The body heat will help to make it a bit more pliable. Also try washing your hands with hot water exotically if the room you are working in is cold.


Depending on what you are making adding some translucent clay will soften firmer clays because the translucent clays are by their very nature very soft. If you are going to be mixing the clay with another clay to adjust the color try to pick a softer clay to mix in.


What if you have old crumbly clay that you want to revive? As clay sits it can get very dried out and crumbly like the one I used to demonstrate this portion of the video. That particular clay was a very firm clay to begin with and it has been in my stash for many years. If I had to guess I would say probably at least 10 years.


The first steps would be to try the suggestions in the working with too firm clay section. I have tried all of those things many times on this particular clay and know it is beyond those working.


So when I want to use this clay I start by chopping it very fine and using my clay roller to roll it. You need to use a lot of pressure on the roller especially at first. Just keep chopping and rolling until it starts to come together.


As a final step you can add something like TLS (Translucent Liquid Sculpey) or one of the clay softeners that some of the clay manufactures market.


As yo saw I was able to pretty quickly make that crumbly mess into a very workable clay.


You can almost always rescue old clay if you know how. As long as it has not been stored at too hot of a temperature that is of course.


As always I do want to sincerely thank all of you for watching my videos and reading my blog posts. It means so much to me that you are supporting me in this way. If I could ask you all to do just a bit more by subscribing to the channel and liking the videos and leaving comments. Those help more than you can imagine. Also if you could pass the links on to your friends I would appreciate it so much.


Saturday, June 18, 2022

Dollhouse Miniature Anaheim Peppers


Watch the video here.


Most weeks I at least have an idea of what I am going to make on the Saturday video by Monday at the latest. This week inspiration just wasn’t coming. It wasn’t until I was putting away my groceries on Thursday morning that I came up with this week’s project. I had purchased an Anaheim pepper to go in my dinner for that night and as I was cleaning it I decided it would be the perfect project for this week. So here we are.


The first challenge was to come up with some clay in the correct color. I knew that I wanted at least try to show you how to do the sliced peppers today and for that I needed to have at least part of my clay blend be a firmer brand of clay. If I had used all Sculpey III I would probably not been able to get the slices to work today. I talk a bit more about that when I get to the part about the slices.


For the color I started with Fimo in Tropical Green, it wasn’t the right green but it was the closest I had in Fimo. Then I added some yellow (Sculpey III) and then a bit of white, I still wasn’t getting the color I wanted so I added a bit of Sculpey Camouflage Green. I had planned to mix the clay on camera but my daughter called and she talked for over an hour so I chose to mix it off camera so I could get the video filmed.


Since I had the pepper in front of me it was easy to get not only a good look at all sides of the pepper, a really good look at the color and also I could see how it looked in my hand so I could try it in the doll’s hand to get a better idea of how it should look.


The first part of the pepper we need to make after getting the color correct was to make the stems. To do this just make a really thin snake of the clay. Lay it on your baking surface so that there are lots of curved areas since the stems on these peppers are rarely straight. Bake this snake for 10 minutes at the temperature your clay requires. If you are mixing brands of clay like I did use whatever is lowest temperature listed on the packages.


While this snake is still warm from the oven cut it into small pieces.


Now we are going to make the peppers. For this roll a snake about 1/8” in diameter and cut into segments somewhere between ½” and ¾” long. Don’t measure every one of them just get them in this range, peppers are not all the same size.


Use some TLS (Translucent Liquid Sculpey) on the end of the stems to attach them into wide end of the peppers then shape the peppers so that the stem end is the widest and they gradually go to an almost point at the other end. Use a tool to make some lines on the peppers and curve some of them.


Bake the peppers at the temperature for your clay for 10 minutes and allow to cool.


Now we can make the pepper slices. For this I knew I needed my clay a bit firmer than it was so I flattened out some of what was left and pressed it down onto a piece of white paper and left it there overnight. This allowed some of the oil in the soft clay to leach our and left the clay firmer. This is something I am going to talk more about in tomorrow’s Clay 101 video so be sure to come back and check that video out.


I took some of this clay and added a bit of white clay, about 1 part with to 3 parts of the green. I wanted to be able to see the difference in the two colors but I didn’t want to add so much white that it softened my clay back up.


The thing other than the clay we will need for the pepper slices is some 20 gauge floral wire, mine is the type that is coated with a green paint and if you have that it is better since sometimes the un-coated wire can react with the clay and cause discoloration. You will need 3 short pieces of this wire, mine are probable 3” or 4” long.


Roll our some of the lightest color very thin then lay two of the pieces of wire side by side on the clay, then lay the 3rd piece on top of them. 


Then carefully wrap the clay around the wires trying not to have a huge overlap.


Next roll out the darker green clay (the color we used for the peppers) again very thin, roll this around the outside of the light green clay.


Again try not to overlap the edge very much. Gently roll the bundle in your had to firm it up but try not to squish it too much. Bake this for 10 minutes at the temperature recommended for your clay. 


Immediately after removing from the oven carefully pull the wires out of the clay tube. The first one is always the hardest. It does help to have a small pair of pliers on hand to assist you in this. Just be careful to not damage the clay tube. 


As soon as the wires are removed carefully slice the tube into pepper slices. This also needs to be done with the clay is still very warm from baking. If the clay cools down all the way it is not only harder to cut but it is more apt to crumble.


When I started the video I was hoping this stage would be successful but I wasn’t sure. Some clays work much better for this type of application that others. Because of the amount of the softer Sculpey was not positive I would be able to form the tube over the wires, get the wires removed and slice it. In general you need a firmer clay to do these things which is why first I make sure that at least most of my clay was Fimo and secondly I left it overnight on the sheet of paper to firm it up.


If your clay does cool off and starts to not cut nicely try putting it back in the oven and baking it for about 5 minutes to warm it up again. This usually will work to soften the baked clay enough that you can successfully cut it.


Once you have as many peppers and slices give them a very thin coat of Satin Mod Podge and allow to dry.


The 3 slices in this picture were each from a different batch so you can see they will vary a bit.


And now the dolls in the dollhouse have some fun peppers to cook with.


As always I do want to sincerely thank all of you for watching my videos and reading my blog posts. It means so much to me that you are supporting me in this way. If I could ask you all to do just a bit more by subscribing to the channel and liking the videos and leaving comments. Those help more than you can imagine. Also if you could pass the links on to your friends I would appreciate it so much.