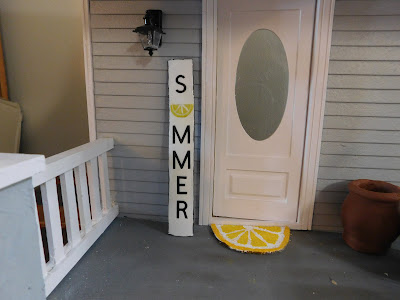
The day I filmed this was one of those days where more went wrong than right but in the end I am okay with the finished porch sign.
So I didn’t film this until the day before it was going to be posted which I try to never do. I try to have all my videos finished, uploaded and scheduled for release at least 2 days ahead. This time I was running late and I even though I knew I would have to rush on Monday to get this done I took a rare day off from working on YouTube (mostly off anyway) on Sunday. The weather guessers were telling us it was going to be the first day of a heat wave and I really just wanted to take it easy.
First thing Monday morning I went to my bin of wood pieces that I have collected for many years to make the sign I had decided on several days before. I knew I had this particular shape of wood in the right size and the sign was going to be a fairly easy and quick project. I searched through that bin multiple times and the piece I needed was no where to be seen. I was so sure I had it. Okay, time for a new plan.
I got online and found another sign design I liked. So I grabbed the materials I needed. And got to work.
I used the first craft-stick I came too, even though it was a bit warped. I figured it would be fine. That was a mistake, it was already showing me it had a tendency to warp. I should have grabbed another one.
I cut my jumbo craft-stick to 6” long (it was ¾” wide) and painted it white. I did paint both sides to help prevent further warping but it was not enough. What I should have done was cut some short pieces (about ½”long) of skinny stick and glued them crosswise on the back of the wood. The grain of those going across the grain of the stick and glued firmly would have helped to keep the sign flatter.
After the white paint dried I added a black edge. I was only planning to paint the sides and not come onto the front. By painting from the back with a flat brush I should have been able to keep the paint where I wanted it. But I was trying to hurry and got paint on the front. Instead of doing what I should have, just leave it and cover the small mistake later with white paint I decided it would be faster to add a narrow border around the front to try to hide it. Big mistake I hated it.
So I ended up repainting the front white and repainting the black edge the way I was going to in the first place. Since I was in a hurry I did something I very rarely do. I used my heat gun to try to speed up the dry time. This was a huge mistake because the already warped board really warped with the heat and the uneven drying of the moisture in the paint.
So my sign has a definite warp to it. I might be able to fix it, I haven’t yet decided if I am going to try. If I do I will take pictures and do a blog post about how I fixed it.
For the lemon slice I decided to use my Bic Mark-It pen (any alcohol marker will work) to make the design. I used one of my circle templates so I could make really round circles. I like how it came out. If you have a lemon slice sticker that would also work really well here.
Now onto the lettering. I decided I didn’t want to paint the letters on the font of the sign so I dug out my Cricut and did a quick cut of the letters for the word summer minus the letter u. I wanted to use a lemon slice in place of the u. I did this off camera but if there is enough interest I could put together some tutorials for using the Cricut to make minis.
0nce the paint was dry I added my word to the front of the sign doing my best to get it centered. I used some Mat Mod Podge to add the half lemon slice to complete the word. I then gave the entire sign a good coat of the Mod Podge and allowed it to dry.
After the Mat Mod Podge dried I added a bit more detail to the lemon slice with white paint and touched up the white on the front of the sign. Since the Mat Mod Podge had sealed the card-stock I used to make the lemon I knew I could wipe away any mistakes I made with the paint. That took a lot of pressure off getting those tiny lines in the right places.
Once dry a final coat of Satin Mod Podge gave the sign a nice finish.
A huge thank you to Plaid for supplying the paint brushes, paints, and Mod Podge used in this project.
As always I do want to sincerely thank all of you for watching my videos and reading my blog posts. It means so much to me that you are supporting me in this way. If I could ask you all to do just a bit more by subscribing to the channel and liking the videos and leaving comments. Those help more than you can imagine. Also if you could pass the links on to your friends I would appreciate it so much.


No comments:
Post a Comment