Check back often

Have you checked out all my blogs?


Dollhouse Minis: http://joannesminis.blogspot.com


18” Dolls: http://joannes18dolls.blogspot.com/


General Crafts: http://joannes-place.blogspot.com/


Cooking: http://joanne-kitchen.blogspot.com/


Also if for some reason I can't post I will try to give a head's up on the Facebook page so check there too.

Wednesday, September 28, 2022

Dollhouse Miniature Blind Bags September 2022


Watch the video here.


I always love when I get my blind bag order I the mail. These are just so much fun to open.


The details of this batch are as follows. They were purchased on eBay and this group was listed as “Dollhouse Miniature Accessories“the price was $2.84 USD for the set of 10. I ordered them on September 2nd and they arrived around September 24th. I say around because they arrived during the week my daughter and grandson were visiting and I didn’t cheek my mail everyday.


I did a comprehensive blog post on how I search for these blind bags which you can find here.


Now onto the fun part, what was in the bags.


1- was this cute zebra, I think he is adorable and really reminds me of a stuffed zebra. I need to do some experimenting on how to turn these into convincing stuffed animals.


2- (as well as 3 and 4) were these ducks. I really am amazed I didn't crack a joke about having my ducks in a row since I opened three of the same duck three times in a row. These could either be a stuffed animal or they could become a landscape statue. I know I have seen ducks of similar style in many front yards tucked in around the plants. Some painted and some plain concrete. I might use one to experiment with an idea I have for making the plastic look like a stuffed animal.


5- the Christmas bells. These really remind me of some the retro Christmas decorations from years ago. They seem to become popular from time to time. Overall I think they are fine as is although I might touch up the paint a bit to neaten it up a bit and maybe improve the colors. These would look lovely either as a decoration on a table or placed into a wreath.


6-the fish. This little guy just makes me smile, he is just adorable. I am thinking he has to turn into a stuffed animal for a kid’s room


7- the elephant, I am thinking this is also destined to become a stuffed animal. I may need to change the color though since he just looks exactly like the elephant that used to be the logo for a car wash that we drove by often st when I was a kid. He is really cute though a the perfect size for a stuffed animal.


8- the unicorn, the last of the items that are probably going to become stuffed animals. This guy like his friends is adorable, I’m pretty sure one of my kids had a stuffed unicorn that looked a lot like this guy.


9- the Christmas tree, this might be my favorite item in the entire set and make the purchase well worth the price. I love this and we will be re-painting it next week to make it look like a ceramic tree to use in our Christmas decor. I am not even willing to wait until I am going to be doing the Christmas projects I want to play with this one immediately.


10-last but definitely not least this sailboat. I have been looking at several sailboat projects to use in the decor of the Beachside Bungalow and this will fit in perfectly. I am going to be re-paining it to go with the color scheme of the dollhouse but it is perfect.


So those were the treasures in this set of blind bags. I am really happy with all the items even though I did get 3 of the same duck.


As always I do want to sincerely thank all of you for watching my videos and reading my blog posts. It means so much to me that you are supporting me in this way. If I could ask you all to do just a bit more by subscribing to the channel and liking the videos and leaving comments. Those help more than you can imagine. Also if you could pass the links on to your friends I would appreciate it so much.


Saturday, September 24, 2022

Dollhouse Miniature Halloween Monster Cake


Watch the video here.


This week we are making another “display” cake, by that I mean a cake meant to be displayed in a mini scene as a whole cake. I think this one would be right at home in many scenes this time of year from the dollhouse to a mini bakery.


So our first step is to make a “cake blank” to work on top of. This is a basic shape that we decorate and can really be any clay you have on hand. Since in the finished cake we won’t be seeing this base use whatever clay you have on hand. I used some Original Sculpey for mine. You need to roll out a slab of clay that is approximately ¼” thick. I used my pair of double craft-sticks for this step. The exact thickness is not as important as being the same thickness all the way across. 


Then cut a rectangle shape that measures ¾” by 1” for our cake. Bake this at the recommended temperature for 15 minutes to make sure it is cured all the way through and allow to cool to room temperature.


Like many time for these projects I looked online to find real size cakes that people had made to get inspiration for my mini version. When I looked up “Halloween monster cakes” I found so many wonderful ones to look at for ideas. Some were just plain cute, some were kind of scary. There was a wide range of green tones used for the skin tone from a very light yellow-green to very dark blue-green. I looked through my clay stash and found a package of Premo in Wasabi that I felt would be perfect for my cake today.


Once you have your green clay roll it out into a very thin even sheet of clay. I used some of the Hobby Lobby “slim sticks” to make sure mine was a nice even sheet. Then coat you cooled clay blank with some liquid clay and cover the top and sides with the green clay. This should look like a fondant coating on a real cake. Take you time and get it as smooth as possible. I do like to leave the sides a bit past the bottom of the cake so I can even out the bottom edge once baked. Once you are happy with your cake covering bake for another 10 minutes. If you left the sides a bit long place the cake upside down on your baking surface.


Once baked and cooled run the cake over some sandpaper to even up the bottom. I find this gives the nicest looking bottom edge on my cakes lately.


Now the fun part we get to add the monster face to the cake and turn it from just a green rectangle into a Halloween monster. For this I am using my White Liquid Sculpey. I mixed the liquid clay with just enough black oil paint to make it a nice black color. Then use a toothpick which you have dulled the pointed end on to draw the facial features. For the whites of the eyes I used the white liquid clay to make the dot and placed a tiny black dot over it.


Once you are happy with the face bake the cake a final time for another 10 minutes and allow to cool.


Now the dolls in the dollhouse have two Halloween cakes to choose from for their party.


As always I do want to sincerely thank all of you for watching my videos and reading my blog posts. It means so much to me that you are supporting me in this way. If I could ask you all to do just a bit more by subscribing to the channel and liking the videos and leaving comments. Those help more than you can imagine. Also if you could pass the links on to your friends I would appreciate it so much.


Wednesday, September 21, 2022

Dollhouse Miniature Round Halloween Sign


Watch the video here.


This week we are making a round Halloween sign, I know I keep seeing these big round signs all over for real size decor so I decided to make this one for the dollhouse for Halloween.


To make this much easier for you to reproduce the sign I am providing a pattern for you to use. You can download a zipped file here that contains a PDF with simple instructions if you want to hand cut your sign and also a PNG that can be used with an electronic cutting machine like a Cricut. There is also a text file to give you the sizing for the PNG in the file.


I am so happy with how this sign turned out and I hope you love it too. I did my best to make it really simple to make so I am sure you can make one easily for your dollhouse.


There well be a lot more projects like this in future too and I would love some feedback as to what you would like to make.


To start we need to cut the pattern piece out of medium weight white card-stock. I almost always use white card-stock for these and paint them the colors I want them to be for many reasons. One I feel the colors stay better (less fading overall when I paint) also you don’t need to go out and purchase a bunch of colors of paper this way a package of white will make a bunch of project. And most of us have craft-paints on hand to use. Also since we are using multiple layers of paper I find the paint helps to hide the fact that the project is made of layers and not a single thicker material. Since it is card-stock it can be easily cut with either scissors or an electronic cutting machine.


No matter how you cut the pieces I do recommend making a mark on the back of each of the bat pieces. Although I did my best to get them symmetrical they are just a bit asymmetrical and it really shows up if you glue them together wrong (sorry about that I am still learning this skill). So a small dot on the back before you mix them up will be very helpful.


Now glue each set of shapes together so you have three layers in each like these. Allow the glue to dry.


Now we are going to paint.


The ring unit and the bat unit both need to be painted black. Really pay attention that you get all the edges of the bat and the inside of that ring covered completely. Any little white specks will show up on the black later and it is much easier to paint now before we assemble the entire sign.


Now for the fun part, the background sky. Of course you can do yours anyway you wish but I was envisioning this orange to yellow blend and it is so easy to do and looks so cool. I did use some double sided tape to hold my background unit to my work tile. Then I put out a drop of orange and a drop of yellow craft-paint next to each other and using a flat ended brush that is about ¾” wide load the paints together on the brush so that about half the width is orange and the other half yellow. Don’t’ try to mix the paint the blend happens when you stroke the paint.


Now with the orange side of the brush on the edge of the background unit paint across the piece. Then brush the other way with the orange against the opposite side of the background. You should end up with a wonderfully blending background that goes from orange to yellow to orange again. I love this technique and need to use it more often.


Allow the paints to dry completely before the next step.


Now we need to glue the sign together, start by gluing the ring unit to the front of the background lining up the edges as much as possible. Now add the bat to the center. It wold be a good idea to test fit the bat before you put on a glue if you cut accurately it should just fit.


Now allow the glue to dry again.


Using the black paint again and a very small brush work from the back of the piece to paint the outside edge all around the sign. At this time touch up any areas on the black paint that need ti. Allow to dry.


To finish our signs I recommend a thin even coat of Mat Mod Podge.


Once dry your sign is ready to display in the dollhouse.


As always I do want to sincerely thank all of you for watching my videos and reading my blog posts. It means so much to me that you are supporting me in this way. If I could ask you all to do just a bit more by subscribing to the channel and liking the videos and leaving comments. Those help more than you can imagine. Also if you could pass the links on to your friends I would appreciate it so much.


Sunday, September 18, 2022

Polymer Clay 101 pt 6 Tips for Rolling Clay


Watch the video here.


This week for the Clay 101 series I thought I would share a few tips for rolling clay out. This is a short video mainly because I am taking some time off to enjoy my daughter and grandson while they visit me for the week.


So one of the challenges in rolling clay out is to get an even thickness across the entire piece of clay. Once way to make this easier to is have some kind of spacer that you can lay on each side of the clay to set a thickness. In the past I had some pieces of strip-wood that were of various sizes from1/16” up to around ¼” thick. So far since I moved I haven’t found them. So in the meantime I have been using a couple of sets of craft-sticks. 


The first thinner set is simply two individual craft-sticks that I can use to stop my clay roller giving me an even thickness.


The second set I simply glued two sets of two craft-sticks together (if you do this use some kind of clamps to make them stick together evenly) so I can quickly roll out thicker slabs of clay.


You can use a lot of things to do this you just need two matching pieces, one for each side of the clay. I know a few clay artists that have glued layers of card-stock together to give them different thicknesses.


In addition to being able to roll out consistent layers of clay you can take this a step further and use it to help you mix your colors of clay. If you are making a project and you need to mix colors of clay and you have the ratios to use simply roll out the different colors to the same thickness and using the same cutting tool cut however many pieces of clay you need to mix. This way you don’t need to eye-ball the quantities of clay when mixing.


As always I do want to sincerely thank all of you for watching my videos and reading my blog posts. It means so much to me that you are supporting me in this way. If I could ask you all to do just a bit more by subscribing to the channel and liking the videos and leaving comments. Those help more than you can imagine. Also if you could pass the links on to your friends I would appreciate it so much.

Saturday, September 17, 2022

Dollhouse Miniature Spiderweb Cake


Watch the video here.


Today we are making a fun display cake for Halloween, I love making these so much since they set the scene for many holidays and special occasions. And they are much quicker and easier since you don’t have to worry about doing the inside of the cake cutting the work down a lot.


Since we won’t see the interior of the cake we can use pretty much any clay to make the base that will decorated. For mine I used some Original Sculpey.


To get the correct size for my cake I used a pair double craft-sticks. 


After rolling the clay out I cut 2 rounds with a ¾” round clay cutter. 


Then simply stack these together and bake for 30 minutes at the temperature recommended for the clay you using. Then allow to cool to room temperature.


Now we get to do the fun part, the decorating. Like a lot of my projects I went online to find a real cake to take inspiration from. For this one I found several that I took parts from. One thing I noticed was that most of the ones I was looking at were covered in fondant as opposed to frosting. I love this look so that was the direction I went.


For the layer of fondant I rolled out thin layer of an orange colored polymer clay. This was one from my stash and I don’t know the color name. Since I wanted a pretty thin even layer of clay I used a pair of slim sticks (from Hobby Lobby) to act as guides on each side of my roller. These were the thinnest items I had that I felt would work for this. Once the clay was rolled out I put some :Liquid Sculpey on the top of my baked clay blank and placed the sheet of clay onto it. I then added some more liquid clay to the sides of the blank and carefully molded the sheet of orange clay to the top and sides of my blank. I cut most of the excess clay off and make sure to get the orange clay just the way I wanted it. I then baked the piece for 10 minutes at the recommended temperature. 


I did place my cake upside down on my baking surface since the l had left some of the excess clay on the bottom as well as the fact there was a bit of Liquid Clay there also.


Once baked and cooled to room temperature I carefully evened out the bottom edge using a piece of sandpaper.


Now time to add the spiderweb. I admit I was a bit worried that the white Liquid Scupley wouldn’t give the rich black I was looking for but I worked just fine. It took about the same amount of black oil paint to give a nice rich black as I would expect to use with the Translucent Liquid Sculpey.


To make the spider web make some circles of the tinted liquid clay on the top of the cake, I like to use a toothpick that I have dulled the tip on for this. Then using the sharper end of the toothpick draw more black lines to make the web. Once you are happy with the effect you have bake the cake a final time at the recommended temperature fro 10 minutes.


And there we have it, a fun Halloween cake for the dolls in the dollhouse to serve at their Halloween party.


As always I do want to sincerely thank all of you for watching my videos and reading my blog posts. It means so much to me that you are supporting me in this way. If I could ask you all to do just a bit more by subscribing to the channel and liking the videos and leaving comments. Those help more than you can imagine. Also if you could pass the links on to your friends I would appreciate it so much.


Wednesday, September 14, 2022

Dollhouse Miniature Tabletop Pumpkin Decoration


Watch the video here.


Today I have another project for you that I created a pattern you can download to make it easier to make. The pattern can be found here. There are both a PDF and a PNG file. The PDF was created for those of you that are going to be hand cutting the pieces, it also has a brief description of how to assemble the project. The PNG is there for those of you that want to use your electronic cutting machines to cut the pieces. Along with the PNG you will also find a text file that gives you sizing instructions. You are welcome to create the project to sell if you desire however please do not distribute the pattern,. If you want someone else to be able to use the pattern direct them to this blog post and the video so they can download it themselves. Thank you.


The project is designed to be cut from white medium weight card-stock. You can easily find this in almost any store that sells craft supplies. I prefer to use white and paint it to the color I want for a couple of reasons. First less paper to buy I only need white on had for these projects. And most important I find that for the most part the paint is more light fast than colored paper so the project doesn’t fade as much or as quickly.


In addition to the paper pieces you will also need something to use as a base. I used a piece of a regular craft-stick that was cut 1” long.


Glue the three sets of paper pieces together so you have a set of face pieces, an oval set, and a pumpkin with a stem set. I prefer a thick tacky glue for this. Allow the glue to dry completely.


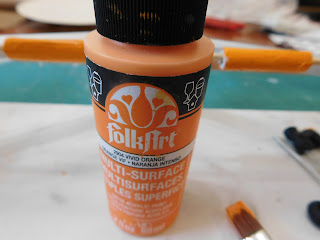
Now paint all the pieces with an orange paint you can skip the stem on the pumpkin set. I used FolkArt Multi-Surface paint in Vivid Orange. Once dry paint the reverse side of the pumpkin piece. You might need 2 or more coats of paint. Also be sure to get the edges of the interior cuts on the face set.


Once the orange has dried paint the stem of the pumpkin set with a green, I used FolkArt Multi-Surface paint in Bright Green. You will need to paint both sides of the stem.


Once dry paint the center of one side of the pumpkin with a yellow paint. This will be behind the face cutouts. I wanted a bright yellow to help it show up better and the bright yellow paint I had (Apple Barrel Bright Yellow) was a bit on the translucent side so it took several coats to cover.


Once the paint is all dry assemble your pumpkin by gluing the face set to one side (over the yellow paint) and the oval on the other side and allow to dry.


This is also a good time to do any painting of your base that you wish to do. I used a very thick Burnt Umber paint to coat the wood piece then I wiped off most the paint leaving a finish that looks like a wood stain.


Once the glue dries do a touch up of the orange paint being sure to get all the areas of yellow and any edges you might have missed. Allow to dry.


When all the paint is dry it is time to glue the pumpkin to the center of the base. You might need to use a bit of sandpaper to even up the bottom of your pumpkin so that it will stand up on its own. Then use some tacky glue to glue it to the base. Allow to dry.


Now all we need to do is apply an even coat of Satin Mod Podge and allow to dry.


There you have a two sided tabletop pumpkin to display in the dollhouse.


As always a huge thank you to Plaid for supplying most of thee paint, brushes and Mod Podge used in today’s project


As always I do want to sincerely thank all of you for watching my videos and reading my blog posts. It means so much to me that you are supporting me in this way. If I could ask you all to do just a bit more by subscribing to the channel and liking the videos and leaving comments. Those help more than you can imagine. Also if you could pass the links on to your friends I would appreciate it so much.


Sunday, September 11, 2022

Dollhouse Miniature Witch’s Legs Decoration


Watch the video here.


I just had to create a pair of these witch’s legs for the dollhouse this year. Every time I see them in real life I chuckle so I decided the doll family has to get in on the fun.


If you have the area around your dollhouse landscaped you could skip the pot of beads and just poke the legs into the lawn or a flower bed but since I haven’t even thought about doing the landscaping yet I put mine into a big pot.


So to start we first need to create the witch's shoes and legs. I did these very much like the crashed witch project from last year. I used some black polymer clay which I rolled into a rather fat snake. (about ¼” in diameter, maybe a bit bigger) then I cut 4 slices that were about ¼” long and two snakes that were somewhere in the neighborhood of 1 ¼” to 1 ½” long. I didn’t measure I rolled and cut pieces that looked right. Make the snake of clay to come a point on one end.


Then I cut some wire to be about 3” long. The wire I used is kind of heavy but very bendable, I think I got it at Dollar Tree in the floral area.


I dipped the end of the wire into some TLS (Translucent Liquid Sculpey then put it through one of the slices.


Then I dipped it again and put the snake of clay on the wire.


Then dip one more time and add the second slice.


Now position the clay pieces at the very end of the wire and shape the snake so it looks like a shoe with the bottom slice acting as the heel of the shoe. Form the snake to an arch so it touches the surface in front of the heel.


Now cure the pointed end to look like the curled tip of a witch's shoe.


Bake the legs at the temperature recommended for the brand clay you are using for 15 minutes. Allow to cool.


While the clay was baking I painted my container black. I used one of the wooden candle cups you can usually get at the craft-store with the wooden shapes. I used black for mine. You can use pretty much any container for your witch.


Once this paint dries add a chunk of some kind of foam to your container. I used some floral foam since that was handy. Use some flue to make sure it stays in place.


Now we are going to cover the leg wires and give our witch legs. To do this I cut 2 strips of white card-stock 1 ½” by 5 ½”. I used my scissors to start the curl then wrapped it around a skewer. Now I coated the back of the strip with thick tacky glue and rolled it up over the skewer. Take it off to dry.


Now paint the legs as desired. I started by painting mine solid orange.


Then added some black stripes.


Allow to dry.


By now hopefully the glue from adding your foam to the pot is dry so you can trim the foam a bit below the top of the container and paint the top with the same black paint. And allow to dry.


Once the paint dries add a generous amount of tacky glue to the top of the foam. Slip the wires attached to the shoes into the card-stock legs and then slip them into position in your pot. Make sure the card-stock comes in contact with the glue.


Now add whatever filler you want. Since one of the ones I saw online was filled with sliced up pool noodles I decided to use pony beads to fill the top of mine. I felt they gave the same look and feel in mini form and I have a bunch of them leftover from making masks a few years ago. I picked out just some of the green, yellow and white ones. Add a layer of the beads over the tacky glue. Now be aware the tacky glue won’t do a great job of holding the plastic beads that is why we have a couple more steps coming.


Once the tacky glue dries completely, this took forever on mine. Add another layer of beads using some e6000 or a similar glue that will hold the beads better. Be sure to get some of the glue holding beads to the legs too. Allow to dry, making sure you give the glue ample time to cure.


Now coat everything in a coat of Satin Mod Podge. This will not only give it a finished look it will also aid a bit in holding everything together.


As always I do want to sincerely thank all of you for watching my videos and reading my blog posts. It means so much to me that you are supporting me in this way. If I could ask you all to do just a bit more by subscribing to the channel and liking the videos and leaving comments. Those help more than you can imagine. Also if you could pass the links on to your friends I would appreciate it so much.