Check back often

Have you checked out all my blogs?


Dollhouse Minis: http://joannesminis.blogspot.com


18” Dolls: http://joannes18dolls.blogspot.com/


General Crafts: http://joannes-place.blogspot.com/


Cooking: http://joanne-kitchen.blogspot.com/


Also if for some reason I can't post I will try to give a head's up on the Facebook page so check there too.

Tuesday, June 29, 2021

Dollhouse Miniature Vinyl Flooring


Watch the video here.


This week I decided to create some faux vinyl flooring to use later in the bathroom of our project house. I have made and used this type of floor previously in different projects but I don't think I have shown you how I make it. I first came up with this back when I was working on my big dollhouse (the Harrison) that I used to have. I knew I wanted a floor in the kitchen of that house that looked like the sheet vinyl that is in so many homes. Back then I was still homeschooling my son and I had a good sized chunk of bright blue poster board from the dollar store left over from one of his projects. I thought I would play around with it, never imagining I would be able to use it with that bright blue base. Long story short I did end up loving it and used it in that house. You couldn't even tell the bright blue was under the other paint since I went a lot heavier with that one.


This time I wanted the same type of flooring but I was after a much lighter and brighter look.


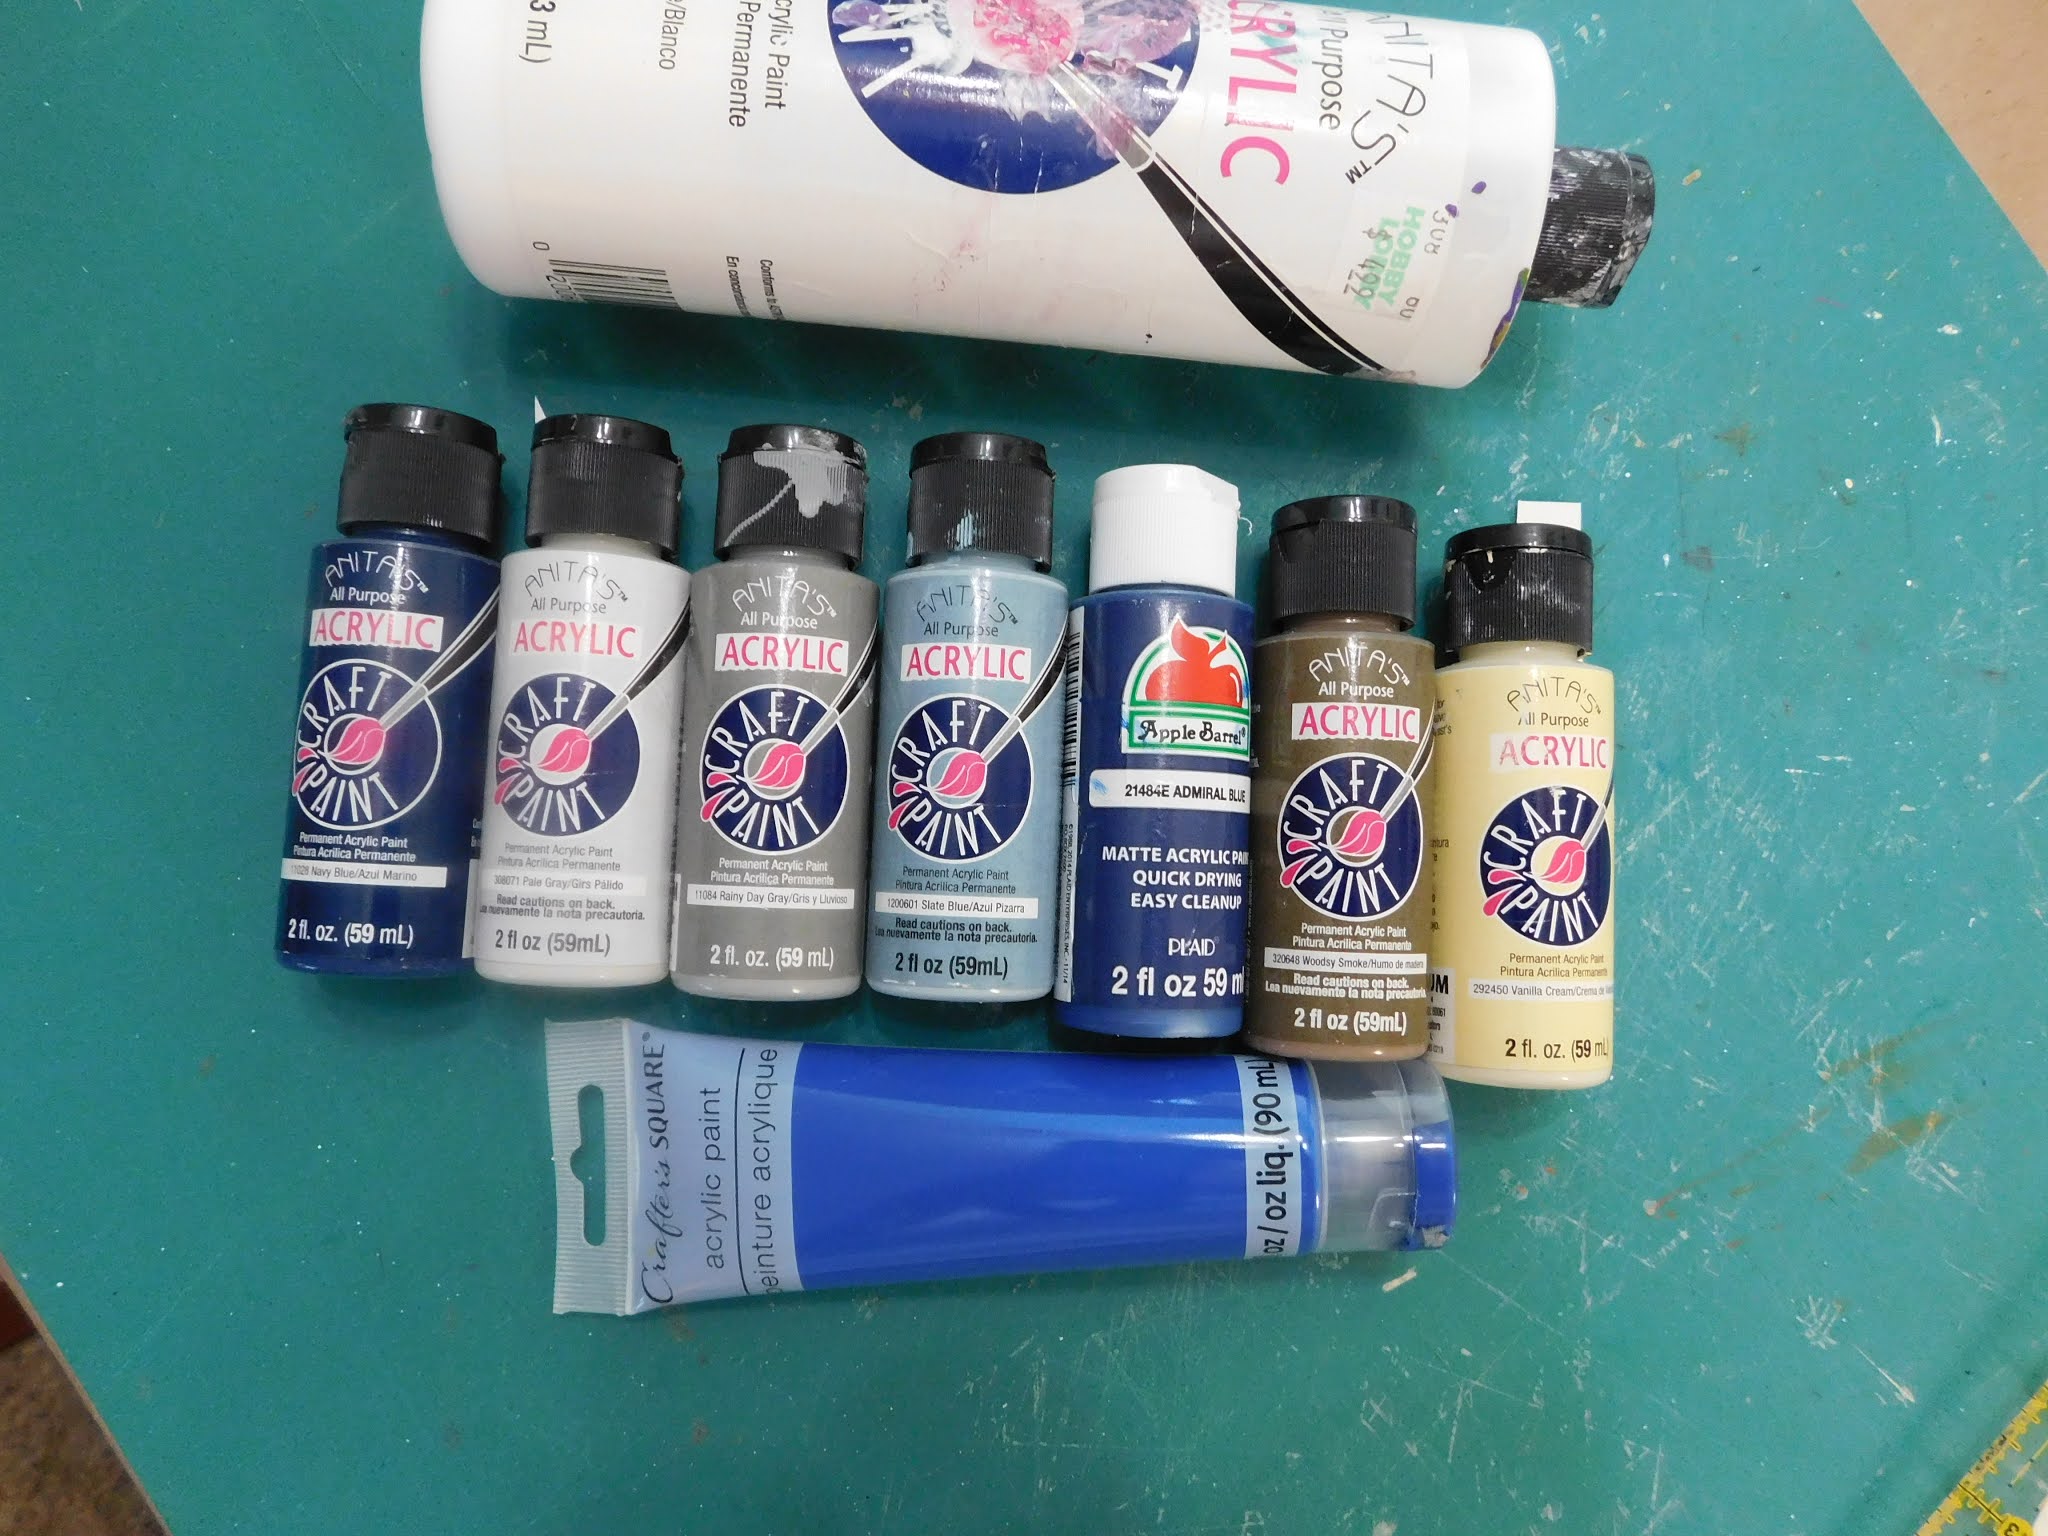
I love that this project is done using craft paint, a simple applicator (or several) and some plain poster board. All of these are things I almost always have on hand and if I don't have them they are easy and cheap to find.


My first step for this process is to really look at whatever I am using for inspiration in the room. In both this case and in the floor for the Harrison that inspiration was the wallpaper I would be using. For other rooms I have used fabric that will be in the room or even a piece of wall art from the room. Now really look at your inspiration piece and see what colors are in there. You might be surprised at what you find when you really look.


You might end up with a lot of colors and this might be fine or you might want to pick and choose among the colors. I am very happy with the colors I ended up using. I did have a couple of teal colors pulled in the beginning but as much as I really wanted to include them they just didn't work with the look I was going for.


Now look around and see what you have to use as an applicator for your paint. I pulled several items that I felt might work.


Now the fun begins. Take an extra sheet of your poster board, or just part of a sheet. And just play with your paints and whatever tools you have picked.


I played around with a cotton ball, a makeup sponge, a piece of kitchen sponge and a pompom (I know I called it a cotton ball- I filmed this on a week where I wasn't sleeping well and my brain was not up to task)


If I would have had a natural sponge on hand I think that would have been another good choice.


For a palette I just grabbed a lid from a container of dishwasher pods. I love to save the containers and lids things like this come in because I can re-use them for crafting in so many ways.


For paint colors the ones I ended up using were- white (Anita's), Vanilla Cream (Anita's), Rainy Day Gray (Anita's), Pale Gray (Anita's), Woodsy Smoke (Anita's), Slate Blue (Anita's), Navy Blue (Anita's), Admiral Blue (Apple Barrel) and a blue from Dollar Tree.


You want to work in layers of colors to avoid them from all combining and turning into a muddy mess. I wanted some blending but not a lot. I chose to use the plain cotton ball for my first layer and all the colors. Then I followed up with just a few colors and the kitchen sponge.


You might want to use a lot more layers or just a few. That is part of the fun of this project. You can make it the way you want it.


I followed up with a coat of Mod Podge in satin. This not only seals the flooring but it gives it that slight sheen that a real floor would have.


Another step that would be fun on this would be once the Mod Podge is dry take a paint pen and draw “grout” lines every 1” or so both ways. I thought about it but I ended up accidentally getting the bathroom wall in crooked so I don't want to emphasize that fact so I am leaving the lines off.


As always I do want to sincerely thank all of you for watching my videos and reading my blog posts. It means so much to me that you are supporting me in this way. If I could ask you all to do just a bit more by subscribing to the channel and liking the videos and leaving comments. Those help more than you can imagine. Also if you could pass the links on to your friends I would appreciate it so much.


Sunday, June 20, 2021

Building the Beachside Bungalow part 17


Watch the video here.


This week we are installing the front porch light. This is the only light that needs to be done before we wallpaper. The rest we will do as we decorate the individual areas/rooms (and as I find fixtures I like)


The first step in the installation is to drill a hole in the front wall where the light will be placed. This is because although the light is on the outside it has to be wired inside the house. I measured where I wanted the light to be placed and marked the spot with a sharpie pen.


 Then I drilled the hole through to the inside. Make sure you are not drilling where you will hit the tape-wire. Once the hole was drilled, I cut the oversized plug off the end of the wire and fed the wire in the hole to the inside of the house.


Now it was time to glue the fixture to the front wall of the house. I know there is sticky stuff on the back of the fixture but I never trust that it will hold long term. I used a dab of the same wood glue I have used for the most of the construction of the dollhouse. Once the glue is in place and the fixture placed measure it very carefully to make sure that the placement is correct. You want to double check you have the fixture straight on the wall. Now let the glue dry. I left mine to dry for almost 24 hours so I knew it was not going to be dislodged when I was moving the wires around on the inside of the house getting them wired into the system.


Now before I moved to the next step I did a quick check of the wiring to make sure everything was in order. By this I mean I plugged in the transformer and used my test probe to just make sure the tape-wire was still working. I tested both before the point I was going to be wiring to and a point past this point.


Next very important I unplugged the lead-in wire from the dollhouse. I like to fasten it where I can see it while I am working. That way I am absolutely sure it is unplugged. NEVER work on the wiring with the house plugged into the electricity. You could short out the system and probably hurt yourself.


Now we need to split the wire coming from the fixture so we can wire the two parts of the wire to the two separate runs of the tape-wire system. Make sure the wires from the two bundles stay apart once you have taken the protective sleeve off them. Just like the two strips of the tape-wire need to stay separate so do these bundles of wire. I like to wire them a bit apart when possible.


Pick the spot to put the first eyelet and drill hole to fit it. (you could use a brad in place of the eyelet I just have better luck with the eyelets and use them wherever possible) Put the eyelet part way in the hole and wrap the bare wire from one side of the wire coming from the fixture around the eyelet. Then push the eyelet all the way into the wall. Now use small piece of paper first aid tape (click here to see an example of what I mean) cover the eyelet and all the bare wire attached to it. Now repeat this process with the other half the wire and the other strip of the tape-wire.


Once the fixture is wired into the tape-wire system it is time to check once again that everything is working as it should. This means plugging that lead-in wire into the house again. And once again use the test probe to test the tape wire both before the point we were working and a point after the point we were working. Then once you are sure the tape-wire is still working check the light fixture to see if it is working.


Now unplug the system again and make sure you have the eyelets/grommets or brads as flush with the surface as possible. Trim the bare wires if they are sticking out too far and then cover them with a piece of paper first aid tape. Be sure to use a separate piece of the tape over each set of wires. Also I like to cover the wire that runs along the wall with some of the tape. This will help to protect it from getting pulled loose and disguise it a bit when we paper over it later.


Once you are happy with the fixture I recommend covering the eyelets/brads at each splice of your tape-wire with small pieces of the paper tape. I then follow up by painting on a coat of the same white primer I have been using on the rest of the project. This will help the tape wire to blend a bit more under the wallpaper.


Next week we will move onto the first step in the wallpapering process- covering the ceilings with paper.


As always I do want to sincerely thank all of you for watching my videos and reading my blog posts. It means so much to me that you are supporting me in this way. If I could ask you all to do just a bit more by subscribing to the channel and liking the videos and leaving comments. Those help more than you can imagine. Also if you could pass the links on to your friends I would appreciate it so much.


Tuesday, June 15, 2021

Let's Assemble a Dollhouse Door


Watch the video here.


I have a really short video for you today. I thought I would set up the camera when I put the front door for the dollhouse together. The door was provided as part of the house kit. It is a rather simple door, not necessarily the one I would have chosen for the house but it will be just fine. The door has a oval window in the door. 


I admit I did manage to loose one of the hinge pins. I had a couple of ideas for what I could use in its place but I decided to contact the manufacturer of the dollhouse kit. They did give me a couple of ideas the first and the one I did was to use the sharp area of a thumbnail or pushpin. The other option they gave was a short piece of wire cut from a paperclip. I am pretty you could also use a small piece cut from a sewing pin.


I did need to do a bit of sanding to make the door fit the door frame. I had figured this would be happen. I wanted to give the edges of the door some of the trim color and even I did sand off the majority of it a few spots but there is still enough to the paint to give the illusion that it is still painted.

I do want to assure you that it is not nearly as difficult to put that hing pin in as it looked on the video. You just need to get it up to where you can actually see the holes to line it up.


I will still need to put the glazing into the door and I will need to add a doorknob in the future also.


As always I do want to sincerely thank all of you for watching my videos and reading my blog posts. It means so much to me that you are supporting me in this way. If I could ask you all to do just a bit more by subscribing to the channel and liking the videos and leaving comments. Those help more than you can imagine. Also if you could pass the links on to your friends I would appreciate it so much.


Sunday, June 13, 2021

Building the Beachside Bungalow part 16


Watch the video here.


This week we are putting the tape-wire system into the Beachside Bungalow. Last Tuesday I did post a short video where I did some prep work to get ready for this step. If you haven't read that blog post or watched the video I suggest you go do that before you get into this one. I spent some time talking about some of the major parts of the system and also on how to pick the correct size transformer to power your dollhouse. I won't be repeating that information in this post.


Before we start I want to say that even though this is not a difficult part of the process of building the dollhouse it is (for me anyway) one of the most intimidating. I always have to force myself into starting. I am really not sure why but that is the case. I have never really had any issues in any of the houses I have wired and it is actually a fun step. I mean it is really cool to connect those parts and put the test probe onto the tape-wire and get it to light up. I still get excited when that happens.


Once you have all your supplies in hand you need to make a decision- where do you want to start the tape-wire run? It needs to be an area that will be easy to access when the house is in it's place on display. Not only do you need to be able to reach the on/off switch on the power cord it is nice to able to see and easily reach the junction splice to be able to make sure the lead-in wire is plugged in correctly. For me that is the back corner of the house, because of where I am going to display the house I am putting my junction splice on the outside of the house not inside. If I put it inside I would have to turn the entire house to be able to access it once it is on display. This does mean I will need to be careful to not damage the tape-wire that wraps about the back edge of the house though.


Once you have the tape-wire stuck to the house and get the junction splice in place go ahead and plug the lead-in wire into it and do your first test of the system. To do this press the prongs of the tester into the two strips of the tape wire. It should light up, if it does you are in business. If not make sure you have the on/off switch to on, then try again. Now before you do anything else unplug that lead-in wire. Always unplug it before you work on the system in any way. 


The spots where you join two pieces of tape-wire together is called a splice. This is the spot that has the most potential for problems. Number one rule here is to be very careful to always connect the tape-wire correctly. You don't ever want to connect the two strips to each other. So always use this pattern to connect them.


Also make as few splices as possible in this house I used a total of 6 splices. And I know those are the first places I will need to check if there are problems in the future. The ones I know that some people do a folded corner in place of a splice to go around corners like around the door. I have tried that in the past and almost every time I do them I end up having problems later on. So for those areas I used splices. The only other splices were to join the top floor to the bottom floor and to join on a line to wire the ceiling light that will go into the kitchen area. That is the only ceiling light I am going to be putting in the house this time. My preference is to wire the ceiling light onto the floor above the ceiling it lives on. In this case it will be wired under the floor treatment for the bathroom. This works out because the bathroom is going to be the only room that doesn't have a wood floor. I have something else in mind for there.


So you see the wiring is really easy and it is so nice to be able to have that moment when the test probe lights up to show you did it correctly.


Next week we will be putting the front porch light onto the outside of the house.


As always I do want to sincerely thank all of you for watching my videos and reading my blog posts. It means so much to me that you are supporting me in this way. If I could ask you all to do just a bit more by subscribing to the channel and liking the videos and leaving comments. Those help more than you can imagine. Also if you could pass the links on to your friends I would appreciate it so much.


Tuesday, June 8, 2021

Prepping for Wiring


Watch the video here.


This week for my Tuesday video I thought I would have you join me as I did some of the prep work to tape-wire the Beachside Bungalow. I also took the opportunity to explain a bit about the parts of the system we are testing.


So we start with the Transformer. This is what allows the electricity that is powering our real house to work to power the lights in the dollhouse. Transformers come in different sizes and you do need to pick the one that is the correct size for the dollhouse you are wiring. If the transformer is too big it will give too much power to the system and among other problems your lights will burn out much faster. If it is too small you will not get much light and it will put too much of a load on the transformer.


The first step to picking a transformer is to do a count of how many and what kind of light fixtures you will be using in the dollhouse. You need to count how many bulbs will be used not how many fixture you will be using. So if a fixture has 1 build it counts as 1 but if you have a fixture for say over a dining room table and it has 5 light bulbs that will count as 5 not 1. I hope that makes sense. The thing that really counts here is the milliamps that the lights are drawing and a quick and easy way to figure this is simply to count the bulbs. Much less math to do that way.


The packaging for the transformer will tell you how many bulbs it can handle. If you are ordering online that information should be in the description of the transformer. As a general rule a 5W transformer can handle up to about 7 bulbs, a 10W up to 15 bulbs, a 20W up to 31 bulbs, and a 40W up to 62 bulbs. You have some leeway on this I am aiming for between 10 and 16 bulbs in my current build. This will give the correct amount of drain on the transformer and not over power the lights.


Some of those lights will not be installed for a while as I decorate and find them. In the meantime I will need to be careful to not leave the small number of lights turned on for very long at a time.


The next part in the system is the lead-in wire. This is what connects the transformer to the dollhouse. One end fits onto the screws on the transformer and the other end plugs into the junction splice. Most of the time these wires have an on/off switch on them. This makes life much easier and is well worth making sure yours does.


The junction splice is the funny little flat object with the nasty looking spikes coming out of it. This is what the other end of the lead-in wire plugs into. Those spikes are put into the tape wire to allow the electricity to flow through the dollhouse.


I like to test the system when I set it up. By that I mean when I sit down to put the lead-in wire onto the transformer I like to set up a test area on a small piece of foam core with a short piece of tape-wire. Then after I put the cord onto the transformer I plug the junction splice into this piece of tape-wire and plug the lead-in wire into it. I then plug the transformer in and use my test probe to make sure I have light. It is much easier to do this now than to wait until you have the wire in place in your house and it doesn't work.


Since these were all new just out of the package parts (except the tape-wire) I was pretty confident everything was in working order but I still always check it.


I hope this information was helpful to you. Be sure and join us on Sunday as I actually start wiring the house.


As always I do want to sincerely thank all of you for watching my videos and reading my blog posts. It means so much to me that you are supporting me in this way. If I could ask you all to do just a bit more by subscribing to the channel and liking the videos and leaving comments. Those help more than you can imagine. Also if you could pass the links on to your friends I would appreciate it so much.


Sunday, June 6, 2021

Choosing Colors and Finishes for Your Dollhouse


Watch the video here.


I had planned to have the first of the videos on wiring the dollhouse but to be totally honest I haven't started the wiring. My allergies have been horrid this week and I have had a borderline migraine again most of the week. The last few days have been better so I am hoping that means relief is almost here. (fingers crossed)


I decided this would be a good time to talk about a subject I get asked about a lot- how to pick colors/finishes for either the outside or the inside of your dollhouse. (or both)


There are several factors that can help you determine the colors and the finishes to choose. I talk about the ones I find most important and that help me to make my choices. I also tried to further explain this by relating how these points helped me to choose the colors for the Beachside Bungalow. I really hope you find this information helpful. I am going to try to expand on some of the points here in the blog. I also have photos of the wallpapers that I will put towards the end of this post.


So the first question we need to ask ourselves is what is the intended purpose of the dollhouse. By this I mean is it a display house for an adult collector or is it intended to be a playable dollhouse for a child. This difference will make a big difference in how you finish the house.


For a playable house think durability first. This means leave off any of the delicate parts and stick with easily cleanable finishes. I would probably just use a good quality of satin finish interior paint like I used on the exterior of this build for both the inside and the outside of a child's playable house. I would also paint the roof and not put the shingles on. Keep any of those pieces that you don't add now and if and when the child wants the house to grow up you can make a project to do together. As for colors have fun and use the child's favorite colors.


Since the majority of my audience is here to make adult collector pieces that is what the majority of this post and the video will cover.


The first things to consider is what I call the “place and time” of the build. In other words when and where is the house supposed to be located. If it is a historical home do the research as to how houses were finished in real life. The geographical location the house is representing will play a part in what is correct or not also.


Next ask yourself what is the architectural style of the house. The colors you would put on a Craftsman Bungalow and Victorian painted lady are very different. Both are wonderful but they need to be thought about.


Now where in your real house are you placing this dollhouse. You want it to fit in so think about the colors of the room where it will live.


Now that you have narrowed the choices down pick the color that your heart tells you is the right one/ones.


As for the interior I do prefer to cover the walls in some way in all builds except for playable houses for children. That is because it will just look more realistic if the wood is covered in some way.


You can use papers, stucco, bricks or whatever your feel looks right in your build.


As for painted walls like we have in our homes today I like to use this paper from Canson, it is an art paper and sold in large sheets. I usually pay somewhere around $3 per sheet for it. I got 3 sheets for this build and when we get done with the interior I will let you know how much we use. I love this paper because not only does it give the perfect texture to the walls in comes in beautiful solid colors that look wonderful in house. That being said I picked white this time, it just seemed like the best choice.


As for the wallpaper I picked up I found this set on the Hobby Lobby website and ordered it a couple of months ago. I love that the papers are picked to go together and they are themed to be a seaside/beach theme which was perfect for this house. I especially love the one with the sail boats.


As for your color scheme you need to keep it simple since you can see all the rooms at one time on most dollhouses. I like to keep to around 3 colors and use them in combinations in the rooms. If every room is a different color pallet it is very hard on the eyes and makes it hard to really see the wonderful treasures you have so lovingly placed.


One thing I didn't remember to talk about on the video is the importance of the having a story for your dollhouse. Know where it is located, when it is located and who lives there will help you to make a lot of the decisions about color and finish.


As always I do want to sincerely thank all of you for watching my videos and reading my blog posts. It means so much to me that you are supporting me in this way. If I could ask you all to do just a bit more by subscribing to the channel and liking the videos and leaving comments. Those help more than you can imagine. Also if you could pass the links on to your friends I would appreciate it so much.


Tuesday, June 1, 2021

Mini Haul


Watch the video here.


This month I have a short haul of the stuff I needed to purchase to start putting the electric tape-wire system in the Beachside Bungalow. In case you missed the video a couple of weeks ago I thought I had everything I needed to get started then when I did a last minute test of what I had it didn't work.


Since it wasn't working I had no idea what part was at fault so I decided to just order a new set of everything (except tape-wire) and start with fresh pieces.


I don't have a mini store close by started by placing an order with Hobby Builder's Supply (miniatures.com) I was able to get most of what I needed. They were out of stock on the lead in wire the day I placed my order.


That was okay though because I had several things in my online shopping cart over at the Hobby Lobby site and they had the lead in wire in stock.


So I placed both orders and then it was just a matter of waiting for the mailman to bring my goodies to me. The HBS order arrived first so that is where I started the haul.


From them I got-


The junction splice (you can find it here) this is what allows us to connect the electricity to the tape-wire.


A new transformer, (you can find this one here) I decided to go with the one that can handle up to 16 bulbs. I am not sure how many lights I will be using but my guess is somewhere between 12 and 15 so this should be the perfect size. I will do a video later where I go into to detail on all these components and how to choose the correct ones. The transformer is what plugs into the electrical outlet in your real home and powers the dollhouse with the correct amount of power.


Test probe (you find this here) another must have when wiring or troubleshooting a wiring system. They are not very expensive and since I really am not sure which item I had that was not working I decided it was worth ordering a new one.


Porch light (you can find this one here) I wanted just a simple porch light for this house. The front porch light is almost always the first light I install in the system since it needs to be wired under the wallpaper from the inside of the house. I had another one I wanted to find but everywhere I looked for it was sold out. The one I wanted was just a bit bigger and painted white instead of the black. What do you think? Should I keep this one black or paint it white? I still haven't decided.


And lastly from HBS was a tub of wallpaper gel.(you can find it here) Since I don't have any type of paste/glue for the wallpaper on hand I decided to give this one a try. We will find out together on a future video what I think and how it works.


The last item in the haul was a lead-in wire for the transformer. This is what connects the transformer to the dollhouse. One end screws onto the transformer and the other end plugs into the junction splice. Again we will go into much more detail in a later video. I ordered this one from Hobby Lobby since I already had an order to place and HBS was out of stock when I placed the rest of my order.


As always I do want to sincerely thank all of you for watching my videos and reading my blog posts. It means so much to me that you are supporting me in this way. If I could ask you all to do just a bit more by subscribing to the channel and liking the videos and leaving comments. Those help more than you can imagine. Also if you could pass the links on to your friends I would appreciate it so much.