Check back often

Have you checked out all my blogs?


Dollhouse Minis: http://joannesminis.blogspot.com


18” Dolls: http://joannes18dolls.blogspot.com/


General Crafts: http://joannes-place.blogspot.com/


Cooking: http://joanne-kitchen.blogspot.com/


Also if for some reason I can't post I will try to give a head's up on the Facebook page so check there too.

Wednesday, February 28, 2024

Dollhouse Miniature Footstool


Watch the video here.


This is really a trash to treasure project since everything I used were found objects. I started with the base of the footstool, a 1” piece cut from the tube from inside a roll of aluminum foil. The tubes for aluminum foil are skinnier and made from thicker cardboard than other rolls in my experience. To cut this I used my miter box (the regular size one from the hardware store) so I could cut the tube easily without smashing it.


For the top I traced the end of the tube onto a piece of cardboard that was the backing for a tablet of paper I had used up.


I then glued a piece of a cotton ball onto the top of the cardboard circle to give just a bit of padding.


Once the cotton ball is glued on it is time to cover the parts of the footstool. I used some plain white 100% cotton fabric. You can use any fabric that is lightweight, I do recommend using 100% cotton but any color or even small prints would be fun for this project. I didn’t have the energy or time to dig through my fabric stash so I used white with the intention of painting my footstool later in the project.


For the top cut a piece of fabric that is big enough to fold under the edges. I like to trim as I glue so I have enough fabric to work with. Try to make the fabric tight enough there are no wrinkles and the edges are as smooth as possible.


To cover the base I used a piece of the same fabric cut to about 3” by 4 ½”

Fold over one edge (on the shorter side) to form a hem and glue in place onto the tube being sure one long edge is lined up with the bottom of the tube. Once this is in place cover the outside of the tube with glue and wrap the fabric around the tube. There should be some overlap where the piece meets the spot you started. Glue this in place. Allow the glue to set up enough that the fabric won’t move around.


 Now carefully fold the fabric down so that there is a fold at the top edge and there are two layers of fabric. Add a small bead of glue to hold the hem/seam in place and allow the glue to dry a bit.


To finish off the covering of the footstool spread some glue on the inside of the tube and neatly tuck the excess fabric up into the tube. This will give the footstool a nice finished appearance on the bottom and inside.


Then run a bead of glue around the top of the tube and add the top cushion to the footstool. Make sure it is centered and looks the way you want it to look then let this dry.


The next step is to add some cording to the spot where the top cushion meets the side of the footstool. I used some kitchen twine on mine but you also use yarn. The yarn would be the best solution if you are using a colored fabric or a patterned fabric and aren’t going to be painting the footstool. If you are not painting your footstool you are done as soon as the glue dries.


If you are going to paint your footstool do that at this point. I wanted a light beige color which of course I didn’t have so I mixed up a color that I liked. I did need to give mine 2 coats to get a good coverage.


Once dry you are done and ready to display the footstool in your mini scene.


As always I do want to sincerely thank all of you for watching my videos and reading my blog posts. It means so much to me that you are supporting me in this way. If I could ask you all to do just a bit more by subscribing to the channel and liking the videos and leaving comments. Those help more than you can imagine. Also if you could pass the links on to your friends I would appreciate it so much.


Sunday, February 25, 2024

Dollhouse Miniature Saint Patrick’s Day Gnomess


Watch the video here.


I have another free pattern for you to download so you make the project. You can find the file here. In the download there are 3 files: a PDF for hand-cutting of the pieces, a PNG to use with your electronic cutting machine and a text file with handy hints and tips (and the sizing information) to use the PNG.


As with most of these projects I cut all the pieces from medium weight white card-stock, the kind used to make cards and such. This is way more economical than having to purchase a bunch of colors and in my experience the paint colors are a lot more stable than the paper colors. I rarely get noticeable fading with the painted projects.


You are free to use the pattern as many times as you wish and even to sell the finished project. But, please don’t give away or sell my patterns. I spend a lot of time creating them and the only compensation I get is from people watching the videos and checking out the blog post. I really want to keep offering these for free so please if someone else wants to make one send them to the video and blog so they can get their own copy of the pattern.


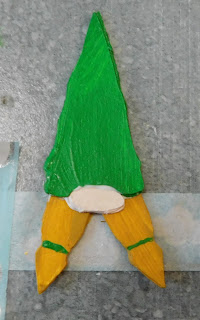
Use a nice thick glue to glue the individual pieces together to form the units that we will be using to build the gnomess. Here is a picture of them all glued. These will need to dry completely before I move onto the painting step since I place mine in a piece of sticky tape to hold them still while they are being painted and drying.


Once dry tape a strip of masking tape sticky side up to your work surface and put the units we just glued together on it in groups by the color they will be painted. I also used a piece of wash tape taped sticky side up to hold the pieces to the rainbow.


The braids got painted with a golden yellow.


The shoes with black.


 The nose and hands with a flesh type color.


And the backing/body and the hat with a green.


Then the rainbow pieces got painted with the colors of the rainbow.


Allow the paints to dry.


Once the paints dried I added a line to each braid to represent the ribbons holding the hair in place. For this I used the same green that I used for the other green areas.


Now it was time to glue the rainbow together. I did make an error in gluing mine by lining the biggest arch up with the edge of the backing. I really should have let it hang off a bit to give a bit more surface for the last arch to have a bit more room. I was still able to get it glued on but it would have been better to have more surface area for it.


Next we are going to add the braids to the hat along with the nose. I like to use another piece of Washi tape to hold the braids in place while I am gluing the hat in place. Be sure to add the nose now too. Allow this glue to set up enough that the pieces won’t shift when being added to the rest of the gnomess.


Normally I like to glue these projects in more stages. For me that works better because then I know none of the pieces are going to shift on me. However, this week I am running way behind schedule and I needed to get the video done as quickly as possible. So I added all the pieces at this point. You will need to let the glue dry enough that there is no visible cloudy glue remaining when you add the clear finish in the next step.


Once all the glue has dried to the point you see no cloudy areas on it go ahead and add a coat of clear finish on both the back and the front of the project. I used Satin Mod Podge but you can use your favorite clear finish.


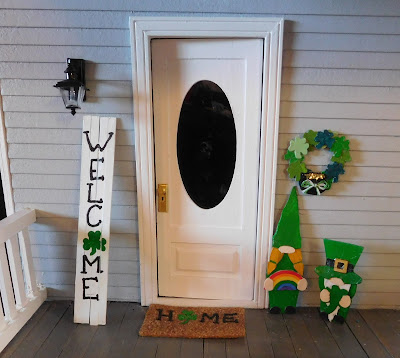
Once the clear finish dries your gnomess is ready to display in you miniature scene. I think she looks right at home with our other Saint Patrick's Day projects.


As always I do want to sincerely thank all of you for watching my videos and reading my blog posts. It means so much to me that you are supporting me in this way. If I could ask you all to do just a bit more by subscribing to the channel and liking the videos and leaving comments. Those help more than you can imagine. Also if you could pass the links on to your friends I would appreciate it so much.

Wednesday, February 14, 2024

Dollhouse Miniature Temu Haul


Watch the video here.


I really wasn’t sure I would get this video up this week. It took forever to get shipped and then it sat after it cleared customs for longer than I have seen packages sit in the past. Then according the tracking it took a really round-about trip to get to me. Then it reached Fargo where I live and tracking stopped. UPS said they had turned it over to the USPS. Meanwhile the USPS tracking said that UPS still had it. Then out of nowhere I got several messages from the various tracking systems that it had been delivered. Now the made dash to film and edit and upload this so you can all see what I got.


So I have been thinking about getting into UV Resin for several months and I decided that it was time to just dive in.


So what did I get??


The UV Resin itself, I got a smallish bottle since I am not sure what I want and how it works or if I will like using it. The bottle I got is 100 g and cost around $6.75. This one says it is crystal clear, non-yellowing and fast cure. I guess as we use it we will find out if those things are true or not. It also says it is odorless, again I guess we will discover that for sure soon.


The light, the other important element of this adventure. I do know in a pinch you can cure UV resin with sunlight but I have heard that takes a very long time. I picked a small light that is charged with a USB cable so I don’t have to plug it in while I am using it. I paid $2.19 for the light. Is this a good light. I have no idea at all. Again this is all new to me and I am going to learn as I go. I figured to start I would get this one and if I find it necessary I will upgrade later when and if I feel the need to.


The gloves, anytime you are working with any kind of resin you should be wearing gloves. I decided to try this set to see how they fit and what the quality is like. As you saw in the video I tried one on and it fits exactly like I hoped it would. I did get a size medium in case you are curious. I paid $1.48 for a package of 10 gloves (5 pair) but now that I know I like them I will definitely be getting a much larger package. And yes they are food safe so the same gloves for in the kitchen and the craft-room is a nice thing.


The tweezers, these are not really part of the resin haul other than I ordered them at the same time. I needed a new pair of tweezers and I happened to see these and just ordered them. They come in 3 colors- the purple, a pink, blue, and white. They cost was only $1.48 so I wasn’t sure how they would be but so far they seem really good. They feel good in my hand and they spring back really nicely.


And the last item the resin pigments I got a set that has 24 colors hoping that I will be able to make anything we decide the dolls need. The bottles are tiny about 5ml each and I have no idea how long they will last. But again this is all new to me and I need to learn more to even know what I need to get. The cost of this set was $5.39.


I decided to take pictures of the bottles grouped by color so you could see what I got.


The neutrals-


The yellows and oranges.


The greens.


The purples.


The reds.


And the blues.


So I am super excited for this purchase and I hope to be getting some food tutorials up on the channel soon. I was hoping that I would get started with those in January but life happens and the best plans don’t always work out.


So let me know if there are specific foods you want to see.


As always I do want to sincerely thank all of you for watching my videos and reading my blog posts. It means so much to me that you are supporting me in this way. If I could ask you all to do just a bit more by subscribing to the channel and liking the videos and leaving comments. Those help more than you can imagine. Also if you could pass the links on to your friends I would appreciate it so much.


Sunday, February 11, 2024

Dollhouse Miniature Topiary


Watch  the video here.


This week I thought it would be fun to make a simple topiary. I used what I had on hand and this tutorial is meant to be a general guide for you to create a topiary from what you have on hand.


For mine I decided to use one of the wooden candle cups that I have in my stash. You can use anything that is about the same size to make a similarly size plant. The candle cup measures 1 ½” tall and 1 ¼” in diameter (about) at the widest area. I had actually wanted to use one of the plastic shot glasses but I seem to be out of those. So this is what I quickly found to use.


The first step was to add some texture to the outside of the pot. I started by winding some embroidery floss around the pot at the point it is narrower. I used thick tacky glue to hold everything in place.


Next I added some thick jute cord around the bottom of the pot.


And then another band of the jute around the top edge. Do try to keep the joints in the heavy cord on the same side of the pot.


Then I found some embossed stickers in my stash and used one that I think was supposed to be a border around the center of the pot. If you use stickers do be sure to go ahead and use a good glue to hold them in place. The sticky on a lot of stickers will not hold up for very long especially once we cover them with paint.


Now let all the glue dry.


Now the entire outside of the pot as well as down inside a ways needs a coat of a mat black craft paint. This is going to blend everything together and give us a base to work on. You might find that you like how your pot looks after just the black paint and that is fine. If so you can skip the next step.


Since I wanted to highlight my texture a bit more I added a very thin coat of a silver paint. I actually brushed it on lightly then wiped off most of it. That way it just acts as a highlight and my pot is still black not silver. Allow to dry.


Now a coat of a clear sealer will keep all the finishes intact and make the pot look much better.


While the sealer is drying we can work on the plant that will go into the pot. I used a foam ball (it’s about 1 ½” in diameter) because that was what I had on hand. You could use a foam ball, a bead, whatever is in your stash when you go to make this. It doesn’t even need to be round, topiaries are trimmed into a lot of different shapes in real life.


For the stem/trunk of my plant I used a piece of a branch. It is part of the ones I collected when I was preparing to do the wood for the fireplace. For this project I picked a piece that was pretty straight and a diameter that I felt looked right with the foam ball. You could also use a dowel or a wooden skewer for yours.


First step is to glue the foam ball onto the stick using some tacky glue.


Next we need to give the white foam a coat of leaf green paint. That is because if we don’t it is going to be really hard if not impossible to cover up the white if we miss any spots on the next couple of steps.


Once the paint is dry coat the foam ball with a thin glue, I used the same Mod Podge I used to finish the pot. Try to not miss any spots. Then cover the layer of glue with some dry herbs. I looked in my cabinet for the bottle that looked like it was starting to fade in color the worst and used some of that. Allow this glue to get completely dry, overnight is best for this step.


One the glue is dry it is time to paint the leaves of our topiary. For this I used the same leaf green that I painted the foam ball with as well as a tiny bit of a light green and a bright green. I find the that using a little bit of a couple of other greens helps to make this look more realistic. You don’t need much and you can use whatever greens you have in your paint stash. I like to use a flat brush like what is used for stenciling for this since then I can put the paint on with a pouncing motion as opposed to a brushing motion. This helps to not knock off as many leaves.


Allow the paint to dry.


While the green paint dries we can get the pot ready to use. I was pretty sure this was going to be top heavy so I wanted to add some weight to the bottom of the pot. All I could find were these little magnets but anything will work to add weight. Normally I would use some nuts off a bolt or some washers but I couldn’t find any.


Add some glue to the inside of the pot, add your weights, and then add some foam to the pot. I am using some floral foam today. Try to fill the top of the pot as well as possible. Then add a coat of water based dark brown paint. Allow to dry.


 Once all the paints are dry trim the stick your topiary is on to the height you want for your plant.


The first step is to add a layer of thick tacky glue to the top of the foam in the pot and add a layer of dried out coffee grounds. We use these on the channel for soil a lot and I almost always have a jar of them on hand. These are coffee grounds that have been used to make coffee and then dried thoroughly in the oven. If done correctly they will work really well and I’ve been using them without problems for about 30+ years in various mini projects.


Now while this glue is still wet we need to add the topiary to the pot. Start by making a hole in the foam/soil with the stem of the topiary. Then since this is a larger stem I pulled it out and added some glue to the stem and replaced it back in the pot. Add more soil as needed to cover any glue showing around whee the stem goes into the soil. And allow to dry.


Once dry the topiary is ready to display in/around your dollhouse/mini scene.


As always I do want to sincerely thank all of you for watching my videos and reading my blog posts. It means so much to me that you are supporting me in this way. If I could ask you all to do just a bit more by subscribing to the channel and liking the videos and leaving comments. Those help more than you can imagine. Also if you could pass the links on to your friends I would appreciate it so much.


Wednesday, February 7, 2024

Dollhouse Miniature Books


Watch the video here.


This is a super simple project to do. I know I have made a lot books over the years on the channel. It is totally a possibility that I have made some a lot like these in the past. But I wanted to make some this week for a small project and I thought I would film it for today’s tutorial.


These books are meant to either lay on a table or be in a bookcase. They don’t open in other words. They are soooo easy to make and it is a pretty relaxing process. You might find it hard to stop making them once you get started. You could use different sizes of wood pieces and make a fully stocked library in just a short time.


I am keeping mine simple by just using a single craft stick. This is one of the ones from the dollar store so it is a bit narrower than the craft store ones.


 I started by sanding one long edge to be flat with some coarse grit (80) sandpaper. This does 2 things, it ensures the edge is flat but it also leaves very subtle lines going lengthwise that will look a bit like pages in the book. I then added a thin coat of a gold paint to this edge and let it dry. Since I wanted a very thin coat I used my finger tip to apply the paint. You could use other colors of paint depending on the look you are after. Let the paint dry (it will only take a few minutes)


Now using a finer grit sandpaper (120) I rounded the other long edge of the craft stick. This will be the book binding and the paper cover will wrap around it.


Once you have a book shape that you are happy with cut the craft stick into individual books. I didn’t measure because I didn’t care if mine were the same I wanted them to be close to the same size but not exactly the same. I would say for this width of craft stick ½” would be the target length but just eyeball it. If you want bigger books with wider wood strips make them taller.


Once cut use the coarse sand paper on the short ends of the cut pieces to again make the “pages” of the books. Then follow up with the same paint as before. This will need to dry before going to the next step but since the paint is so thin it will take just a couple of minutes.


Once the paint dries use the books to cut strips of card stock that are the width of the height of each book and long enough to wrap around the book with some extra to aide in painting later. Use just a bit of thick glue on one side of the book to glue the cover to the book like this. Line up the 3 edges of the book that you painted with the edges of the paper strip. Let this glue dry.


Now I like to go ahead and wrap the cover around the binding edge of my book before I add the glue. Then add just a bit of glue to the flat side of the book and wrap the cover around again. Allow the glue to dry.


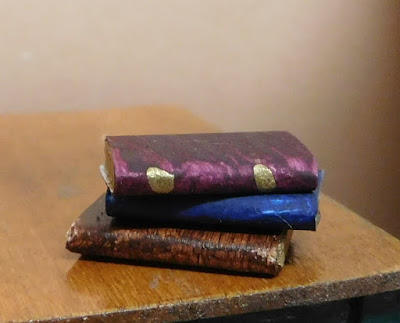
Once the glue is dry we can paint the book covers. I would normally in the past trimmed the cover to fit the book first but it occurred to me today that it would be way easier to paint them first and trim latter. This way I have a handle to hold onto for the painting step and I can use my clamps to hold the books while they dry. So much easier. I chose all fairly dark colors because that was the look I was going for. I used a brown, a navy blue and a plum. Let the paint dry.


Once dry I did decide to add a couple of gold lines/areas to the binding on the plum book. Totally optional but I thought it would make the stack of books look more interesting. Allow o dry.


Now just use a pair of scissors to trim the cover to fit the book and you are ready to display the books in your mini scene.


As always I do want to sincerely thank all of you for watching my videos and reading my blog posts. It means so much to me that you are supporting me in this way. If I could ask you all to do just a bit more by subscribing to the channel and liking the videos and leaving comments. Those help more than you can imagine. Also if you could pass the links on to your friends I would appreciate it so much.