Check back often

Have you checked out all my blogs?


Dollhouse Minis: http://joannesminis.blogspot.com


18” Dolls: http://joannes18dolls.blogspot.com/


General Crafts: http://joannes-place.blogspot.com/


Cooking: http://joanne-kitchen.blogspot.com/


Also if for some reason I can't post I will try to give a head's up on the Facebook page so check there too.

Showing posts with label tutorial. Show all posts

Sunday, December 29, 2024

Dollhouse Miniature Chinese Checkers


Watch the video here.


The day after Christmas I was talking to my daughter and she asked what I was doing that day. I told her I was trying to figure out what to make for today’s video tutorial. She said I really needed to do a project for New Years this year. I told that was a good idea but I still had no idea. Then she suggested a board game of some kind. She then reminded me that when she and her brothers were growing up New Year’s Eve was always a family game night. We would dig out all the board games to play and eat snacks to stay awake until to ring in the new year.


After I got off the phone I googled board games and settled on a Chinese Checkers set since it didn’t look as complicated as some of the other games and I also remember not only playing with my kids but I remember playing it as a child.


I did create a template for you to use to mark the holes on the board for the marbles. This template took me a while to figure out but was a really fun project. You can find the template here. You are free to use the template as many times as you wish and to make more Chinese Checker sets with it, you can even sell the games. Just please don’t sell or give away my template.


I did have to film this video on Saturday to have it up for you guys on Sunday so you got my first time through on all the steps. If I had had more time I would have gone back and re-filmed the cutting and marking of the board.


In the video I rolled the clay out, cut it with my round cutter then placed the template on top and used a pin to mark where the holes need to be. In hindsight I think it would have been better to put the template on the sheet of rolled out clay and marked the hole placement with the pin. Then used the cutter to cut out the round shape. I think it would have been much easier to get the board centered.


Since I had to wait until the last minute to film I didn’t have the time to start over by the time I realized this. My filming time is very limited this last week and probably for the next week or so. They are doing a major construction job on the building I live in and it is very noisy. For anyone interested they tore all the balconies off the building and are replacing them. Since I am on the first floor I don’t have a balcony that was affected but the noise of them working on the one just above me last week was really loud. I can’t film while they are working so I have to work when they aren’t. Hopefully they will move on to other parts of the building soon.


I decided to just use some white clay since it was handy but I saw some beautiful boards online made out of everything from acrylic to glass, to wood to marble and probably other materials I can’t think of off the top of my head. So pick something pretty for your board.


So to prep condition the clay of your choice and then roll it out, I used my set of double thick craft-sticks for the thickness. Lay the template over the clay and use a sewing pin to poke through each circle on the template. I know there are a lot of them but I was surprised at how quick this went once I turned off the camera and could just focus on what I was doing. (as suggested above I suggest actually cutting the circle out at this point instead of prior to this step like I did in the video)
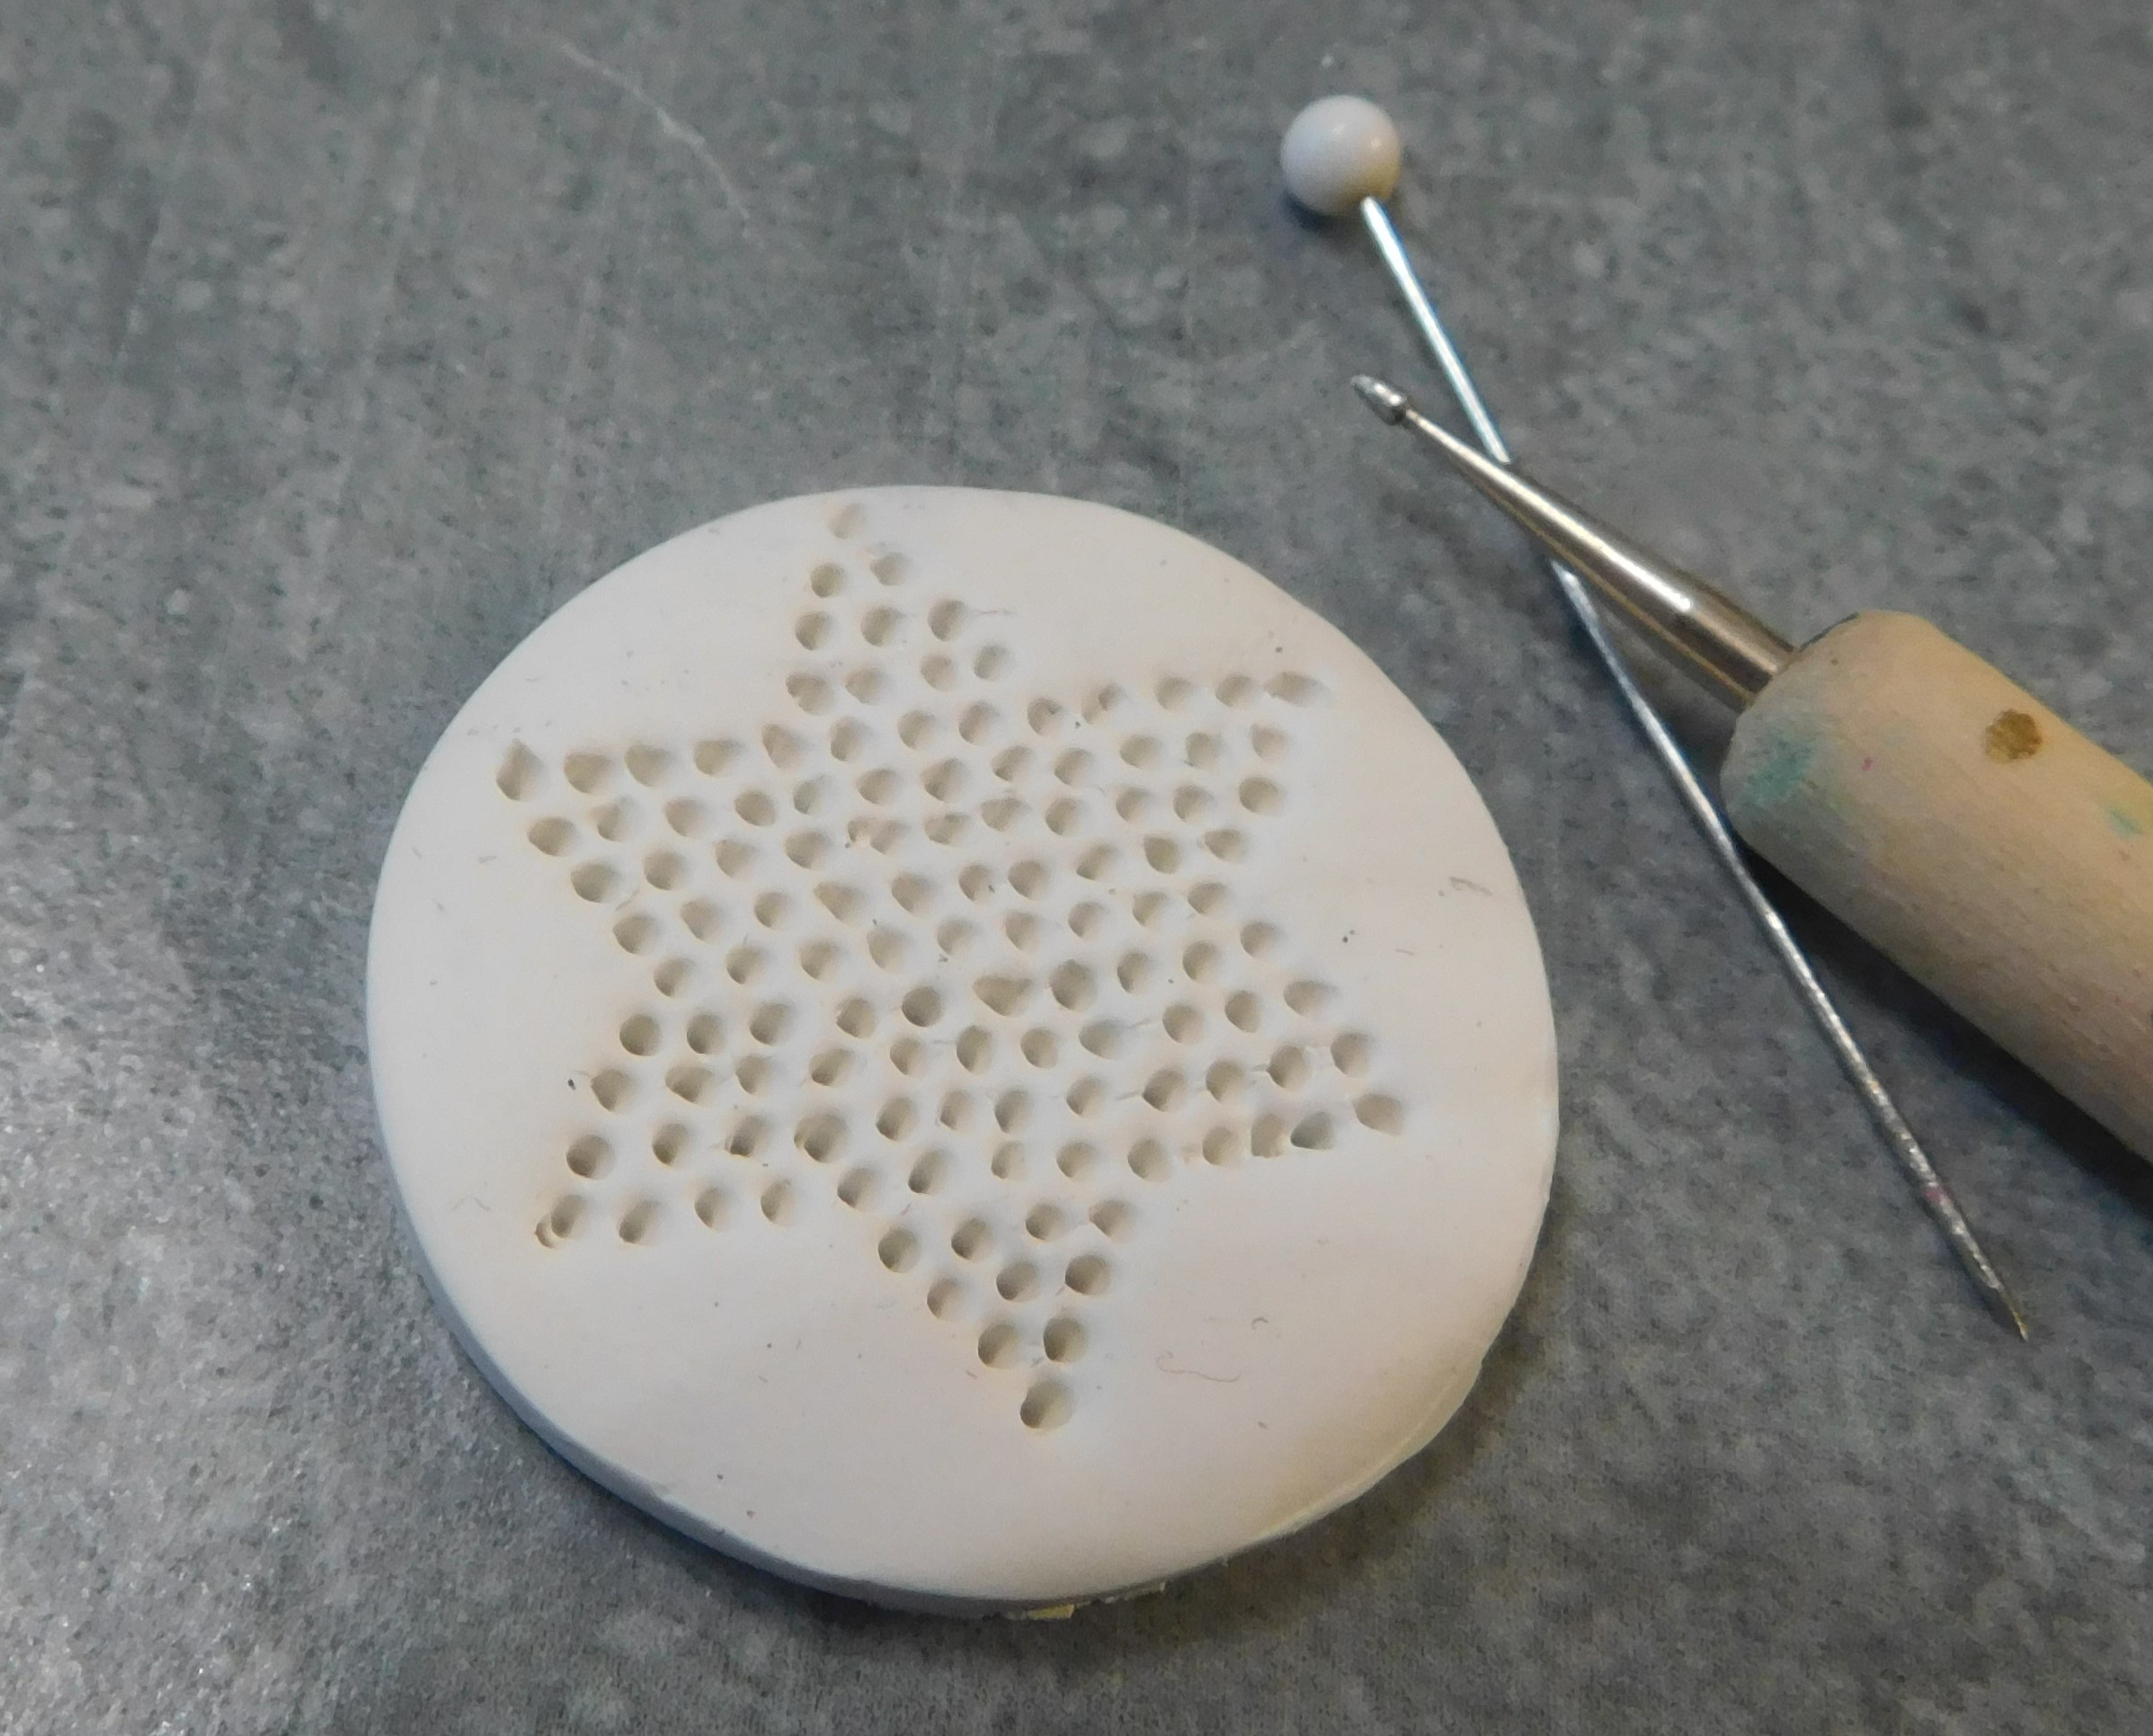


Once all the holes are poked in the surface of the clay use a very small dotting tool to kind of open up those holes made with the sewing pin. Again this didn’t take nearly as long as I expected.


Once the holes are finished transfer you game board to a baking surface (paper plate) and bake at the recommended temperature for the clay you are using for 15 minutes and allow it to come to room temperature.


Once cooled I used a tiny drop of super glue in each hole (use a toothpick to apply the glue) and I used the raw spaghetti trick to transfer a tiny no hole bead to the holes. You will need 10 no hole beads of each color and you will need 6 colors. I set my game board up so it is ready to start playing. However, you could set yours up part way through the game to tell a story that is specific to your setting.


This was by far the most tedious part of the project (after actually making the template for you to use LOL) but I worked on it over about an hour. I would finish one color of beads. Then walk away and do something else for a couple of minutes. Then come back do another color set and again walk away for a few minutes. I find this helps me to get through this type of project much easier with fewer mistakes.


Allow the super glue to dry/set up then give the board a couple of coats of a matte or a satin clear sealer. I used Mat Mod Podge.


And here we have the board set up in a scene, it looks like the kids talked grandpa into a game of Chinese Checkers…..


As always I do want to sincerely thank all of you for watching my videos and reading my blog posts. It means so much to me that you are supporting me in this way. If I could ask you all to do just a bit more by subscribing to the channel and liking the videos and leaving comments. Those help more than you can imagine. Also if you could pass the links on to your friends I would appreciate it so much.

Wednesday, December 25, 2024

Polymer Clay Test: White Clay


Watch the video here.


Last week I showed you the translucent clay that I had added onto my recent Michael’s order. I got this block of white Craftsmart clay in the same order. I was in need of some white clay and I was curious when I saw this because the price was lower than the same size block of Original Sculpey. I think I paid around $13 for this 1 pound block of clay. If I like it that is a really good price.


What I am expecting before I open it is for it to be soft and similar to the Original Sculpey clay.


Upon opening I did find it to be a bit softer than the Sculpey but not by a long way. By the time both were completely conditioned they had a very similar texture. I did not like that the Craftsmart brand left white residue on my fingers though.


The other brand of white clay I have on hand is part of a block of Original
by Sculpey. It is much firmer than the Original Sculpey and more suited to doing things where I want to have fine details.


To set up the test I grabbed my clay roller, clay blade, some sets homemade spacers for rolling the clay, a small round cutter, my chalks with their brush, and a new paper plate. I marked the paper plate into 3 areas for the 3 brands of clay.


Once I was set up (and had the oven heating) I conditioned a ball of each of the 3 clays.


I proceeded to work with each clay. I rolled out the clay using my single layer guides and cut 2 circles. That way I could leave one white and add some chalk to the other one. I also used my double layer guides to roll out thicker slabs of clay and cut 1 circle of each clay from the double thick piece of clay.


I am looking at several things in this test. First off I am looking at the unbaked texture of the clay. How easy are they to condition? I am looking at how smoothly they each roll out, do I get excessive finger prints on any of them? Once baked, what color is the clay? Is it a nice bright white or is it an off-white? Did the clay remain the same size? I have been working with polymer clay for over 30 years and I have never seen one that shrinks but, as my dad always said there’s a first time for everything so I am looking at that. I added chalk to one of the circles of each brand to see if there was a lot of difference in how well the chalk stayed in place once baked.


I did check the package instructions for temperature and baking time. The Craftsmart has exactly the same directions/temperature as the Scupley products.


I baked the samples at 250°F, (the packages all called for 275°but my oven has a bad habit of going higher than I set it) for 15 minutes.


I then allowed the clay to come back to room temperature.


The first thing I noticed was how nice and white the Craftsmart clay came out. It looks great. All the clays baked up nice and smooth.


As for the chalk test there was conditioned the Craftsmart did wipe of slightly easier than the other brands. The Premo held the chalk the best of the three.


Here are some close up photos of all three clays so you can see for yourself how they came out.


So my thoughts overall, I am much happier with the clay than I really thought I would be. It came out very white, it is easy to work with. It is very soft fresh from the package, even softer than the Original Sculpey but once conditioned I think it seems to be nicer to work with, other than that bit of residue that it left on my fingers.


So if you are looking for a less expensive white clay I would say check this one out. It won’t work for everything and I doubt it will be suitable when I want to make a project that has fine details since you really need a firmer clay for detail work. But for those projects that don’t have the really fine details and if you want to give your hands a rest and just have some fun with the clay I like this stuff.


As always I do want to sincerely thank all of you for watching my videos and reading my blog posts. It means so much to me that you are supporting me in this way. If I could ask you all to do just a bit more by subscribing to the channel and liking the videos and leaving comments. Those help more than you can imagine. Also if you could pass the links on to your friends I would appreciate it so much.

Sunday, December 22, 2024

Dollhouse Miniature Christmas Gnomess


Watch the video here.


I have another free pattern for you to download so you make the project. You can find the file here. In the download there are 3 files: a PDF for hand-cutting of the pieces, a PNG to use with your electronic cutting machine and a text file with handy hints and tips (and the sizing information) to use the PNG.


As with most of these projects I cut all the pieces from medium weight white card-stock, the kind used to make cards and such. This is way more economical than having to purchase a bunch of colors and in my experience the paint colors are a lot more stable than the paper colors. I rarely get noticeable fading with the painted projects.


You are free to use the pattern as many times as you wish and even to sell the finished project. But, please don’t give away or sell my patterns. I spend a lot of time creating them and the only compensation I get is from people watching the videos and checking out the blog post. I really want to keep offering these for free so please if someone else wants to make one send them to the video and blog so they can get their own copy of the pattern.


Glue the pieces together as shown on the video using your favorite white glue. I like to use Tacky glue and I use a toothpick as a glue applicator.


Once the glue is completely dry I laid down a strip of masking tape (sticky side up) to hold all the pieces that needed to be painted. To make that easier I group the pieces by the color that I am painting them. I did the same thing with the 3 single layer cookie pieces but I used a piece of washi tape since it is slightly less sticky and won’t tear the single layer of card stock as easily.


I painted the back and hat with red. Then once dry I added a slightly lighter color of red to the hat to give it a bit of dimension.


The plate for the cookies with metallic green.


The braids with a golden yellow color.


 The hands and nose with a flesh like tone.


The had band with white.


The shoes with black.


And the cookies with a cream color. And once dry I added some “chocolate chips” with dots of a brown paint.

The cookies are simply a ¼” round and if you want a different shape cookie you could use any shape ¼” hole punch to make them.


Once the paint dries completely it is time to assemble the gnomess. This will be done in stages allowing the glue to dry at least a bit in between so everything stays in place as you add parts.


I like to start by gluing the hat to the hair and the nose as the first step. Then this can set up. Since she is holding the plate of cookies I also glued the cookies to the plate so they could also dry.


Next the hat portion can be glued to the body/backing piece. I wish I had glued my hat on lower to the body but I was feeling really rushed as I was working on the gluing since the building I live in is in the middle of having all the balconies removed and new ones put on. Just as my paint was dry they showed up to do the removal and it was very noisy for the rest of the day.


After the hat part add the shoes, the plate of cookies and the hands. Then allow the glue to dry completely.


Now we just need to add a thin even coat of a clear finish. I am using Satin Mod Podge on mine. I did coat the back off camera (including the edges all the way around) then when that dried I came back and coated the front on camera going over the edges a second time. I find doing 2 coats on the edges really helps to seal all those layers and makes the finished gnome look a lot nicer. Allow to dry.


As always I do want to sincerely thank all of you for watching my videos and reading my blog posts. It means so much to me that you are supporting me in this way. If I could ask you all to do just a bit more by subscribing to the channel and liking the videos and leaving comments. Those help more than you can imagine. Also if you could pass the links on to your friends I would appreciate it so much.


Wednesday, December 18, 2024

Polymer Clay Baking Test- Translucent Clay Comparison


Watch the video here.


I decided to grab a block of translucent clay and when I saw that Michael's has Cernit brand available I decided to get it. I then went to my YouTube channel thinking I had done a baking test of translucent clays many years ago. I was really confused to not find a video since I remember doing the test. Then I checked the blog and discovered that when I had tested the translucent clays way back in 2012 I had made it a blog post only. So today we are testing the 3 brands of translucent clay I have on hand.


I am doing the test in a similar manner to how I did the old one just subbing in the clays I have on hand today. Some of the clays are different than I had then and some of the brands have made some major formula changes in the last decade plus. So I was excited to see how this was going to turn out and if I would get similar results to what I got way back then.


The three brands of translucent clay have on hand today are: Sculpey III, Fimo, and the Cernit that I just picked up.


I mixed all three of the translucent clays with both red and black. I chose those two colors specifically for the following reasons. Red because red has a habit of color shifting more than any other color of clay I work with. And black because if we are mixing a translucent with black we want it to still be black and not change to a gray.


I did several things off camera for the test. First I marked a paper plate for my baking surface that gave me areas for each brand of clay and a spot to put the control samples of the colored clays. That way I knew I would be able to keep all the samples in the correct places and not get them mixed up.


Next I found the thinnest craft-sticks I had on hand (a slim stick from Hobby Lobby) to use as a rolling gauge. Since I only had one I cut it in half that’s why I am using the short pieces in the video.


After rolling the clay I used a small round clay cutter to cut pieces that were all the same size of each clay. And since I was so short of the Sculpey clay I cut those circles in half and used just a half circle of each clay in each test. I cut 3 half circles of each of the translucent clays and 4 each of the red and black clays. I made sure to put the pieces of clay in the correct areas of my labels paper plate.


I then mixed the samples I wanted to bake- 1 that was equal parts black and translucent and one red and translucent. I left one piece of the translucent clay plain also. In the center of the paper plate I kept on piece of each of the red and black clays.


I rolled the mixed samples out with my clay roller and the same spacers. I then baked the all the clay at the proper temperature for 10 minutes and allowed the clay to come to room temperature.


Now let’s talk about each brand individually.


Sculpey III- this one is definitely the softest of the three and the easiest to work in with the colored clay. The big downside for me is the translucent clay on its own stays somewhat beige when baked. Although this wasn’t an issue in the test with the colors that I used I think if I had used white as a third color we would have seen a difference in the baked color. Also the translucent properties are really not great. Even with the thin sample I baked there was no way I could see the black lettering on the plate through the clay.


Fimo- this was the firmest of the translucent clays and because of that it was a bit of a challenge to get it combined with the colored clay. Once mixed in it acted very nice. This translucent clay is very white when raw and keeps that white hue when baked alone. I do find it works well with pretty much any color of clay I combine it with. I could see the lettering through the plain baked sample a bit.


Cernit- this clay does have a somewhat strange texture by itself. It is almost slimy and because if that it was a bit hard to combine with the colored clays. I do like the feel of the clay once I got used to it though. It did bake up the most translucent of all the clays tested today. I think for most projects when I can get this one I will stick with it. I like how it worked in.


As always I do want to sincerely thank all of you for watching my videos and reading my blog posts. It means so much to me that you are supporting me in this way. If I could ask you all to do just a bit more by subscribing to the channel and liking the videos and leaving comments. Those help more than you can imagine. Also if you could pass the links on to your friends I would appreciate it so much.


Sunday, September 29, 2024

Dollhouse Miniature Monster Windsock


Watch the video here.


As I was looking through some images online of Halloween decorations for real front porches I ran into several different designs of windsocks for the holiday. I remember how much fun the ghost one was that we made on the channel in the past so I decided to pick one and make it for this week’s tutorial. There were a lot of choices but the monster one was just so cute I had to go with him today. And besides it was a great excuse to play with some of the metallic paints I recently picked up.


The main part of the windsock is just a strip of medium weight card-stock that I cut to ¾” by 3” I just used some that was leftover from one of the Cricut projects we have done.


I then painted both sides of the strip with some of the Metallic Lime Green paint, of course you could use a regular lime green paint or any green color you want for this. Paint both sides of the strip and allow to dry completely.


Next we need to add the streamers to the bottom of the windsock. I like to use embroidery floss for this. For a windsock this size I like to use about 12 streamers and I cut them 3” long. This time I decided to alternate black and dark purple. The real ones had a variety of colors, some were the same green as the main part, some were black but a couple had the mix of black and purple and since purple is my favorite color I had to choose that combo. To cut the floss I wrap it around a piece of cardboard that is 3” wide then cut at each side where it bends around the cardboard. That is the easiest way I have found to cut multiples the same length.


Now wrap the painted strip around the barrel of a marker (I use a Sharpie) and mark just where the point is where it will start to overlap. We want to just add the streamers to the layer against the pen barrel.


Now lay a bead of glue to the edge of the strip at the bottom edge on that area that will be against the marker and add the streamers. This is much easier than it looks on the video if you aren’t trying to stay under a camera and can just add the pieces it is pretty quick to do. Once the streamers are in place add another bead of glue over the ends of the streamers and pat everything down so it makes really good contact with the strip of card-stock. Allow this glue to dry completely before the next step.


Start by wrapping the strip of card-stock around the marker to make it start to curve. Then add glue like I did in the video and carefully wrap the strip around the marker to create the windsock. Most of the time I find it I hold the end in place for about a minute it will stay just fine. If it wants to come unwrapped just add a small rubber band to hold it in place. (mine stayed just fine even with the paint on the surface) Allow the glue to dry.


Now the fun part starts we get to add the features. I like to start at the top with his hair. For this I used some of the black metallic paint but any black will work just fine. Add a narrow kind of crooked band of paint at the very top of the windsock then use something with a point (I used a toothpick) to pull down points of his hair. Then allow this dry so it doesn’t smear as we work on his face.


Next up add the whites of his eyes by dipping something like the handle of paint brush into white paint and making 2 nice big eye balls. Allow to dry.


Now for some personality. I started with a tiny dotting tool and added a mouth and a scar with the same black paint I used for the hair. Then changing to a larger dotting tool add a black dot to each eye. Where those eyes are placed will really affect his personality so think about how you want your monster to look. Now let this paint dry.


Now we can add a string to hang him up with. I just cut some of the same black embroidery floss to about 5” long and glued the very ends to the inside on each side at the top of the windsock. You can adjust the length of the string depending on where you are going to hang him.


Allow the glue to dry and he is ready to hang on the porch of the dollhouse.


As always I do want to sincerely thank all of you for watching my videos and reading my blog posts. It means so much to me that you are supporting me in this way. If I could ask you all to do just a bit more by subscribing to the channel and liking the videos and leaving comments. Those help more than you can imagine. Also if you could pass the links on to your friends I would appreciate it so much.


Sunday, September 15, 2024

Dollhouse Miniature Giant Spider Halloween Decoration


Watch the video here.


This week I wanted to start making some Halloween decorations for the dollhouse so I spent some time looking at images of real size houses decorated fro the holiday. I kept seeing these huge spiders and I knew the dolls had to have one. I am in love with how he (she??) came out. I am sure after the dolls get past the nightmare view of the spider right outside their bedroom window they will love it too.


The body of the spider is simply half of a styrofoam ball. Mine was about 1 ½” in diameter and since we only need half the ball you could make a pair of spiders really easily at the same time. The other main component of the spider is just some chenille stems. I used white stems since I wanted to coat them with the same paint I am going to use on the body both so they match in color and to give a good “spider leg” texture to them I cut my legs to about 4” long so I got 3 pegs per stem so I only needed 3 stems (with a bit leftover)


When I cut my ball in half one side of it kind of flattened a bit so I decided to use this as the spider’s face. I used a bamboo skewer to poke four holes on each side of the spider body and dipped the ends of the legs into some tacky glue and inserted them into those holes. Allow this glue to dry.


Next we are going to disguise the texture of the foam ball by covering it with a layer of wrapping tissue. To do this tear some pieces of the tissue paper then brush some Mod Podge onto a small area of the ball add a small piece of the paper and brush more of the Mod Podge over it. You want to really soak the paper with the Mod Podge. Make sure to cover the top of the spider’s body. If you miss some of the flat bottom that is not so important but the part that will show needs a good coat of it. Also be sure to work some around each leg where it is attached to the body. This will blend the legs into the body and also help to hold them into the body. (we don’t want to have our spider loosing a leg at some point) Allow this to dry completely.


Once dry it is time to paint the spider. I just used some black craft paint for this. I was able to use a brush on the body but I did find that it was easiest (although very messy) to use my index finger and thumb to apply the paint to the legs. Just dip your finger/thumb in the paint and run the leg between them, much faster and I got really coverage with one coat of paint that way. Allow to dry completely.


I wanted to add a bit of bling to my spider so I used some purple glitter paint on the legs. It is very subtle and I might go back later and add another coat but I didn’t want to add too much. Just enough to catch the light from time to time. Allow to dry.


Next it was time to add the eyes to his face. I simply used some dots of red 3-D paint for this. I had debated trying to add glitter but in the end like the plain eyes better. Allow to dry (this type of paint takes a while to dry so let it sit at least overnight before you touch the area where his eyes are painted on.


Now it was just a matter of bending the legs and setting him place, I think he really likes the roof of the dollhouse but you could put him anywhere. And since his legs are so flexible you can use those to help anchor him in place.


As always I do want to sincerely thank all of you for watching my videos and reading my blog posts. It means so much to me that you are supporting me in this way. If I could ask you all to do just a bit more by subscribing to the channel and liking the videos and leaving comments. Those help more than you can imagine. Also if you could pass the links on to your friends I would appreciate it so much.