Check back often

Have you checked out all my blogs?


Dollhouse Minis: http://joannesminis.blogspot.com


18” Dolls: http://joannes18dolls.blogspot.com/


General Crafts: http://joannes-place.blogspot.com/


Cooking: http://joanne-kitchen.blogspot.com/


Also if for some reason I can't post I will try to give a head's up on the Facebook page so check there too.

Tuesday, September 28, 2021

Dollhouse Miniature Paper Towel Holder


Watch the video here.


A note about the blog post, I somehow managed to delete most of the photos I took while making this project.

I got the idea for this project from the paper towel holder in my real kitchen. Mine is all wood but the idea is the same and I used the measurements from mine to make this one. I love how it turned out.


I decided the mini one should have a marble base since I love the look of marble right now. Also I love to create marble with polymer clay, it is such a simple look to achieve and just looks really nice.


If you've watched any other videos where I made marble you will recognize my basic technique. I change the colors a little bit every time I make it but the changes are usually small. I almost always use mostly a white/translucent mix. I find that all white looks too dense and too much translucent has a strange color. I then add my accent colors. Normally I use greys for the main accent with a touch of black and a touch of something that will give a bit of glimmer, this time I used silver for that and I love how subtle it is. I didn't want this piece to be too sparkly or over the top, just a simple marble.


Since it would be really hard to make such a small amount of marble clay there will be some leftover. Just store it with in a zip-lock sandwich bag with your polymer clay, I am sure you will find a use for it in the future.


For the wood parts of this paper towel holder I used one of those fancy toothpicks. If you don't have any of those just use a piece of really thin dowel or a regular toothpick, you could even add a tiny bead to the top if you wish.


I dipped the wooden pieces into TLS (Translucent Liquid Sculpey) to help make sure they stay where I put them.


Normally when I make marble I like to just buff it to a shine but with the wooden pieces in the way that would not work so I added a coat of Satin Mod Podge to the entire holder once baked and cooled.


The roll of paper towels has a strip of regular printer paper (¾ “ by 11 ½”) that I made into what is in essence a paper bead. I formed this bead shape over a bamboo skewer being careful to not get it glued to the skewer and to keep the strip of paper rolling straight. I then added a small strip of Kleenex type tissue as an outside layer to be the visible “paper towels” on the roll. This was much more in scale to look like paper towels.


Paint brush and Mod Podge used in this tutorial were provided to me free of charge from Plaid.


As always I do want to sincerely thank all of you for watching my videos and reading my blog posts. It means so much to me that you are supporting me in this way. If I could ask you all to do just a bit more by subscribing to the channel and liking the videos and leaving comments. Those help more than you can imagine. Also if you could pass the links on to your friends I would appreciate it so much.


Sunday, September 26, 2021

Beachside Bungalow Kitchen- Corner Cabinets


Watch the video here.


This kit is part of the Houseworks Kitchen Collection which can be found here.


I am going to be very honest here as I was in the video this kit did not go together as well as the others in the set. I am not sure why. It could have been me, it could be the kit, I have no idea but I struggled this time. In the end I got it done. I think I have it put together correctly but there might be a few mistakes here and there.


I am fairly positive I will be using both of the base cabinet pieces. The top ones I am really not sure if I will be using either of them. I will need to figure out the upper cabinets that I want to use before I will know. That is something I won't figure out until I have the lower cabinets and appliances in place.


On the bright side the lower corner cabinets really won't be seen in the final kitchen. They are mostly going to be there fill in the corners and make sure the countertops fit correctly.


Because they won't be seen they are really simple pieces with few parts.


The base corner piece went together much better than the upper one. It is glued much like the other cabinets in this set minus the doors/drawers and shelves. They do help with figuring out the layout of the kitchen though.


The upper corner unit was what gave me the most trouble. I really am not sure why I had so many problems with it. If I use this piece the front angled panel will show in the kitchen.


These are the last of the cabinets that we will be putting together for a while. Next week I am planning to work on the cook-top and oven door kits. Then I want to paint all the base cabinets and put them in the kitchen. Then the countertops will need to be figured out.


I also hope to get the refrigerator kit to complete too.


Only after all of those steps will I tackle the upper cabinets.


As always I do want to sincerely thank all of you for watching my videos and reading my blog posts. It means so much to me that you are supporting me in this way. If I could ask you all to do just a bit more by subscribing to the channel and liking the videos and leaving comments. Those help more than you can imagine. Also if you could pass the links on to your friends I would appreciate it so much.


Tuesday, September 21, 2021

Dollhouse Miniature Halloween Sign


Watch the video here.


Paints, brushes, and Mod Podge used in this tutorial were provided free of charge by the manufacturer.


I thought it would be fun to make a fun little Halloween project this week for our Tuesday tutorial. I have been seeing these signs everywhere in real life decorating so I figured the dolls would want to get one too.


I used a simple craft stick for the base, mine came from the dollar store so it is a bit smaller than the ones we are all used to getting from the craft store. Either would work, you could even make a larger sign from a jumbo craft stick.


I used some Multi Surface paint from Folk Art in the color Vivid Orange. Any orange would do for this project. I do love how bright this one is though.


For the letters, if you have wonderful handwriting just write the word either with a small brush or a paint pen. I don't have wonderful handwriting so I used these tiny letter stamps. These are fairly easy to find at most craft stores that sell any kind of rubber stamps. I use my rubber stamps with both ink and paint I am just careful to thoroughly clean them after each use.


 If you haven't used stamps before they are really easy to use and can be a lot of fun. Just be sure the paint is only a very thin coat and only on the face of the area to be stamped, keep all paint (or ink) off the rest of the stamp to avoid making a mess.


Once I was happy with the letters and the paint was dry I painted the edges of the sign using the same Apple Barrel Black paint I used to stamp the word. I did this before cutting the sign to length because it is so much easier at this point. Once this paint dries cut the sign to the length you want then paint the ends.


Once all the paint was dry I gave the sign a nice coat of matte Mod Podge and allowed to dry.


This sign can either be leaned against the wall of your dollhouse or hung on the wall.


If leaned against the wall this would look really cute on the porch of your dollhouse. If you want to hang it I would recommend the white poster putty that is sold near the office supplies in many stores.


As always I do want to sincerely thank all of you for watching my videos and reading my blog posts. It means so much to me that you are supporting me in this way. If I could ask you all to do just a bit more by subscribing to the channel and liking the videos and leaving comments. Those help more than you can imagine. Also if you could pass the links on to your friends I would appreciate it so much.


Sunday, September 19, 2021

Beachside Bungalow Kitchen- The Oven Cabinet


Watch the video here.


This kit is part of the Houseworks Kitchen Collection and can be found here. I am working on several of the pieces on the channel to build the kitchen in the Beachside Bungalow.


So this week we put the Oven Cabinet together. I like this piece for several reasons on being it adds some height to the kitchen and will allow the wall cabinets that come later a piece to kind of anchor them.


The cabinet has 2 areas each with a door and an opening to place the Oven Door kit from the same collection. 


The kit goes together pretty much like all the others in the set. The big difference being it is more difficult to keep the unit square because of the shape. The height combined with the narrow size make it want to go a bit wonky. It was easy to work with once all the pieces were together but it definitely needed to be taped. I also let the glue dry all the way before taking off the tape and adding the trim pieces. This one really needs the drying time.


As I was doing my dry fit before I turned on the camera it did seem that one of the long side trim pieces was slightly warped. Not much just a tiny bit. I was able to still get it in place with the glue and some careful clamping.


I did run into an issue I have not had in any of the other kits so far- the smaller of the 2 doors was just a tiny bit short for the opening. I have checked multiple times and all the parts appear to be glued correctly so I am not sure what happened. I think because of where it will be placed it won't show a lot so I think it will be fine. The gap is really small but it is there it you look at it straight on.


I did show how the oven door will fit into the cabinet and I am really looking forward to getting all the pieces finished and installed in the dollhouse. I think it is going to look really nice.


As always I do want to sincerely thank all of you for watching my videos and reading my blog posts. It means so much to me that you are supporting me in this way. If I could ask you all to do just a bit more by subscribing to the channel and liking the videos and leaving comments. Those help more than you can imagine. Also if you could pass the links on to your friends I would appreciate it so much.


Tuesday, September 14, 2021

September Mini Haul


Watch the video here.


Today I have a very short haul for you. I purchased some more kits to use in the Beachside Bungalow Kitchen. This time I got the oven cabinet and the oven door, a faucet for the kitchen sink we got last month, a cook-top and a pair of corner cabinet sets.


Let's talk about the items one by one.


The oven cabinet kit is one of my favorite pieces to use because I happen to love wall ovens in real life and I love the realism you get by adding one to the dollhouse. This cabinet has 2 working doors as well an opening to add the wall-oven door kit. When finished the cabinet height will be 7” so it will break up that solid line of cabinets.


Next the oven door kit is made completely of metal and when properly painted looks very nice in the kitchen. It does not open or have a window but it is still a really wonderful addition to the kitchen.


I purchased 2 sets of the corner units. I am not sure if I am going to use both or just part of one but I decided to just get two and worst case scenario I end up with extra pieces I can use in a future project.


I really love the cook-top in this set of kits also, Again it just makes the kitchen seem a little nicer and little more real. I haven''t decided how much I will modify this one yet. I have some thinking to do about what I want to do and how I want it to look when in place.


Lastly this time I got a faucet for the kitchen sink. I like the look of this one and although I think we will have to do some modifying to the sink I got last month I think it will look wonderful in the finished kitchen.


I was really hoping to get the refrigerator kit this month also but it was still out of stock when I ordered. I did sign up to get an email when they get them back in stock so I am hoping to get my hands on it soon also.


As always I do want to sincerely thank all of you for watching my videos and reading my blog posts. It means so much to me that you are supporting me in this way. If I could ask you all to do just a bit more by subscribing to the channel and liking the videos and leaving comments. Those help more than you can imagine. Also if you could pass the links on to your friends I would appreciate it so much.


Sunday, September 12, 2021

Beachside Bungalow Kitchen- 1 ½” Base Cabinet with Door


Watch the video here.


This week we tackle another of the kitchen cabinet kits I purchased. This time it is a 1 ½” wide cabinet with 1 door and a drawer. The hardest part of this was probably trying to decide which way I wanted to hinge the door. LOL


The process was pretty much the same as the previous kits so hopefully you aren't bored by this by now. I did run into a problem which I tried to explain both the cause and the fix for. The area was just too small for me to really show what I was doing. In a nutshell I had neglected to wipe out the glue from the
inside where the drawer slides in. I got distracted and just forgot. So when the glue dried that little bit of extra space it took was too much for the drawer to slide in. it did take me a few minutes to realize what had happened. 

Once I knew the cause of the issue I had to figure out how to fix it. In the end I was able to use a dental pick (this is a great addition to your craft tool box) and some of my pointed clay tools. I then wrapped a screwdriver with some sandpaper and sanded off most of what I couldn't pick out. Since the spot was still really tight I sanded off a bit of the back corner of the drawer and now everything fits. The area of the drawer I sanded off isn't noticeable unless you take the drawer all the way out of the cabinet.


Like all the other cabinet pieces I will be adding the finish at a later time when I have all or most of the rest assembled.


As always I do want to sincerely thank all of you for watching my videos and reading my blog posts. It means so much to me that you are supporting me in this way. If I could ask you all to do just a bit more by subscribing to the channel and liking the videos and leaving comments. Those help more than you can imagine. Also if you could pass the links on to your friends I would appreciate it so much.


Sunday, September 5, 2021

Beachside Bungalow Kitchen-1 ½” Base Cabinet with Drawers


Watch the video here.
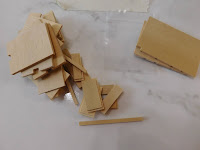


This week we continue work on the kitchen cabinet kits that I recently purchased to put into the Beachside Bungalow. This week I am putting the 1½” wide base cabinet with drawers together. So not only do I put the cabinet itself together I also assemble the 4 drawers.


While drawers might sound kind of scary put together they are really easy since the pieces of the kit are cut so well. All (or most) of the edges are cut in such a way that they almost go together by themselves.


The number 1 thing to remember when putting any kit together is to take it slow. Don't rush the steps to get it done quickly. You need to work carefully and make sure each step is done correctly. Always dry fit everything. I can't emphasize that enough, by dry fitting you can see what goes where and if it fits.


The first step on all of these (and really) kits is to sort and label all the parts that come in the kit. That way you know what the pieces are so you are less likely to make mistakes.


On these cabinet units you do need to make sure all the corners are square and all the edges that should line up do. So take your time and make sure you understand each step before you start doing it. 


Also at each step give your glue time to dry. Not amount of measuring and fitting will do any good if you try to rush and move to fast. That is when things get crooked and end up not fitting.


The drawers did need to be sanded just a bit to make them fit which it normal. I was pretty certain they would even before I tried them. All kinds of things can affect the fit of the drawers into the cabinet. After all the fit is very tight since we are working so small. When you do sand pieces keep your sandpaper flat on the work surface and keep the item being sanded at the proper angle.


This piece like the one last week will get finished later when more pieces are ready.


As always I do want to sincerely thank all of you for watching my videos and reading my blog posts. It means so much to me that you are supporting me in this way. If I could ask you all to do just a bit more by subscribing to the channel and liking the videos and leaving comments. Those help more than you can imagine. Also if you could pass the links on to your friends I would appreciate it so much.