
This week we are making the main dish for our Valentine's dinner, a steak. I am showing you kind of a generic boneless steak this time, later we might some steaks with bones in them. I wanted to keep this one a bit easier.
So for the steaks themselves we are using Caramel polymer clay from Fimo. I find it makes a really good cooked meat color in this type of project. The only other clay I am adding is just a tiny bit of a mixture of 2 parts Translucent with 1 part white clay. This is one of the clay mixes I try to always have on hand because I use it so much. This translucent mixture will form the areas of fat that run through out steak. You can use as much or as little as you wish, or just leave it out if you wish. I like a bit of the fat running though the steak I think it makes it look more realistic and adds some interest when you are looking at it.
To form our steaks I made a fat drum like shape from the caramel clay then I split it vertically a few times, trying to tear it more than cut it smoothly. On these newly exposed surfaces I smeared on some of the fat color then reassembled the clay shape. I also added a bit of the fat mixture to the outside of the drum on one side. When I was satisfied with the marbling of the fat in the meat I reduced the drum to a snake about ¼” in diameter. I then cut some small pieces and rolled them a little to start the process of getting the steaks to the correct thickness. Then I used my thumb and finger to finish flattening them. This way my finger prints are actually the texturing tool for the flat surfaces of the steak.
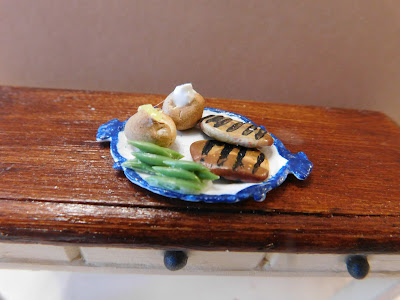
At this point I trimmed the steaks to size added some chalks to color them.
On the vertical edges of the steaks I added just a bit of a mix of red and a reddish brown chalk to replicate that blush that a steak cooked a bit rare will have. Do be careful to keep this color off the fat areas.
Then I added some yellow ocher chalk to all the surfaces paying particular attention to the fat areas.
A quick brush with some dark brown in just a few areas will give you steak a nice cooked look.

I
then used a bent sewing pin dipped in just a thin layer of black
paint to add the grill marks.
Once you are happy with how your steak looks cook it at the recommended time and temperature for your clay.

Once
baked and cooled an very thin coat of satin Mod Podge will help give
your steaks a delicious appearance.
As always I do want to sincerely thank all of you for watching my videos and reading my blog posts. It means so much to me that you are supporting me in this way. If I could ask you all to do just a bit more by subscribing to the channel and liking the videos and leaving comments. Those help more than you can imagine. Also if you could pass the links on to your friends I would appreciate it so much.
No comments:
Post a Comment