Today we are making a Yule Log cake for our project. I have wanted to make this on the channel for a while and today seemed like the perfect day. I love these cakes in both real life and in mini. They are just so pretty and make such a nice presentation especially on a pretty cake plate.
We are only using two colors of polymer clay- a dark brown (I used Fimo Soft in Chocolate Brown) and a white (I used Sculpey III in White) to do this.
We start out (after conditioning our clays) by mixing some sand into the brown clay. Not a lot just enough to give us a head start on the texturing later on. I only have white sand but as you can see in the finished cake it doesn't really mater since we are only using a small amount. If you have brown sand though go ahead and use that for this step.
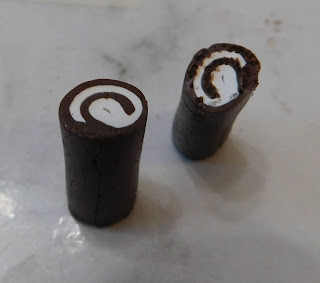
Once the sand is worked through the clay roll both colors of clay out into flat sheets of clay about the same thickness. The white can be slightly thicker if you wish. Next stack them and roll out a bit more. To both thin the layer and to adhere them together.
I used my metal drill gauge that I got at Home Depot several years ago to help me size this. I love this tool for sizing small clay canes (up to ½”) since it is metal so the clay won't harm it.
Since my clay was pretty soft I next put the cane into my freezer for 20 minutes to firm it up. This allowed my to cut the cane into the size pieces I wanted as well as to work with the texture of the cake portion of the cane.
I cut the cane into a couple of different lengths- ⅞” for a mostly whole cake, ½” to fit my special glass cake plate, and then into some thin slices (about ⅛” or less).
 |
Once the cake part is textured it is time to texture the white cream filling. I used a small ball tool for this and just did a very light swirl in the surface of the clay.
If at any point your clay becomes too soft to work with put it in the freezer for 10 or so minutes to help firm it up again.
Once you are completely happy with the texturing bake the clay pieces at 275°F for 15 minutes.
Allow to cool to room temperature before moving to the next step.
Now we need to mix up our frosting. First I combined some of the brown clay I used before with just a small touch of white clay. I wanted a slightly lighter chocolate color so the frosting would stand out a bit from the cake. Once happy with the color add just enough TLS (Translucent Liquid Sculpey) to make a frosting consistency.
Use a toothpick to spread the frosting on the top sides and un-textured end of the longer cake pieces. And to the top/side edges of the cut slices. You want the slices to look like they were cut from the larger cake pieces so try to be consistent.
Do the frosting in stages and bake at 275°F for 10 minutes. I actually switched my oven down to 250°F for this step because I noticed it was drifting up above the set temperature the day I was doing these. I do recommend you keep an oven thermometer in your oven and check it regularly while baking clay.
Just keep adding frosting and baking until you are happy with your results. As long as you keep the temperature at 275°F or lower you can bake as many times as you need to.
Sorry I somehow missed taking any pictures of the frosting process.
Once
you have the cakes frosted coat just the frosting portion with a thin
coat of mat Mod Podge and allow to dry.
If
you want to decorate the tops of your cakes there are many options
available. Do an online search of Yule Log cakes for inspiration. I
used some tiny red no-hole micro-beads as well as some white glitter
(I used some white sand of some too to show the difference) using
more of the same Mod Podge to adhere them.
That is really all there is to this project. It is not really all that hard once you get started and the results are so wonderful.
As always I do want to sincerely thank all of you for watching my videos and reading my blog posts. It means so much to me that you are supporting me in this way. If I could ask you all to do just a bit more by subscribing to the channel and liking the videos and leaving comments. Those help more than you can imagine. Also if you could pass the links on to your friends I would appreciate it so much.


No comments:
Post a Comment