
This week for the Saturday video we are adding some crackers to our cheese and meat tray.
I do have an older cracker video on the channel which you can find here if you want to do some other crackers,
I am starting with the same base color of clay for my first set of crackers this time that I used in that video. But I am using other colors for the 2nd and 3rd crackers this time than I use in that video. Ia am also making all three of these differently than I did in that video.

For
the base color of clay I am mixing equal parts white and beige
polymer clay. Any brand will work.

For the first set of crackers I rolled that clay out into a snake ⅛” in diameter.

Then cut this into approximately ⅛” pieces.
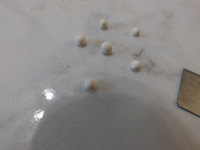
Roll
each of these pieces into a small ball.

Flatten each ball with your
fingertip.

Then add some holes using either the tool I showed you how
to use in Tuesday's tutorial or anther pointed tool.

Dust the tops
with chalk and bake according to the directions on your clay. I baked
mine at 275°F
for 7 to 8 minutes.

For
cracker number 2 I added a bit of Fimo Yellow Ocher to give the clay
just a bit of a warm beige color.


The crackers were then textured with the same tool as I use with the
first batch. Then chalk was applied and they were baked.

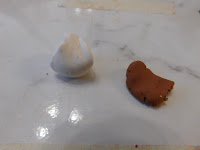

These were rolled the same way as the last batch but I cut
them into diamonds just bloodlessly using the lines to guide. For these I
used the texture tool with 3 pins.
Then again chalk was added and they were baked.
Our meat and cheese board is really starting to come together. I hope you are enjoying the process as much as I am. If there any items you would like to see me make to add to the board? Be sure to let me know if you have any requests.

As always I do want to sincerely thank all of you for watching my videos and reading my blog posts. It means so much to me that you are supporting me in this way. If I could ask you all to do just a bit more by subscribing to the channel and liking the videos and leaving comments. Those help more than you can imagine. Also if you could pass the links on to your friends I would appreciate it so much.
This looks simply yummy. I'm not going to miss a single video tutorial, even if I'm late for lack of time. Thank you so much and a Happy New Year to you and yours!
ReplyDeleteHugs,
Drora