
This week I have something a bit different for the Tuesday video. I needed a specific clay texturing tool in for the video I have planned for next Saturday. I used to have one of these that I had made many years ago. Unfortunately I have no idea what happened to that tool. I decided I might as well make a new one. And since I am going to be using it a video I figured I should probably do a tutorial on how I made it.

You
will need some sewing pins, TLS (Translucent Liquid Sculpey, and some
polymer clay (I am digging into my scrap clay bag)


Now
take a pair of needle nose pliers and bend the cut end like this.
This gives the clay more to hold onto and will keep your texturing
tool intact for a lot longer.

Now
roll a small ball of clay and insert the pins into it spaced as you
wish for the projects you plan to use it for.

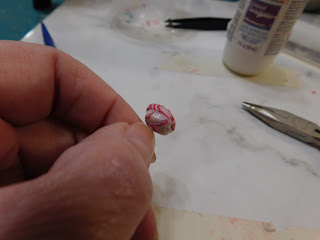
Roll
a thin layer to act as a cap over the bent ends of the pins.

Now turn the tool over and make sure the pins are right where you want them as far as spacing. Also make sure the points are all at the same level. Add a generous amount of TLS to the area where the pins exit the ball of clay.
Bake the tool at 275°F for 2 minutes and allow to cool.
You new clay texturing tool is now ready to use. I made a total of 4 of these while I was at it. One each with 1 pin, 2 pins, 3 pins and 4 pins.

Be
sure to store these in a safe place. I am going to keep mine in this
little clear box with a lid that I picked up at the dollar store.
Otherwise I know I will be sticking my finger every time I reach into
my tool drawer.
As for trouble shooting this one, the only real way to make it incorrectly is to not have all the points at the same level. If this happens carefully trim the lung one(s) so they are all the same length with wire cutters.
As always I do want to sincerely thank all of you for watching my videos and reading my blog posts. It means so much to me that you are supporting me in this way. If I could ask you all to do just a bit more by subscribing to the channel and liking the videos and leaving comments. Those help more than you can imagine. Also if you could pass the links on to your friends I would appreciate it so much.
No comments:
Post a Comment