 |
| 10 ounce size orange juice bottle |
I do want to add a nice fire to the interior of this project in the future so I am planning to leave the bottom area at the back unfinished. Since this idea is fairly new I haven't thought through exactly how that will happen yet.
So I felt this particular bottle would work very nicely as kind of a cement/stucco/whatever material you would call it. I started cutting out an opening on the front of the bottle to allow access to the “fire” area. I just followed the design of my bottle for this. Do be careful this can be dangerous if you are not careful.
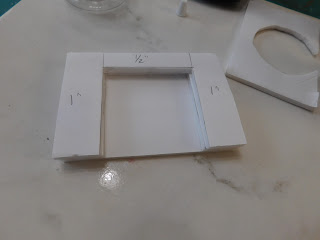
Next up was to make a base for our fireplace to live. I did this with 4 pieces of foam-core board cut 4 ½” by 3”. One of these was left intact. One I traced the base of the bottle on and cut out a round opening right at the back edge and centered on the board. And two were cut with an opening that would give room for the bottle base.
I
glued these pieces together and to the bottle.
Make sure to center
the opening along the solid long edge. (I almost messed this step up
and only caught it when I got ready to take the pictures)
Once this was dry I added a layer of white paint mixed with baking soda to the outside of the bottle. I debated what color to make this layer. I had thought about tinting it a tan/cream color but was concerned I would run out part way through the layer and have to mix more. I know how hard it is to mix a custom color for something like this. So I used white for this layer and added the color later via layers of washes. I like the effect of the washes better anyway because they do give a depth of color that can't be copied with a layer of color.
The
layers of wash coats started light and went darker as I went. This
gives the best result in my opinion. You could do the same with other
color choices and have a very different looking finished fireplace.
This
was all then sealed with a coat of mat Mod Podge.
Now it was time to work on the base/hearth. You can cover this in so many ways. I opted to use stones made from paper egg carton. I painted flat areas of my egg carton with various grey and brown craft paints and allowed them to dry.
Then
I cut them to size (for this project I cut them all about 1” by ¾”)
then glued them in place. Work in areas so that the glue doesn't set
up on you or make too much of a mess.
Once you are happy with the placement of your stones, give them a coat of mat Mod Podge and allow to dry thoroughly.
Now it is time to grout. You have many options for this. I have used various things over the years. Real tile grout works well, as does paint-able caulk mixed with paint. This time I used a paint/baking soda mixture (it was the batch leftover from the foundation of the Beachside Bungalow) and it worked very nicely.
Now your fireplace just needs to dry and it is ready to display.
As always I do want to sincerely thank all of you for watching my videos and reading my blog posts. It means so much to me that you are supporting me in this way. If I could ask you all to do just a bit more by subscribing to the channel and liking the videos and leaving comments. Those help more than you can imagine. Also if you could pass the links on to your friends I would appreciate it so much.


No comments:
Post a Comment