This week I have a really fun and simple project. I decided the front porch of the dollhouse needed a small bench and I came up with this the one I am showing you today. I had taken a walk to the local dollar store and picked up a new package of craft-sticks so I had plenty of them to play with. (you get 100 of them for just over a dollar at Family Dollar) The bench we are making is very loosely based on one I saw on a front porch in the neighborhood a while back.
To make the process easier I am building the bench in “units” that way we don’t have to do near as much measuring and the pieces fit together to create the bench.
Let’s start by making the seat and back units. For these two pieces we will need 5 whole craft-sticks and 4 small pieces. For the seat lay 3 of the craft-sticks side by side and cut 2 brace pieces that are just shorter than the width of the seat. Mine were about ¾” use some glue to attach the braces to the back side being sure that both of the brace pieces are glued to part of all three seat pieces. For the back repeat the same steps using just 2 craft-sticks and my brace pieces were around ½” for this part. Be very careful to make sure all the craft-sticks are lined up evenly. Allow the glue to dry.
Next we move on to the leg units. We will need to use 4 craft-sticks all together. Cut two in half, mine were 2 ¼” each, these will be the actual legs. Make a mark on each one that is 1 ½” from the cut edge, this will be the placement line to for the front/back pieces.
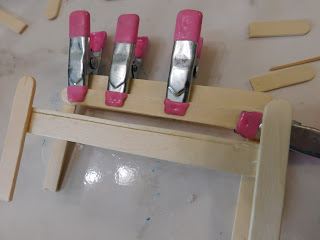
Now glue the pieces together so they look like the ones in this photo. Be very sure to line up the top edge of the complete craft-sticks with the lines you drew on the legs. Make sure everything is nice and straight and squared. Allow to dry and double check that the 2 leg units are exact matches.
Now glue the seat to first one of the leg units and allow to dry. You just want to use a bead of glue along the top of the craft-stick between the legs. Use something to hold this in place and make sure it is correctly placed so that you will have a level seat. Once dry I like to add a bit more glue on the under side of the joint just to be sure it will hold. Allow to dry completely.
Now repeat with the second leg unit, be extra careful to keep all the angles correct so that the seat remains level when finished. Add the additional bead of glue to the under side once dry and allow to dry again.
Now we are adding the back unit. I lined up the top (rounded part) of the legs with the curve on the bottom board of the back unit. Make sure to again line everything up correctly, glue and clamp. Allow to dry.
I decided to make adding the arm rests easier by adding an additional craft-stick to the back lined up with the bottom board on the front. This doesn’t show much but gives a ledge to glue the arm rest to in the next step. The secret to making it blend in as much as possible is to clamp it line it up really well and then clamp it well so it remains flat against the board that is already there. Allow to dry.
Now we are adding some arm rests, these are the rounded ends of another craft-stick cut to 1 ¼” long. Carefully glue them to the top of the front leg and to the top edge of our extra back piece.
Once dry you can paint your bench any way you desire. I went with white (from Apple Barrel) but I was also very tempted by a dark blue. Show me picture of how you do your bench. I did use two coats to give it a nice finish.
Once the paint dries add a coat of Satin Mod Podge or any sealer you choose.
A huge thank you to Plaid for providing the paint, Mod Podge, and brushes used in today’s tutorial.
Once dry your bench is ready to set on the porch, in the landscaping, in the entry way or any number of other locations around the dollhouse.
As always I do want to sincerely thank all of you for watching my videos and reading my blog posts. It means so much to me that you are supporting me in this way. If I could ask you all to do just a bit more by subscribing to the channel and liking the videos and leaving comments. Those help more than you can imagine. Also if you could pass the links on to your friends I would appreciate it so much.


No comments:
Post a Comment