This week we are finishing the front porch floor. And even though I am writing this part of the blog before the work is done I already know I love how this looks. I got the slightly aged wood look I was after without going too far. I think I achieved the mix of old with new and I used just stuff I had on hand. Actually the “stuff” I used a lot of people would consider to be trash. I love it when I can tie a Trash to Treasure project into a major component of a project. I have a lot of the cardboard still on hand (and I get more every month) so don’t be surprised to see more of it in future projects on the channel.
Of the 60 some strips I cut last week I have around 15 or 20 left over. I was hoping to have extra since I would rather have more than I need than have to stop in the middle of a project to make more. I am sure I will figure out a use for the leftovers. Maybe the dollhouse needs a matching doghouse……..
I used the same wallpaper gel glue that I used on the step and on the inside wallpaper in the house. If you don’t have any of this look for the thickest glue you can find. The thicker the glue, the lower the moisture of the glue and the less problems you will have with the project.
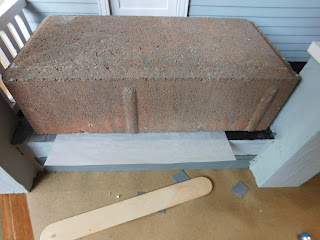
I did use a brick to weigh down the strips as I went. I placed a piece of parchment paper in between the brick and the floor to protect it. I did manage to cause some minor damage to the front wall of the dollhouse but it was easy to fix with a bit of sandpaper and some touch up paint. There was already a drip in the paint below the window that I have been meaning to fix for like forever so I did that at the same time.
This project would have been much easier to do before the porch railing went on for sure. But I know I would not have thought of this method back then so I am glad I waited.
I cut the strips to fit in batches so that I would only cut the amount I needed so the ones that are leftover are full length.
Be sure to make sure every strip you lay down is straight that is the key to this project. Take your time and be careful.
To fit around the places like the posts and the door I used the method my dad taught me many years ago when we were replacing flooring in the house we lived it. Here are some photos showing the process I used, if you do the same you send up a thank you to my dad for me.
When working on projects like this I like to lay just a few strips and let the glue/paste do its job before I add more. That way I find I have a better chance of my finished floorboards being straight the entire length of the porch. If I try to lay too many at a time I find by the time I get to the far end of the porch my boards will have a definite slant which will really show up at the end by the rail.
After laying all the flooring I gave it a coat of Satin Mod Podge. This will seal the floor and make it much more durable. I would have used Mat Mod Podge but I am almost out of that and I wanted to get this finished this week. I do have to say while if you use wood you might be able to skip the clear finish with the paperboard I feel it is necessary.
As always I do want to sincerely thank all of you for watching my videos and reading my blog posts. It means so much to me that you are supporting me in this way. If I could ask you all to do just a bit more by subscribing to the channel and liking the videos and leaving comments. Those help more than you can imagine. Also if you could pass the links on to your friends I would appreciate it so much.


No comments:
Post a Comment