This week we are adding a porch sign to our apple themed collection. As always I took my inspiration from some signs that I found online that people have on there real front porches. This time I picked elements from several of those signs and I love the end result.
For out sign base I went with a solid piece this again this month as opposed to one made of narrow strips of wood. I do like to mix it up in that regard and I felt the design I was going to use really would look best on the solid piece. However, after the warping issue we had recently I decided to take every precaution to avoid warping and it worked. This sign didn’t warp at all.
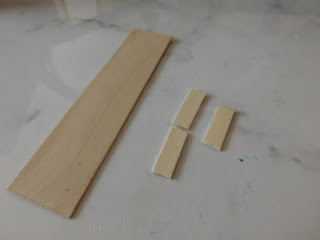
To begin I grabbed two craft-sticks, one was a regular sized one from the dollar store. And the second one was one of the giant ones from Walmart. I do want to talk about safety for just a moment. I see YouTube creators cutting those giant craft-sticks with the miter shears and I really don’t feel that is safe. The shears really struggle with them and I am worried someone will get hurt. I even saw one gal using a pair of scissors to try to cut one the other day. Please don’t do this, use proper tools to cut. If you using that much force to cut with a tool that is not strong enough to cut it, you could do real damage to yourself or someone sitting close by. For the small craft-stick I did use my miter shears, my Easy cutter which I have reviewed on the channel here. For the giant craft-stick I used my X-acto miter box and saw, which I have reviewed here. These are not super expensive tools and can save you a really bad injury. Please be careful when cutting your parts for your projects.
I cut the giant craft-stick around 5” long and I cut 3 pieces of the smaller one that were not quit as long as the giant one is wide. That way they could be glued to the back and act as braces to hold the giant craft-stick flat. I
I used a thick tacky glue for this and allowed it to dry completely before going on to maximize the hold. Also it is important to clamp this step to make sure you have the best bond possible.
Once the glue dries I painted the sign with a brown paint, this will give us a nice color to sand back to later when we age the sign.
Once the brown dried I added a coat of white paint which is the background color for the sign this month.
Once the white dried I used some 320 grit sandpaper to age the sign a bit then drew some guidelines for where I wanted to put my letters. Do all the planning of the lettering with a pencil so it can be erased later.
I penciled in my letters and when I was happy with how they looked I used a fine tip paint marker to write the letters. I find this to be the easiest way to do the lettering by hand. You can work in stages with the letters, get them part way to how you want them then allow to dry and add some more details. Work with them until you are happy.
I let the paint dry overnight at this point since I didn’t want it to smear on the next step which is to erase all the pencil lines that still show.
Once those are gone pencil in the apple for the “o” in the word Welcome and then use some red paint to paint the shape.
Once
dry use the same brown paint to add a stem and also to paint a length
of 1/8” by 1/8” strip-wood brown to use later as our
frame/edging.
Allow to dry then add a green leaf to the apple.
Now cut two pieces of the strip-wood to the correct length for the sides of the sign and glue and clamp in place at the very edges. Allow this glue to dry really well before proceeding so that you don’t move the side pieces trying to fit the ends.
Cut two pieces to fit between the side pieces, I prefer to cut a tiny bit long and sand back to just fit. Glue in place and clamp and allow to dry.
Once the glue is dry use the same brown paint to touch up the edges of the sign and allow to dry.
Once dry use the sandpaper again to age the piece then give it a coat of Mat Mod Podge.
Once dry your sign is ready to display in your favorite mini scene.
As always I do want to sincerely thank all of you for watching my videos and reading my blog posts. It means so much to me that you are supporting me in this way. If I could ask you all to do just a bit more by subscribing to the channel and liking the videos and leaving comments. Those help more than you can imagine. Also if you could pass the links on to your friends I would appreciate it so much.


No comments:
Post a Comment