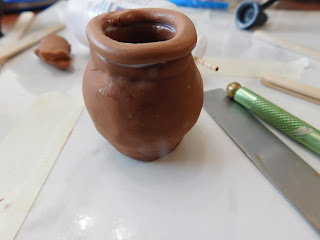
Much like when I make cookie jars I am starting with a strip of card-stock. This time it is Kraft color and 1 ½” wide by around 8” long. You can vary this depending on how tall and wide you want your finished planter to be. The one I made in the video turned out about 1 ½” tall and 1 ½” in diameter. The one I had made earlier that I showed at the end of the video and is also on the porch of the dollhouse is about the same a bit thinner and maybe a hair taller.
I used my clay roller as a tool to roll and glue the paper strip on because it was the correct size and handy. You want something about 1” in diameter for this size pot. Anything with straight sides will work just fine. Be sure to use a thick tacky glue and allow it to dry completely before moving to the next step. I did find I needed to use a paper clip to hold the end of the strip in place until the glue dried.
Once the glue has dried you can start adding clay. I am using some Carmel colored Fimo today both because it is a good color and because I have a bunch of it.
I used a couple of craft-sticks to gauge the thickness of my clay and rolled a sheet of clay. Then cut a strip that covered most of the height of the base and all the way around. This first layer will help us to make the shape of our pot. Use some TLS (translucent Liquid Sculpey) to adhere the raw clay to the card-stock base. Bake at the recommended temperature for 10 minutes and allow to cool to room temperature.
Next I rolled some clay into a long strip using a pair of double craft-sticks. This gave me a much thicker layer and I cut this to a narrower strip that would just go around my pot.
This was placed in the middle with TLS and the edges were smoothed. We are building up the shape of our plant pot. Bake again for 10 minutes.
Now roll out a thin layer of clay that will wrap around the pot and is wider than the pot is tall so you will have some to turn to the inside on the top edge. Using TLS again add this layer on and smooth it in place. This is the layer that will be the outside of your plant pot so make sure you smooth it out really well. Turn some to the inside at the top so that when the pot is finished the inside top looks finished. Cut the bottom edge even and add a thicker bottom to your pot. I found my that my clay cutter that measures 1 ¼” in diameter was the perfect size to cut this. Smooth the seam between the base and the pot.
At this point if you want to emboss a design either with some small rubber stamps or a tool this would be the perfect time.
When you are completely happy with the look of your plant pot go ahead and bake it for 10 minutes again and allow to cool to room temperature.
Once baked and cooled it is time to add the top rim. I stayed simple with mne and just made a snake but you could make a braid or twist 2 snakes of clay together for this. You could also use a tool to emboss a design in the top rim if you wanted to.
At this point you could choose to add some clay designs to the outside of your pot.
Just be sure to use TLS to adhere whatever you add at this point.
Now
it is time to bake a finial time to cure the plant pot. Once cooled
your plant pot is ready to display in your dollhouse landscaping.
Just to give you an idea of how much clay was used here is a picture of both pots I made from this package of Fimo along with the clay that is left. I opened the bar of clay to make these so each one took just under ½ of a regular size block of clay.
As always I do want to sincerely thank all of you for watching my videos and reading my blog posts. It means so much to me that you are supporting me in this way. If I could ask you all to do just a bit more by subscribing to the channel and liking the videos and leaving comments. Those help more than you can imagine. Also if you could pass the links on to your friends I would appreciate it so much.


No comments:
Post a Comment