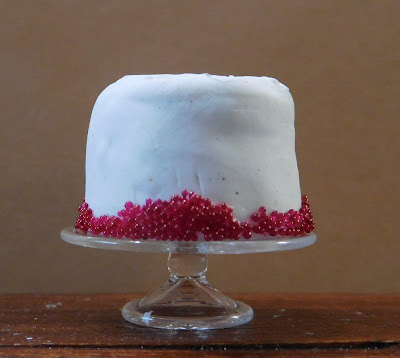
I have a really simple, elegant cake for you to make today. This one was inspired by the picture on the cover of a magazine I got in the mail a few days ago.
Since this will be a display cake we don’t need to have a fancy inside so just use some white(ish) clay to make that part. I used Original Sculpey rolled out using my double thick craft-sticks.
I cut 3 layers using my ¾” round clay cutter
then stacked those together and baked for 30 minutes. Allow this to cool to room temperature before moving to the next step.
Now it is time to create the simple frosting. The one of the magazine was coated in a simple layer of white frosting that has a very pretty swirl design just on the top. For this layer I used a mix of white clay and translucent clay. I had more of the white. I wasn’t trying for a translucent effect I just wanted to soften the white clay to make the swirl easier.
I rolled out a sheet of this white mix using single layer craft-sticks to guide the thickness.
I then added a bit of liquid clay to the top of my cake to act as a glue and placed the cake top down on the sheet of clay.
I added more liquid clay around the sides of the cake and brought the clay sheet up to cover the cake. I cut off the excess and smoothed the layer as much as possible.
I then used a ball tool to add the swirl to the top.
Once I was happy with it I baked it for 15 minutes and allowed it to cool to room temperature.
Now to add the final decoration, I found these tiny no hole beads in my stash. I got them a few years back at the Dollar Tree in the nail art area. They are about half the size of the no hole beads I normally use. I liked the size and I loved the color so I decided to use them.
I used a toothpick to add a very thin bead of Satin Mod Podge around the very bottom edge of the cake then dipped the cake edge in the beads.
Allow to dry, brush off any excess beads and your cake is ready to display.
Here’s a picture I took of the mini cake sitting in front of the cover of the magazine photo that inspired me. How do you think I did? Did I get the cake to look a bit like the one in the photo?
As always I do want to sincerely thank all of you for watching my videos and reading my blog posts. It means so much to me that you are supporting me in this way. If I could ask you all to do just a bit more by subscribing to the channel and liking the videos and leaving comments. Those help more than you can imagine. Also if you could pass the links on to your friends I would appreciate it so much.


No comments:
Post a Comment