Check back often

Have you checked out all my blogs?


Dollhouse Minis: http://joannesminis.blogspot.com


18” Dolls: http://joannes18dolls.blogspot.com/


General Crafts: http://joannes-place.blogspot.com/


Cooking: http://joanne-kitchen.blogspot.com/


Also if for some reason I can't post I will try to give a head's up on the Facebook page so check there too.

Showing posts with label miniature cookie jar. Show all posts

Sunday, October 29, 2023

Dollhouse Miniature Fall Plaid Tablecloth


Watch the video here.


This week for the tutorial we are making a fall plaid table cloth for the dollhouse. I started off camera by creating a table cloth the same way I did in the video you can find here. In that video I show you not only how to make the table cloth that can be draped to look realistic but I talk about how to size it to your table.


This video was supposed to go up on the channel last week and I had all but the end of it filmed when I made a huge error that ruined my table cloth that I couldn’t easily fix. I actually got to the same point twice, making the same mistake. So I decided I needed to build a way to fix that mistake into the project.


So you might be asking what was this mistake. For the plaid design I am using alcohol markers. I use these because they are a medium that won’t run if the table cloth gets wet and are not likely to come off onto other items in our miniature collections. I also find them much easier to work with than paint for adding details. Since I know that I can remove the ink with Isopropyl alcohol I figured that if I made any errors with my design they should be easy to remove. I was very wrong. In both of my first two table cloths I had placed a line in the wrong place and when I went to correct it all I did was make a huge mess. The ink soaked into the fabric so much that it just smeared instead of removing. That told me that I needed to seal the fabric. So I decided to use a coat of white paint on the fabric. Initially I was just going to do that but as I was working on the table cloth for the video I did some testing and decided that I wanted to add the extra precaution of the layer of Mod Podge to further seal the fabric. This way I was able to clean up any misplaced lines as I show later in the video.


I used my normal technique of using tape, sticky side up to hold the table cloth in place while I worked on it. Since I really wanted it to stay in place I used the widest masking tape I could find, and I did add a third strip at the top off camera. I also folded a piece of printer paper to fit under the table cloth that would stick out on the top and bottom. The paper will help my tile that I work on to stay much cleaner. You will also need to have the table cloth attached to a surface that you can rotate to do the lines like the tiles I usually work on.


The first step on the video is to add a coat of white paint to the table cloth surface. I used some white fabric paint simply because I have an entire bottle of that and my white craft paint is getting really low. In the end I do like the color of the paint more than the color of the fabric I had used. They are both white but the paint make a much crisper white color that I was happier with.


Now we can add that coat of Mod Podge, I used Satin in the tutorial mainly because it was on my table and I didn’t have to go find the almost empty bottle of Mat that I had just put away the day before. In my opinion the Mat would have looked better in the end but it is not a big deal the Satin looks good also. Allow the Mod Podge to dry completely.


To make the lines that form my simple plaid I used the Bic alcohol markers that I got at Walmart a few years ago. You could use any alcohol based marker. I have seen a lot of fall table cloths in real size advertised that are teal and orange and I find them so pretty so those are the colors I went with. Specifically the color names are- Hot Aqua and Sunset Orange.


Start by marking the center point of each edge on the tape/paper that is under the table cloth. 


Then pick which color you want to start with and make a line across the middle lined up with the marks you made. Be sure to stop and stop all the lines off the table cloth, this will prevent getting a blob of ink at the points you started and stopped. Working from the center line to the top edge make lines ½” apart. Then turn your surface the table cloth is attached to 180° and work from the center line to the opposite end of the table cloth. 


Now turn the project 90° and repeat the same steps to put lines across the table cloth. Again working from the middle to one edge, turn the project and work to the other edge.

Now you should have a table cloth with a grid of one color of lines. In my case the Aqua color.


Once the first set of lines is in place it is time to add the second color in my case the orange. To do this starting again in the center add a line ¼” away from the middle line and work to each edge just like before. This way your second color lines will be alternating with the first set forming our very simple plaid design.


Once the ink is dry which will be pretty quickly remove the table cloth from the tape and do any trimming needed.


At this point in the video I show you how to correct any mistakes and why I sealed the fabric like I did. 


As you can see where I sealed the fabric with both the paint and the Mod Podge it was easy to remove the ink so if I had made a mistake I wouldn’t had to start over like I did when I didn’t seal it.


Now on to putting the table cloth onto the table which I also showed in the original tutorial for the table cloth in more detail than I did on this one.


And now let’s see a few options for the table with the table cloth and various projects we’ve made on the channel in place on the table for a scene in your dollhouse or room-box.


As always I do want to sincerely thank all of you for watching my videos and reading my blog posts. It means so much to me that you are supporting me in this way. If I could ask you all to do just a bit more by subscribing to the channel and liking the videos and leaving comments. Those help more than you can imagine. Also if you could pass the links on to your friends I would appreciate it so much.

Sunday, November 13, 2022

Dollhouse Miniature Santa’s Hat Cookie Jar


Watch the video here.


I want to preface this post by saying that yes, this cookie jar is a bit larger than I normally make. I did that because I was watching something the other night and in the background of a scene of a kitchen there was a larger than normal cookie jar. I loved how it took center stage in the background and looked so important. If you want to keep yours smaller just use thinner layers of clay in building the hat shape.


We start the cookie jar like pretty much all the others we have made, with a card-stock core or base. This is made from a strip of white card-stock that is ¾” by 4” and is rolled around a Sharpie type marker and glued to form a tube. This allows us to have a sturdy base to build our cookie jar on and it also gives the inside of the cookie jar a nice finished appearance.


I do highly recommend using a thick tacky glue for this step and then allowing the glue to dry really well (overnight is probably best) This way the glue will not let go in the oven. At least that is what has worked best for me on these. The only time this method didn’t work for me was when I tried to rush and didn’t give the glue enough time to dry completely.


Once the glue on the card-stock base has dried we need to add a very thin layer of white polymer clay. This will give us a nice base to build our cookie jar on. For this I used Liquid Sculpey in White. I would much rather of used TLS (Translucent Liquid Sculpey) but I am almost out and couldn’t get any the last time I shopped.


Once you have the outside of the base covered including a bottom added bake for 10 minutes at the temperature recommended on your clay. We also need to make a small disk of clay that will fit inside the top of the cookie jar to form the lid on. Bake your pieces for 10 minutes and allow to cool to room temperature before moving to the next step.


Now the fun part we turn this base piece into Santa’s hat. Start by building out the bottom of the jar with a thin snake of red clay. Use some liquid clay to attach it. Once you are happy with this step you will want to bake it for 10 minutes to set everything in place.


Now add a bit more red clay to even out the shape then cover with a thin sheet of clay again using some liquid clay as a glue. Smooth this out to look like a nice hat, remember the real hat would have a few folds but you don’t want it look like Santa forgot to iron his outfit.


Since I normally use a bit of cornstarch on my fingers when smoothing out my clay and that would not work with this red clay I used my other favorite method. I simply used a bit of Rubbing Alcohol to wet my finger tips and then I could easily smooth the clay out with no problems. The big draw back with this method is it is sooo messy. That is why I use the cornstarch when possible. Bake the cookie jar for another 10 minutes and allow to cool to room temperature.


Now is the time get the top (and bottom if needed) of the cookie jar evened out. For this just rub it on a piece of sandpaper to smooth both surfaces.


Now we can create the lid of the cookie jar, this is going to be a multiple step process. Start by making a small flat disk of red clay that will sit nicely on top of the cookie jar opening. Once you are happy with the size and shape use some more liquid clay to attach that white clay disk we made earlier and bake for 10 minutes.


Now we can build up the point of the hat on the part we just made it is up to you if Santa’s hat stands up straight or if it folds to one side. Smooth it just like for the hat and when you are happy bake it for 10 minutes.


Now we can add the white fur trim. This is simply a band of white clay at the very bottom of the cookie jar (don’t forget the liquid clay) then texture with a toothbrush. Add a small ball tot he tip of the hat and texture it also. Bake for 10 minutes.


Once cooled to room temperature add a very thin coat of Satin Mod Podge and allow to dry. Now you cookie jar is ready to display in your dollhouse kitchen or maybe a mini kitchen or Christmas shop.


As always I do want to sincerely thank all of you for watching my videos and reading my blog posts. It means so much to me that you are supporting me in this way. If I could ask you all to do just a bit more by subscribing to the channel and liking the videos and leaving comments. Those help more than you can imagine. Also if you could pass the links on to your friends I would appreciate it so much.

Sunday, October 23, 2022

Dollhouse Miniature Scarecrow Cookie Jar


Watch the video here.


We start the cookie jar like pretty much all the others we have made, with a card-stock core or base. This is made from a strip of white card-stock that is ¾” by 4” and is rolled around a Sharpie type marker and glued to form a tube. This allows us to have a sturdy base to build our cookie jar on and it also gives the inside of the cookie jar a nice finished appearance.


I do highly recommend using a thick tacky glue for this step and then allowing the glue to dry really well (overnight is probably best) This way the glue will not let go in the oven. At least that is what has worked best for me on these. The only time this method didn’t work for me was when I tried to rush and didn’t give the glue enough time to dry completely.


Once the glue on the card-stock base has dried we need to add a very thin layer of white polymer clay. This will give us a nice base to build our cookie jar on. For this I used Liquid Sculpey in White.


Once you have the outside of the base covered including a bottom added bake for 10 minutes at the temperature recommended on your clay. We also need to make a small disk of clay that will fit inside the top of the cookie jar to form the lid on. Bake your pieces for 10 minutes and allow to cool to room temperature before moving to the next step.


Now onto making our cookie jar look like a scarecrow. I decided to keep this one pretty simple. For the color of the jar part of the cookie jar I am using Fimo Soft in Sahara. This is a light beige color clay you can use any similar color. Roll it thin and cut a strip to cover the jar. Use some more of the liquid clay to attach this layer to our already baked layer. Do keep the layer thin so the cookie jar stays a nice shape. Trim the beige clay to make a nice neat covering. Once you are happy with this layer you can add some details to the bottom edge to make it look more like gathered fabric. You can use any tool to this even a toothpick would do nicely. Once you are happy with it bake for 10 minutes and allow to cool.


Now we can begin working on the lid/hat for this I am using some Sculpey III in Hazelnut. I rolled I out using my craft-sticks to get a nice even layer. I then cut a circle with my 1 ¼” round clay cutter. This will form the brim of the hat. 


I want the hat brim to come down a bit over the top of the cookie jar so that is why I am cutting it this size. Use some more of the liquid clay to attach the round disk of clay we made earlier. Work with the edges of the brim to give it a nice shape and then bake if for 10 minutes. Allow to cool.


Now for the rest of the hat. I used more of the same clay and formed a cone shape. This was then added to the top of the brim with more liquid clay. It was then worked with until it covered the brim and looked like a hat. You could texture the hat at this point if you wish. The hat will need to bake for about 20 minutes.


For the face I decided to use my liquid clay with oil paint for painting the features. You could use craft paint if you wish. I feel with the liquid clay makes the lines I painted stand out a bit and just give a nicer look.


I mixed small dots of the liquid clay with oil paints to create black (using lamp black), white (using titanium white), and orange (using Vermilion red mixed with lemon yellow). 


I then used both a small dotting tool and a toothpick to paint on the features.


I did stop before adding the eyelashes and baked the face for 10 minutes to cure it.


Then I could paint on the lashes with out smearing the parts I had already painted. Bake3 for 10 minutes one final time when you are finished with the paint.


Now a thin coat of Satin Mod Podge will give the cookie jar a nice subtle shine and make him look finished.


As always I do want to sincerely thank all of you for watching my videos and reading my blog posts. It means so much to me that you are supporting me in this way. If I could ask you all to do just a bit more by subscribing to the channel and liking the videos and leaving comments. Those help more than you can imagine. Also if you could pass the links on to your friends I would appreciate it so much.


Sunday, September 4, 2022

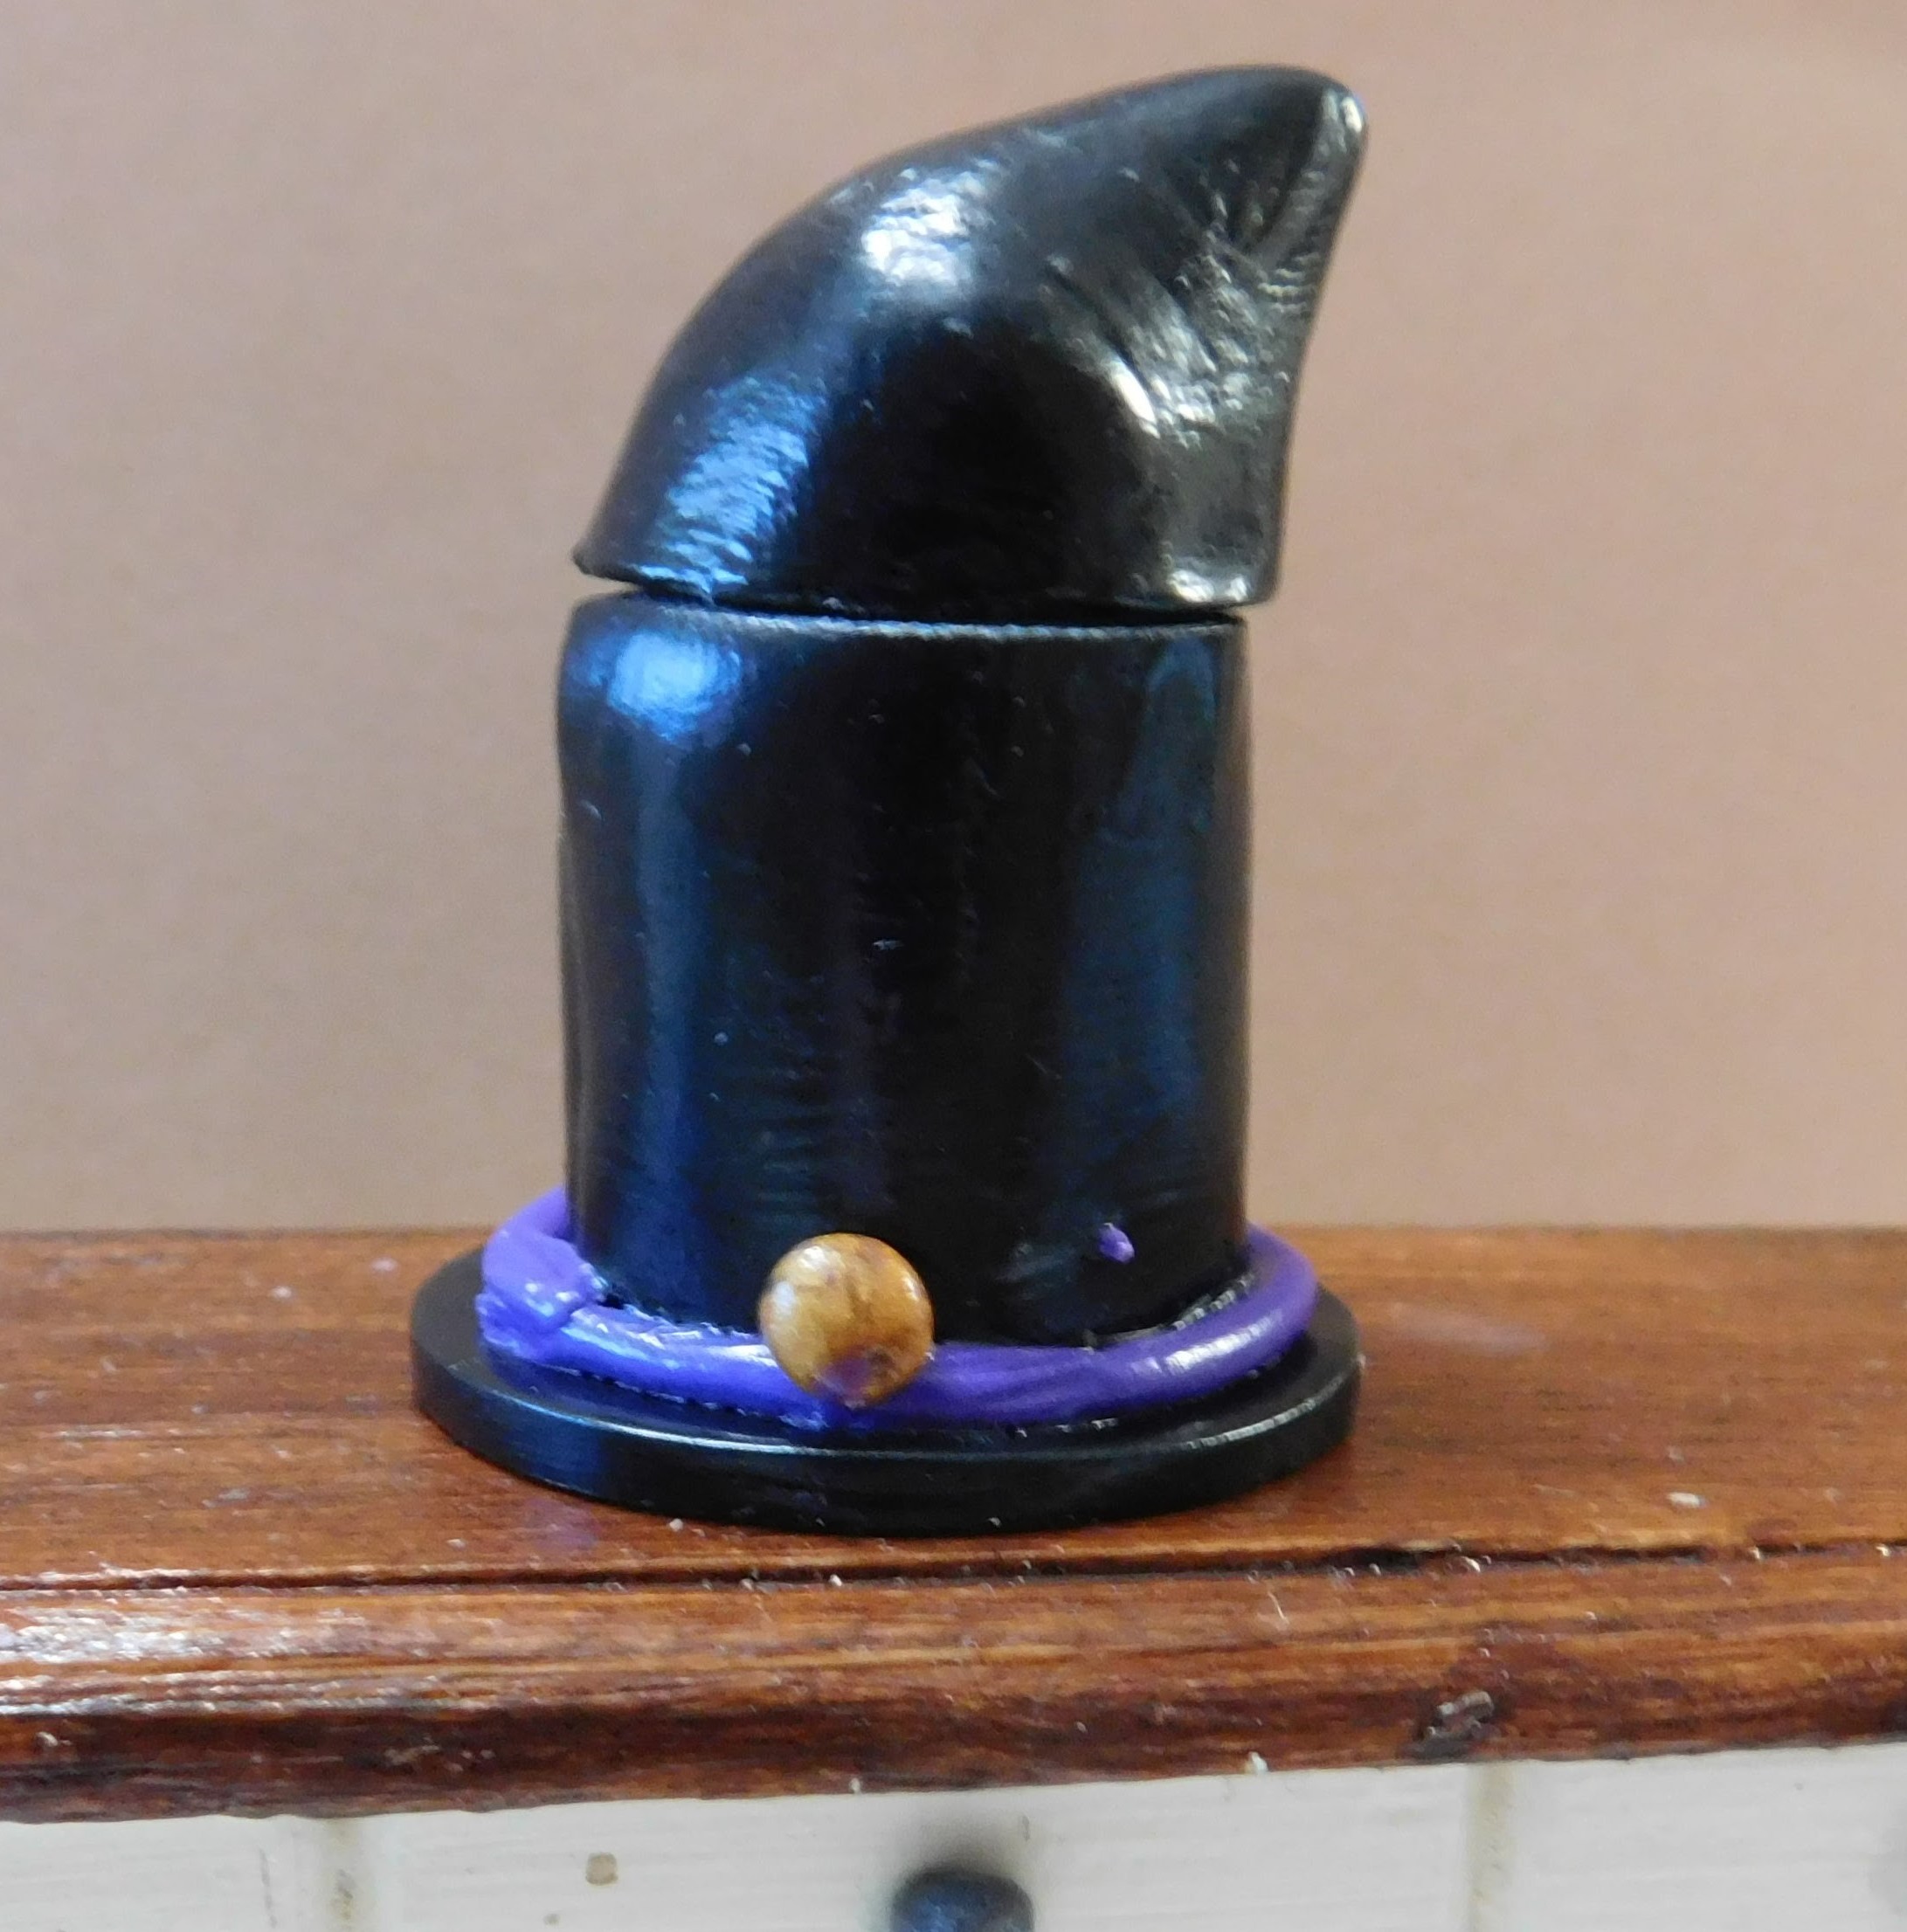
Dollhouse Miniature Halloween Cookie Jar


Watch the video here.


We start the cookie jar like pretty much all the others we have made, with a card-stock core or base. This is made from a strip of white card-stock that is ¾” by 4” and is rolled around a Sharpie type marker and glued to form a tube. This allows us to have a sturdy base to build our cookie jar on and it also gives the inside of the cookie jar a nice finished appearance.


I do highly recommend using a thick tacky glue for this step and then allowing the glue to dry really well (overnight is probably best) This way the glue will not let go in the oven. At least that is what has worked best for me on these. The only time this method didn’t work for me was when I tried to rush and didn’t give the glue enough time to dry completely.


Once the glue on the card-stock base has dried we need to add a very thin layer of white polymer clay. This will give us a nice base to build our cookie jar on. For this I used Liquid Sculpey in White. I would much rather of used TLS (Translucent Liquid Sculpey) but I am almost out and couldn’t get any the last time I shopped.


Once you have the outside of the base covered including a bottom added bake for 10 minutes at the temperature recommended on your clay. We also need to make a small disk of clay that will fit inside the top of the cookie jar to form the lid on. Bake your pieces for 10 minutes and allow to cool to room temperature before moving to the next step.


Now we can make this cookie jar look like a witch’s hat. We start by adding a thin layer of black clay. I used some Premo in Black this time. I rolled it out very thin and used some TLS (Translucent Liquid Sculpey) to attach it. I am almost out of the TLS and any only using it where I really feel I need to until I can get more clear/translucent liquid clay. Trim this black clay as best you can on both the top edge and the bottom. Also work on the seam with your fingers to smooth and minimize it. Now roll out some more of the black clay using a couple of craft-sticks to get a nice even thickness for the brim. I used my round clay cutter that is about 1” in diameter. Use a bit more TLS to attach this part and make sure your cookie jar is centered on the brim.


Back for 10 minutes at the temperature recommended for you clay and allow to cool.


Now that the main part of the cookie jar is baked we might need to even up the top edge. To do this tun it upside down on a piece of coarse sandpaper and carefully remove any un-eveness from the top edge. Be very careful to hold your cookie straight up and down while doing this.


Now use some more black clay to make the pointed part of the hat that will serve as the lid to our cookie jar. To do this start with a ball of clay and work with it until you like the shape. I like to place a small piece of parchment paper over the top of the cookie jar and really make sure the lid is the correct size and shape. Once you are happy with the lid bake at the recommended temperature for your clay for 20 minutes. We want to be very certain we get the clay all the way in the middle of the piece baked. Allow to cool to room temperature.


If needed even up the bottom of the lid with your sandpaper just like for the cookie jar. Now cradle the lid upside down in some foil to keep it level and use some TLS to attach the little piece we formed from the white clay.


At this point we can add trim to the cookie jar also. I used some purple Fimo to form a thin snake that would go all the way around the hat where it meets the brim to form a hat band. I also made a tiny ball of gold metallic Premo as a bit of a decoration.


I decided to forgo the liquid clay on this step because I didn’t think I could apply it so that it would not show on the finished cookie jar. Even the TLS will show up against the black. Since this piece is in a rather protected area and the purple clay goes all the way around and meets itself I am fairly sure it will be fine.


Bake both pieces for another 10 minutes at the recommended temperature and allow to cool to room temperature.


The last step is to apply a thin even coat of Satin Mod Podge to the outside of the cookie jar. This will not only add a nice finish but also give me a tiny bit more insurance that the purple band won’t come off later. Allow to dry.


And there have the newest addition the cookie jar collection. 


As always I do want to sincerely thank all of you for watching my videos and reading my blog posts. It means so much to me that you are supporting me in this way. If I could ask you all to do just a bit more by subscribing to the channel and liking the videos and leaving comments. Those help more than you can imagine. Also if you could pass the links on to your friends I would appreciate it so much.

Sunday, August 14, 2022

Dollhouse Miniature Apple Cookie Jar


Watch the video here.


We start the cookie jar like pretty much all the others we have made, with a card-stock core or base. This is made from a strip of white card-stock that is ¾” by 4” and is rolled around a Sharpie type marker and glued to form a tube. This allows us to have a sturdy base to build our cookie jar on and it also gives the inside of the cookie jar a nice finished appearance.


I do highly recommend using a thick tacky glue for this step and then allowing the glue to dry really well (overnight is probably best) This way the glue will not let go in the oven. At least that is what has worked best for me on these. The only time this method didn’t work for me was when I tried to rush and didn’t give the glue enough time to dry completely.


Once the glue on the card-stock base has dried we need to add a very thin layer of white polymer clay. This will give us a nice base to build our cookie jar on. For this I used Liquid Sculpey in White. I would much rather of used TLS (Translucent Liquid Sculpey) but I am almost out and couldn’t get any the last time I shopped. I am trying the white version out today for the first time.


Once you have the outside of the base covered including a bottom added bake for 10 minutes at the temperature recommended on your clay. We also need to make a small disk of clay that will fit inside the top of the cookie jar to form the lid on. Bake your pieces for 10 minutes and allow to cool to room temperature before moving to the next step.


Now we are going to start making this cookie jar look like an apple. I wanted a stem to act as a handle on the lid and I wanted mine to be brown. I simply grabbed some brown clay from my scrap clay bag to use for this. You could use any color you wish for this step. Simply make a small snake and cut a small piece to act as the hand handle. We are making this now so it can be baked and ready for us when we are ready to use it.


It is also time to add a layer of red clay to the cookie jar. Any red will do for this I used Sculpey III in Red Hot Red. I find it does behave well for most projects and stays fairly close to its raw color when baked. To add this layer we will once again need to use the liquid clay. After I added the red layer I found the layer to be just too soft to be able to get it to cooperate so I put it in the freezer for 15 minutes to help solidify it and make I much easier to work with. Once I was happy with the start of the shape I had I added a thin layer of red clay to the outside to both help cover the white liquid clay and to also help be refine the shape a bit better. Once you are happy with the shape bake your cookie jar at the recommended temperature for your clay for 15 minutes to make sure it is cured all the way through.


At this point I used a piece of 80 grit sandpaper to sand the top edge of the cookie jar smooth. I was certain I had turned on the camera but when I went to edit that clip was missing. Sorry. Anyway all I did was lay my piece of sandpaper flat on my work surface and carefully moved the cookie jar over it until the edge was just how I wanted it. We will do the same thing with the lid too.


Once this is done use something to protect the top of your cookie jar and using some more of the red clay form a half ball to fit the top for a lid. I used a scrap of parchment paper to do this. You can form it to the shape of your apple this way and with the protective layer will keep stains from being transferred to the top edge, it will also keep the two layers from sticking together. Without the protective layer you are apt to misshape your lid removing it to bake it.


Once formed use a tool to make a dip in the top where the stem will be placed. Work on the shape so the top edge has a nice curve. Then dip the stem end into whatever liquid clay you are using and place it in place. Bake this at recommended temperature for 15 minutes and allow to cool.


Once cooled you can use the sandpaper to flatten the bottom of the lid to make it nice and flat.


Now I used some green clay to make 2 very simple leaves to add to the top of the lid. Use just a touch of the liquid clay to stick them and bake again for 10 minutes (you just need to cure the leaves and the little bit of liquid clay this time)


Now we need to cradle the lid upside down so it will remain sitting flat for the next step. I use a bit of foil made into a ring. If the lid doesn’t sit flat for this next step your little white piece we made in the first step could slide off center. Add a dot of liquid clay to the bottom of the lid and being careful to center it add the little disk of clay we made at the beginning of the process. This little bit of clay will help the lid of your cookie jar stay in place while it is displayed rather than sliding off with every little bump.


Bake for 10 minutes and allow to cool to room temperature.


Now we can touch up that white area left from our liquid clay. I simply used a small brush and painted on some brown craft-paint to cover it.


Now a very thin coat of Mod Podge or other sealer will make you cookie jar look like a ceramic cookie jar rather than a blob of clay. I used Satin this time because I felt a little less shine on this one would look nice.


There you have it another addition to the cookie jar collection.


As always I want to thank plaid for the brushes and Mod Podge used in this video..


As always I do want to sincerely thank all of you for watching my videos and reading my blog posts. It means so much to me that you are supporting me in this way. If I could ask you all to do just a bit more by subscribing to the channel and liking the videos and leaving comments. Those help more than you can imagine. Also if you could pass the links on to your friends I would appreciate it so much.