Check back often

Have you checked out all my blogs?


Dollhouse Minis: http://joannesminis.blogspot.com


18” Dolls: http://joannes18dolls.blogspot.com/


General Crafts: http://joannes-place.blogspot.com/


Cooking: http://joanne-kitchen.blogspot.com/


Also if for some reason I can't post I will try to give a head's up on the Facebook page so check there too.

Wednesday, July 31, 2024

Dollhouse Miniature Unicorn Toy Makeover


Watch the video here.


This week while I was thinking about what to do for the Midweek Video I remembered that I had gotten some items in some blind bags a while back that I had set aside to do makeovers on. So I pulled out the container where they are and found this little unicorn. I immediately thought of a stuffed unicorn and decided to show how to do just that. Now this will work in any little plastic figurine, it doesn’t have to be the same as what I did. Look through your stash for any little figurine that you want to turn into a “stuffed” toy for the dollhouse kids.


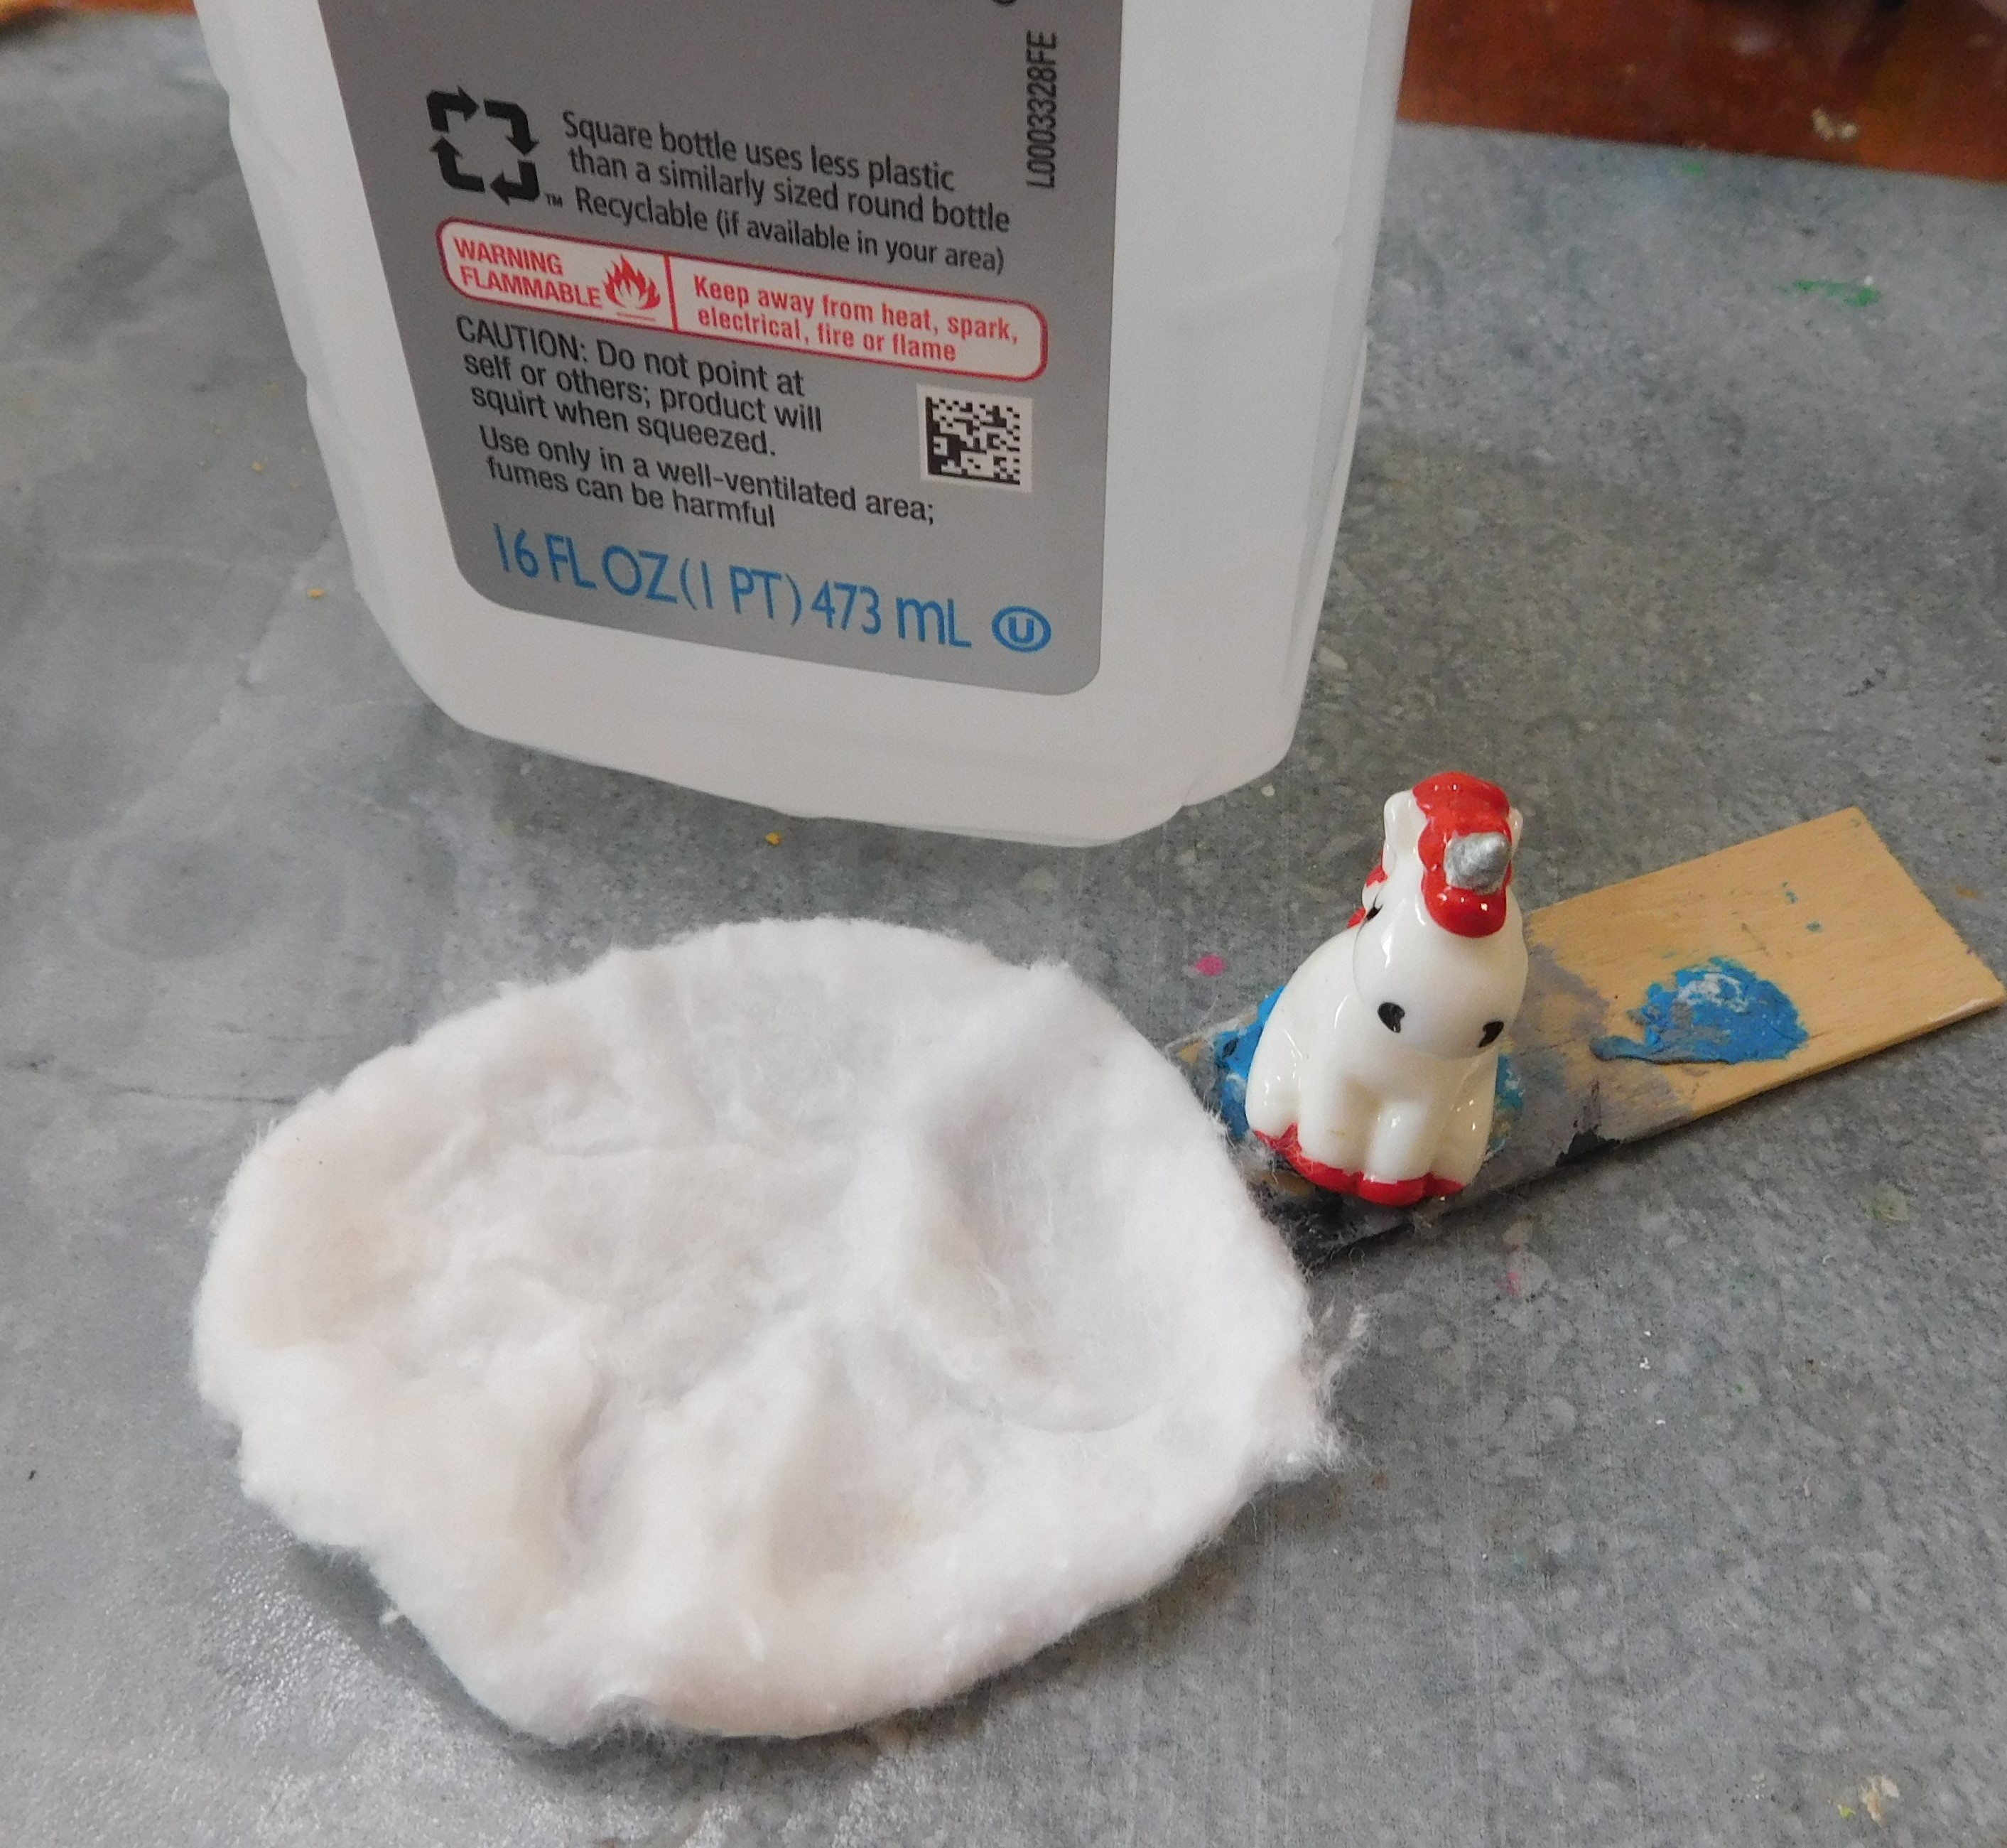
Since the item we are working with is so small it is really important to add a “handle” to help hold onto it with. I like to use some of that stuff that is sold to hang posters up with to stick the item (in this case my unicorn) to a piece of craft stick. Once in place use some Isopropyl alcohol on a cotton pad or cotton ball to clean the surface. We want to clean off any oils or debris that might be on the surface that could cause the glue in the next step to not stick. It is really important to not touch this again with your fingers until after the flocking is on and set. Let the alcohol dry.


Next I added a coat of tacky glue to the surface of the unicorn, trying to stay off the horn. (I want to make the horn look like gold vinyl) Do your best to brush on an even coat and check for missed spots. Once you are happy with coverage cover the glue with some white flocking. I am using the brand Fun Flock because that is what I have. Any brand of white flocking with work. If you don’t have any it is normally sold with the card making supplies. I believe the people that do model cars also use something similar on upholstery to give a similar texture.


Once you feel you have given the glue time to dry carefully remove the excess flocking. I just start by gently shaking it off then use a soft brush to gently brush off the remaining excess. The key word here is gently. Look over your piece and check for areas that are not covered in flocking that should be. If you missed spots add a small drop of glue and add more flocking, allow to dry and brush off excess. Once you are happy let the figurine set out to completely dry. The glue tends to not dry all the way until you remove the excess fluff and let the air get to it.


Once the glue is completely dry it is time to add some paint. I first base coated the unicorn’s horn with some golden yellow color paint. Then I coated all the flocked area with a thin coat of white paint. Allow the paint to dry. I have found that the first coat of paint over the flocking takes a very long time to dry so be patient.


Once dry it is time to add some details back to our little stuffed animal. I started with some pink where the hooves were and then added some pink to his mane. I also added some light lavender and blue paints to his mane. If I had more time I would have probably done more details but for the videos I try my best to balance the details with the how long that would make the video. Let this paint dry.


Next I added some metallic gold paint the unicorn horn and some tiny eyes with a dot of black paint in the appropriate places.


I decided that I wanted both more shine and more depth to the eye so I carefully added a tiny dot of black nail polish over the black dot. Allow this to dry.


As always I do want to sincerely thank all of you for watching my videos and reading my blog posts. It means so much to me that you are supporting me in this way. If I could ask you all to do just a bit more by subscribing to the channel and liking the videos and leaving comments. Those help more than you can imagine. Also if you could pass the links on to your friends I would appreciate it so much.


Sunday, July 28, 2024

Dollhouse Miniature Succulent Chair Part 1


Watch the video here.


Early last week when I was looking for ideas for today’s video I noticed a bunch of succulent chairs on my Facebook feed. I hadn’t noticed them before and they caught my eye because they were so pretty. So I decided to do some image searches which lead to some DIY videos on how to make these in real life and that is how we got to today’s project.


In my stash of stuff to work with was this sad little chair. I got it a couple of years ago at Dollar Tree. I had been in a hurry and grabbed several packages of their dollhouse furniture to use for tutorials. I noticed when I grabbed it that this chair was a bit off. It wasn’t until I got home and really looked at it that I realized just how off that was. I did have a plan for it but I never found anything to make that work so this chair has sat in a box in my craft storage for all this time just waiting.


So today we are going to dig out a messed up chair from our mini stash and create a centerpiece for the doll’s garden. I have seen photos of these chairs in gardens, on porches, in flower beds, on porches and even inside of homes and businesses. So this can go almost anywhere.


To start I just gave the chair a basecoat of a white craft paint. This way I had something to sand back to later and I knew it would allow me to just do one coat of the colored paint in the next step. Don’t be overly careful with this coat for the most part it won’t show, if you miss spots don’t worry about it.


Next add a coat of whatever color paint you want your chair to be. I picked this bright blue color. Again this coat of paint doesn’t have to be really well done. If you miss spots don’t worry about it. We are going to be sanding back in areas in the next step. One place I did make sure was covered was the detail on the legs. That way I can sand back the higher areas and there will still be paint in the more recessed parts of the leg design.


Once your paint is dried use a piece of sandpaper to really add some age to the chair. Take off as much or as little paint as looks right to you. Be sure to hit those areas that get the most wear- edges of the seat, the legs, the back, anywhere on the chair that people would have rubbed on the chair in normal use.


Now for one of my favorite parts of aging anything, adding the grime. For this I used a thicker medium to darkish brown paint, I just a cotton swab to both apply it and to rub off excess. (I also used a paper to towel to remove and blend some) The idea is to add this paint in any areas that would get dirty in real life. Again think about where people would touch the chair. The spots that would get stuff spilled or be in contact with dirt. The area where the seat meets the back and the bottoms of the legs are good areas to do this step on as well as the seat. Allow this paint to dry.


Next I added a thin coat of Mat Mod Podge just to set all the work I’ve done up to this point. I really like how the aging looks and I don’t want to loose what I’ve done. This is optional though and you could skip this step if you wish.


Next I wanted to add what looked like the potting soil that comes through the seat. On some of the real chairs I saw they had removed the center of the seat, lined the area with chicken wire, added one of those liner things and filled that with potting soil. This step is to add that part beneath the seat.


Start with a piece of some kind of foam and cut a shape that will fit the bottom of the chair between the legs that is rounded on the bottom and flat on the top.

Now to replicate the chicken wire texture. I had one of those little stretchy bags that you get fresh garlic in at the grocery store. It is the perfect texture to make this look like it is covered in the chicken wire. The biggest problem was getting it glued in place. I started with tacky glue but while it held a little it wasn’t strong enough. So I ended up using super glue. Lots of super glue. And you guys know how much I hate super glue. But it worked and that was the important part.


Once the glue is dry paint this part with some brown paint. I used the same paint I had used earlier. Allow to dry.


Once the paint dries glue the “soil” to the bottom of the chair. I used my Shoe Goop because my almost new tube of e6000 is still missing in my craft storage room. I remember thinking that I was putting it in a place that “made sense” I still have no idea where that place was….. Anyway use any glue that will hold the soil to the bottom of the chair.


Several of the chairs I have seen online have what appears to be a sheet of moss laying over the back of the chair. I thought that was really pretty and I am hoping it kind of distracts the eye from how thick that chair back is at the top. To make it I am using some cotton fabric (unbleached muslin) I measured and decided to make my moss sheet ¾” by 2” for my chair.


Using a pencil I marked this area on a piece of the fabric. Now brush some Mod Podge inside of the shape you just drew making sure to stay inside the lines but fill it in really well. Now I used some dry herbs and sprinkled them over the Mod Podge. These are just expired dry herbs from the kitchen. Whenever I am changing out a container of dry herbs I dump what I have left in the old container into this zip-lock bag and keep them to use in crafting. Pat the herbs down into the Mod Podge and allow to dry.


Once dry use a variety of green paints to stipple paint the surface of the herbs. This will not only color this to make it look like it is not old dry herbs but it will also help to seal the leaves down. Allow to dry.


I like to now seal the moss mat with a coat of Mat Mod Podge. This will seal everything down and help to discourage any tiny critters from snacking on our project. Allow to dry most of the way.


Now cut the moss mat along the lines you drew and glue it in place on the back of the chair.


This seems like a good place to stop for this week. The video is already pretty long at this point and we are in the midst of a heatwave so I need to stop for the day.


Next week the plan is to create some plants and maybe other decor to put into/onto the chair. Hopefully we will get the chair finished next Sunday.


As always I do want to sincerely thank all of you for watching my videos and reading my blog posts. It means so much to me that you are supporting me in this way. If I could ask you all to do just a bit more by subscribing to the channel and liking the videos and leaving comments. Those help more than you can imagine. Also if you could pass the links on to your friends I would appreciate it so much.


Wednesday, July 24, 2024

Dollhouse Miniature- Ink Swatch Cards


Watch the video here.


As you might remember I purchased some UV resin a while back and I have been using it the last month or so. I am in love with it and I think we are going to be able to some really cool stuff with it. At the same time I purchased some bottles of pigment ink (I am assuming they are pigment ink, they just say pigment on the label) And I have to admit until this week they had sat in the box they came in untouched. I think I was a bit intimidated by them. Remember the entire UV resin world is new to me. So I decided it was time to dive into those little bottles and see what I have.


Since I really prefer to work from actual swatches over trying to guess colors that are contained in bottles I decided I wanted to create some swatch cards. I did have to try a couple of ideas in order to come up with what I think is a good option. To be absolutely honest, this is the 2nd version of the swatch cards, I filmed another idea yesterday and as I was finishing up figured out his much better method. So this morning I started from scratch.


In order to get ready I did open all the ink bottles off camera. This was a tedious process but I watched a couple of videos and got them all opened. If you get similar inks you will need a pin of some kind to pierce the top.


I have 24 colors of the inks, and since I decided to use some index cards as the base for the swatch cards I could easily get up to 10 swatches on each card. So I needed to create 3 cards.


I sorted the inks by color and decided to make the following groups.


Card 1- reds, oranges, and yellows.

Card 2- greens, blues, and purples.

Card 3- black, gray, white and browns.


To create each swatch-


I am working on aluminum foil because neither the ink or the resin will soak into it. Also be sure to wear your gloves while working with resin.


First step was to put out a small amount of resin on my foil. This I made sure to keep covered with a cup whenever I wasn’t dipping into it so it would stay workable.


Next I put out a dot of the ink on the foil. Be sure to shake the ink in the bottle before using it.


Now a single dot of UV resin on my swatch card.


I dipped a toothpick into the first amount of resin to pick up just a bit.

I mixed this small amount of resin into my drop of ink.


Then I carefully mixed this combination into the drop of resin on my swatch card.


This was then cured with my UV light.


I wrote the color name next to the color swatch.


The process I am describing is what worked the best for me, feel free to try doing it differently if this doesn’t feel like it is working for you.


I did find that once I got my system down I was able to do about 3 swatches and cure them all at one time. This saved a lot of time. More than 3 and I found that the color bled a bit into the card at the edge of the swatch.


I did want to show you something I found interesting about the inks in the bottles. I guess it goes with the whole you get what you pay for adage. I noticed that the bottles of ink were not all full. I took pictures of each group of bottles from the back to show you the variation in fill levels. Keep in mind at most I have used 3 drops from each bottle. Most have just had 2 drops taken out. So they were definitely not all full when they arrived.


As always I do want to sincerely thank all of you for watching my videos and reading my blog posts. It means so much to me that you are supporting me in this way. If I could ask you all to do just a bit more by subscribing to the channel and liking the videos and leaving comments. Those help more than you can imagine. Also if you could pass the links on to your friends I would appreciate it so much.


Sunday, July 21, 2024

Dollhouse Miniature Sailboat Wall-art


Watch the video here.


I have another free pattern for you to download so you make the project. You can find the file here. In the download there are 3 files: a PDF for hand-cutting of the pieces, a PNG to use with your electronic cutting machine and a text file with handy hints and tips (and the sizing information) to use the PNG.


As with most of these projects I cut all the pieces from medium weight white card-stock, the kind used to make cards and such. This is way more economical than having to purchase a bunch of colors and in my experience the paint colors are a lot more stable than the paper colors. I rarely get noticeable fading with the painted projects.


You are free to use the pattern as many times as you wish and even to sell the finished project. But, please don’t give away or sell my patterns. I spend a lot of time creating them and the only compensation I get is from people watching the videos and checking out the blog post. I really want to keep offering these for free so please if someone else wants to make one send them to the video and blog so they can get their own copy of the pattern.


I designed this project to be a quick and easy one. It is really humid where I live and my paints and glues are not drying very well so I didn’t want a project that was going to have to be rushed. This one has just a few pieces and since it is put together in layers the glue dried quickly. With only one paint color that was also a bit quicker and then the thin layer of finish. So you can get this one done in a much shorter period of time.


So we only have two pairs of pieces (a circular frame and a sailboat in a frame) the other piece to cut out is the outer frame strip. Set the strip aside and glue the two pairs together being careful to line up the edges. Be very careful of the area where the sail attaches to the boat. This tiny piece is very fragile and we will be adding some strength to it in the next step. All this glue to dry.


 Cut a very tiny piece of wood, I used the tip of a flat toothpick, and glue it to the back of the sailboat behind the mast that holds the sail. This will hide back there and keep the sail on the sailboat. 


Next add some glue to the back of the frame unit and glue this to the front of the sailboat unit. Set this aside to dry completely.


The next step is to add the long strip that will be our outer frame for the art piece. This is really simple. Start by running the strip through your fingers to get it to start curling a bit. Then add glue to the inside of the strip and carefully place it around the round art piece. Once you get started the strip will stand up nicely. Make sure it is up against the round piece all the way around and the sides are standing up straight. Then allow the glue to dry.


Now on to the single coat of paint. I chose black because I want mine to look like wrought iron, you could make yours any metal like color you wish or add colors to make it more of a painted piece. Allow the paint to dry.


Now just a thin even coat of Mat Mod Podge to all sides and allow this to dry.


And there we have another beachy/ocean theme decor piece for the dollhouse. I love it on the porch and I think Mrs. Doll does too.


As always I do want to sincerely thank all of you for watching my videos and reading my blog posts. It means so much to me that you are supporting me in this way. If I could ask you all to do just a bit more by subscribing to the channel and liking the videos and leaving comments. Those help more than you can imagine. Also if you could pass the links on to your friends I would appreciate it so much.


Wednesday, July 17, 2024

Dollhouse Miniature Exterior Floor Cube Side 3


Watch the video here.


This week I decided to add another side to our exterior flooring cube. This time my inspiration was the texture on the roll of paper towels that sits on my work table. I have been looking at I for a couple of days thinking it looks kind of like some of the textured concrete patios I have seen pictures of. I just wasn’t sure how well the texture would hold up to turned into floor. I am really happy with the result and I hope this inspires you to try something different in your next project.


The paper towel that I used in the project is from a roll from Dollar Tree, I get the rolls with the most sheets to keep on my work table. But check whatever brand you have on hand.


I did find that the half sheet is exactly the right width for my cube so that was nice. To attach I used a thin coat of mat Mod Podge. I want to stress that I am using thin coats of any liquid on this project to help preserve the texture that inspired me. The wetter the paper towel gets the more chance of loosing the texture. So apply a thin coat of Mod Podge and carefully smooth the paper towel in place. Set it aside to dry.


Once dry trim the long flaps away and add another very thin coat of the same Mod Podge. This coat will not only seal the surface it will hopefully give the texture a bit of strength. Allow to dry again.


Once dry it is time to add some color to the surface. I picked 4 colors of craft paint, 3 grays and a very gray blue. A small amount of each color was put out on my “palette”. I then used a stencil type brush to pounce the paint onto the surface. This way my brush hits a different mix of the colors each time I get more paint. 


The colors combine but stay separate at the same time and the variation in color is much better. The result is a blend of all the colors and every color in between and I love it. Allow the paint to dry and add a bit more in any areas that just don’t look the way you want them to. Then allow to dry completely.


Finish the surface with another coat of Mat Mod Podge and allow to dry.


Once the Mod Podge is dry use a piece of sandpaper to neaten up the edges of the cube.


So another side of our exterior floor cube is done and I love this one.


As always I do want to sincerely thank all of you for watching my videos and reading my blog posts. It means so much to me that you are supporting me in this way. If I could ask you all to do just a bit more by subscribing to the channel and liking the videos and leaving comments. Those help more than you can imagine. Also if you could pass the links on to your friends I would appreciate it so much.