Watch the video here.
\
This
week on the Sunday video tutorial we put a couple of really short
pieces of the baseboard molding in place. Oh, and yeah we put in the
stairs and add a wall next to the stairs. I knew I wanted to leave
the bottom floor to be one room but I have had this little surprise
in mind all along. I didn't want to say anything until I tried it
and made sure it would work.
As
for assembling the stairs this kit has the stairs partially pre-assembled in two pieces that need to be glued together. The area
for the glue is rather small and I wanted to be sure it would not
only stay together but also I wanted to cover the seam where the two
parts join.
I decided to cover and add extra strength by using some
140 lb cold press water color paper as the wallpaper for this piece.
This paper is really sturdy and I am confident it will support the
area even if the glue fails.
Now lets talk about stairs, more importantly my feelings on how stairs
should be placed in the dollhouse. The stairs in dollhouses have
always been a point of contention for me. The majority of dollhouse
kits (if not all of them) the stairs are pointed to the back opening
of the dollhouse. In a real house the stairs just don't go that way.
In my opinion it is one of the things that makes the dollhouse not
realistic to the viewer. If a child is going to play with the house I
would probably put the steps in the way the plans call
for. When children play with a dollhouse they do like to play with
the dolls going up and down the steps. I want to look in the front
door of my dollhouses and see the bottom of the steps, like in a real
house.
No
matter how you put in your steps you will have an interestingly
shaped area under the steps. In some house builds I have left it open
to the room and place furniture in the area. On my last dollhouse and
this one I wanted to do something else. I add a wall to the open
side, add a door and you will get to see what goes there in future
videos.
Although
I have been planning this area since the beginning of the build I
wasn't completely sure how I was going to pull it off. I had been
planning to use the extra unused wall that is provided for the lower
level of the kit. I just wasn't sure how/if I was going to be able to
use it or not. That is why I didn't say anything about my plan
earlier. I did have a couple more ideas in mind if this didn't work.
I
do still need to come up with a door for the opening, but that is a
“future me's” problem. LOL I do have a couple of ideas for that
too I just need to try a couple of things out to see what is going to
work the best.
The
stairs are glued into the house with tacky glue mainly because I
didn't want to take any chances with wood glue running down my white
walls and making a mess. Tacky glue is much more forgiving if it
drips.
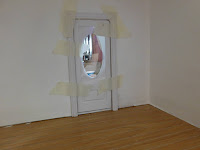
The
wall piece I cut to be 7' wide and it was already the correct height.
The area for above the door was cut from the same board, it is
actually just part of the above the door area in the original wall
as it came from the factory.
I
did wrap the wallpaper around to cover edges on both the wall and the
above door insert. Then I used the same sailboat patterned paper that
covers the accent wall that is opposite from this new wall. I love
how it looks, especially the view in through the door.
I
did install the baseboard molding in the little area at the bottom of
the steps. I am going to wait until I add a door to our new area to
add the molding to that wall.
As
for the rest of the downstairs we are going to start work on the
kitchen area of the dollhouse next.
As
always I do want to sincerely thank all of you for watching my videos
and reading my blog posts. It means so much to me that you are
supporting me in this way. If I could ask you all to do just a bit
more by subscribing to the channel and liking the videos and leaving
comments. Those help more than you can imagine. Also if you could
pass the links on to your friends I would appreciate it so much.


