Check back often

Have you checked out all my blogs?


Dollhouse Minis: http://joannesminis.blogspot.com


18” Dolls: http://joannes18dolls.blogspot.com/


General Crafts: http://joannes-place.blogspot.com/


Cooking: http://joanne-kitchen.blogspot.com/


Also if for some reason I can't post I will try to give a head's up on the Facebook page so check there too.

Wednesday, May 31, 2023

Dollhouse Miniature Metallic Paint Test


Watch the video here.


I thought I would do something a bit different this week for our midweek video, a paint test. Specifically I wanted to see what if any difference there is by using different colors under metallic paint.


I remember years ago an art teacher telling me to use different colors under my metallic paints to make them warmer/cooler and to help them to blend into whatever project I was using them on. I got to wondering the other day if it really makes a difference or was this just something that we were told.


So the first question you might have is why use another color under the metallic paint? Well, I do for a couple of reasons, first to do just what we are testing today. But also because a lot of metallic paints are at least somewhat translucent so they require multiple coats and in many brands the metallic colors are much more expensive than the other colors. (not sure if that is true of all brands or only a few)


To set this test up I got out the metallic craft paints I have in my paint collection. I have two of the Brushed Metals by FolkArt the silver and the gold. The other two are Ceramcoat 14K Gold and DecoArt’s Dazzling Metallics in Shimmering Silver. This gives me two each of silver and gold and they are slightly different in color and transparency.


I also chose a range of basic colors of paints to use under the metallic. A red, blue, yellow ocher, dark gray, green, white and black. I also decided to use two base materials to test on a sheet of white card-stock and some wood craft sticks. I felt these are the two surfaces I paint the most so they would be good to test on. I also wanted to see if I got the same results on both surfaces or not.


To prep for the test the laid down bands of the colors to go under the metallics on each surface. I allowed these to dry completely (overnight) because I didn’t want to take any chances the paints would mix with the metallic and change the color that way. That would be a completely different test.


Next I added the bands of the metallic colors over the dry colors. I had thought about adding a second coat but decided against it, I want to see how this looks with just one coat of the metallic.


Once dry it was time to evaluate the test results. I do see a difference and I think that the colors do just what I have been taught to believe. Some colors work better with the silver and some with the gold. I am for the richest color I think the warm yellow ocher under the gold is the best choice and the gray under the silver does the same for that color. The black under all the metallics gave and older, aged appearance.


I do recommend you do the test yourself to see what the colors in your stash do and how they affect the metallic paints you have. I am going to keep the test pieces in the bin with my paints so I can refer to it whenever I am going to be using the metallic paints in future projects.


As always I do want to sincerely thank all of you for watching my videos and reading my blog posts. It means so much to me that you are supporting me in this way. If I could ask you all to do just a bit more by subscribing to the channel and liking the videos and leaving comments. Those help more than you can imagine. Also if you could pass the links on to your friends I would appreciate it so much.

Sunday, May 28, 2023

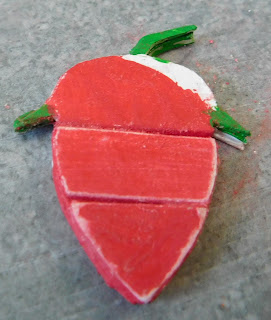
Dollhouse Miniature Strawberry Sign


Watch the video here.


I have another free pattern for you to download so you make the project. You can find the file here. In the download there are 3 files: a PDF for hand-cutting of the pieces, a PNG to use with your electronic cutting machine and a text file with handy hints and tips (and the sizing information) to use the PNG.


As with most of these projects I cut all the pieces from medium weight white card-stock, the kind used to make cards and such. This is way more economical than having to purchase a bunch of colors and in my experience the paint colors are a lot more stable than the paper colors. I rarely get noticeable fading with the painted projects.


You are free to use the pattern as many times as you wish and even to sell the finished project. But, please don’t give away or sell my patterns. I spend a lot of time creating them and the only compensation I get is from people watching the videos and checking out the blog post. I really want to keep offering these for free so please if someone else wants to make one send them to the video and blog so they can get their own copy of the pattern.


When I designed this sign I knew I wanted to age it up a bit to make it look a bit worn. I love the idea that the sign was made of boards and has maybe been around a while. On my first prototype I used 3 layers for the backing piece and it was not a success. I found it bent badly when I tried to sand the edges. I also had some issues with 4 layers, that is why the backing piece has 6 layers. If you want to make a “new” sign you won’t need all 6 layers so use as many as you wish.


Here are the pieces still on my Cricut cutting mat.


We start like always by gluing the pieces into groups. The leaf top is only 2 layers. I glued the rest in groups of 3. it was way to hard to line up all 6 layers of the back at once and also the glue took a long time to dry with I tried that. So glue your groups of pieces to look like this. And allow to dry.


Now we can glue the 2 backing groups together and allow the glue to dry.


Now the fun part the first step of painting. I only used 2 basic colors a green and a red. Note on the picture and in the video the parts I kind of skipped because they won’t matter and also the little bits of green on the berry parts.


Allow the paint to dry and begin gluing the “boards” to the backing. Line up the bottom piece and the top piece then center the middle “board” between them. Allow the glue to dry.


Now use some find grit sandpaper and age the edges of the pieces. Do as much or as little as you like.


Once aged glue the leaf piece onto the berry and allow the glue to dry.


Once the glue is dry you can age the green area.


 Now time to touch up the edges of the sign as well as any areas where you took off too much color in the aging process. Apologies for being off screen when I was doing the touch up painting, I didn’t realize until I was editing the video.

 You do the sanding and paint touch up as many times as it takes to get the effect you are going for. Just be sure the paint is completely dry before you try to sand it.


Next I added a thin wash of brown paint to the sign to tone down the white that was showing where the sanding had revealed the paper. It also toned down the color of the paints used giving the sign an older aged look.


Optionally now add some “seeds” with a warm yellow paint using a toothpick to apply as many or as few as you would like.


Once you are happy with the sign give it a thin even coat of mat Mod Podge. I like to coat the back of the sign also so layers of the paper don’t pull off later when I down from displaying it. Also sealing it will protect the walls of you dollhouse from paint that might have gotten on the back.


Once dry your sign is ready to display anywhere in you dollhouse you wish. I think this would look great in a themed kitchen as well as the porch.


As always I do want to sincerely thank all of you for watching my videos and reading my blog posts. It means so much to me that you are supporting me in this way. If I could ask you all to do just a bit more by subscribing to the channel and liking the videos and leaving comments. Those help more than you can imagine. Also if you could pass the links on to your friends I would appreciate it so much.

Wednesday, May 24, 2023

Dollhouse Miniature May 2023 Blind Bags


Watch the video here.


Today I have another blind bag opening video for you. Before we talk about the items that were in those cute little bags I wand to just say I am sorry for being missing for the last few months. I have been struggling with both depression and burn-out. I am hoping to slowly get back on schedule with the tutorials. Please just be patient a bit longer.


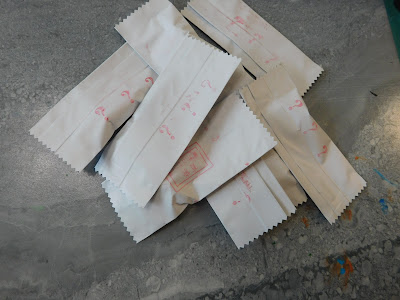
Now onto the blind bags. First a bit of information about what they are and where I get them. I buy my blind bags from eBay and they come from China. They are super cheap and a lot of fun to do. It is kind of like Christmas with all the little packages to open. Depending on the time time of year they can take a long time to arrive. That is worst around the holiday season. The set I am opening today was purchased on April 26th and were expected to arrive between June 7th and August 3rd. They actually arrived around May 20th. The cost was around $2.50. They were listed as “Dollhouse Miniature Accessories” In the past this particular type of blind bag has resulted in a mix of really cool minis and a bunch of stuff that is way out of scale or not really usable without a lot of work.


If you are interested in how I look for the blind bags I have a blog post with screen shots where I take you step by step through how I look. You can find that post here.


Now lets look at what I got.


1- little pumpkin, this I think will be wonderful in a fall table top decoration of some type. I plan to put it in my box of fall decor items so that I will remember to do a makeover on it when the time time comes.


2- pitcher, this would be really fun to fill if it was made a bit differently. The open area is only half way down the depth of the pitcher so it will remain empty. It will however look wonderful in the dollhouse kitchen. The scale is pretty good so it will go nicely.


3-bubble tea, this is a bit big but really that much. It would be a large drink but I do have water containers that are similar in shape that would be about the same size. The straw definitely needs to be trimmed.


4- corkscrew, I love this one, it is so detailed and it looks nice. I think it would look really nice in a scene with a mine bottle of wine and some of the wine glasses I have been collecting from the blind bags.


5-eyeglasses, these are probably Barbie size and we have gotten them in previous sets of blind bags. As part of a costume or as part of a sign they might work though.


6- coke bottle, these are always welcome. I love to put them on nearby surfaces when I set up scenes with the dolls doing something. It just makes it look more real. They would also look good in the fridge or in a grocery bag.


7-plant pot, this is going to be fun to fill, I have been thinking about making a few plants and this will be really fun to fill.


8- bottle of ???, not sure what we will decide to say this is but it needs a label so we can figure it when the time comes. I’m pretty sure it is made from the same mold that is used for the wine bottles so the possibilities are endless.


9-mug and glass, these are cute and I don’t remember getting them before. Will look great in many scenes or to fill the cabinets in the kitchen.


10-perfume bottle, this will look lovely in either the bedroom or bathroom. A bottle of expensive perfume, I do love the bottle. I haven’t decided it I am going to leave the label or make a custom one at some point.


Here are all the things we got together. I am really happy (much happier than I expected to be) we only got one piece that I probably won’t use. The rest will be fun to work into the dollhouse as time goes on.


As always I do want to sincerely thank all of you for watching my videos and reading my blog posts. It means so much to me that you are supporting me in this way. If I could ask you all to do just a bit more by subscribing to the channel and liking the videos and leaving comments. Those help more than you can imagine. Also if you could pass the links on to your friends I would appreciate it so much.