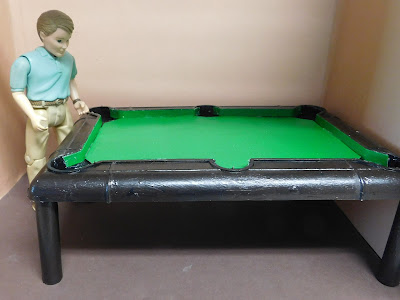
This week we are starting where we left off on the pool table project. (If you missed that video you can find it here)
I did have to add more glue to a couple of the legs to get them to stay where I wanted them. Also although the package on that dollar store glue said it would cure in 24 hours I found it was closer to 48 hours before the legs really felt like they would stay where I put them.
Today I started off by adding an additional coat of the same dark brown paint to the pool table. I have decided to give up on getting a wood grain look on this and am just going to have it be dark brown instead.
Now I was on to the step where I had to figure out the “felt” for the top of the table. I actually have been thinking about this since I started the project. In the end I decided that a sheet of cold press water color paper (140 lb weight) was the best choice of what I had on hand to work with.
I cut a rectangle that was the same size as the top insert that came with the toy pool table as well as 3 strips that were ¼” wide by the length of the paper (12”)
These I painted with a bright green craft paint, I did debate with myself what color I wanted to use and just went with the standard green although I saw online that pool table felt can be many colors.
After the paint was completely dry (mine sat overnight) I set up to glue first the strips that would be on the edges of the table. I decided to use e6000 for this since I needed something that would adhere to the plastic of the pool table. I really was not happy with the dollar tree glue I used on the legs so that was why I made the decision I did.
Initially I thought I would need to clamp the strips in order for them to stay but happily I found the glue soaked into the paper really well and held without having to clamp. This was really good because I could only find 2 of my big clamps so it would have been a very slow process if I had to do all the strips with only the two clamps.
I trimmed all the ends of all the strips so they all ended at a consistent spot on the holes. I then glued them in place. I did have to hold a bit longer on these spots and some super glue would have been handy to help hold them in place but I got everything to stick with a bit of patience.
Once the side edges were finished I checked the fit of the rectangle, I did find I had to take off just a tiny sliver of one long side to make it fit. Instead of making holes at the corners and on the sides I decided to just angle the corners if I were to do this again I would probably make extensions on the rectangle that would go part way into the area for the hole then use a hole punch to make about a ¼” to ½” hole at those spots. Then I added e6000 to the flat areas of the top of the table and to the edges of the rectangle. I carefully put the piece in place and smoothed it down so I would stick together.
Once all the green pieces were glued in place the glue had time to set up I coated the green areas with mat Mod Podge.
After the mat Mod Podge had time to dry I added a coat of satin Mod Podge to the brown areas.
And once that dries the pool table is ready for the man cave or another mini scene, maybe a bar or a pool hall would be a fun project for this to live.
As always I do want to sincerely thank all of you for watching my videos and reading my blog posts. It means so much to me that you are supporting me in this way. If I could ask you all to do just a bit more by subscribing to the channel and liking the videos and leaving comments. Those help more than you can imagine. Also if you could pass the links on to your friends I would appreciate it so much.


No comments:
Post a Comment