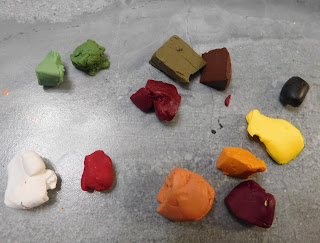
The very first step was to pick out the colors of polymer clay that I felt would be good for this project. I stuck mostly to what I would call fall colors. The muted oranges, yellow, muted green, brown, dark red, plum and brown. I also grabbed a bit of white and black. At this point I had no idea how many of the colors I would use I just wanted a range of colors that I could pull from.
The next thing that needs to be done is to condition the clays. This is the same thing we do anytime we work with polymer clay. If you are unfamiliar with working with polymer clay I have a Clay 101 playlist on the channel (which you can find here) that goes over a lot of the techniques of working with polymer clay.
The first pumpkin I show you how to make is a pretty generic shape, just the round typical pumpkin.
Start with a ball of clay about the size you want your finished pumpkin to be. This could be anywhere from ¼” to 1” or even larger.
Now use something like a ball tool (or the handle of a paint brush) to make a dent in the top of the pumpkin. This does a couple of things, it makes a definite place to begin the segment lines, gives us a place to later put the stem, and it helps to flatten the bottom so the pumpkin. will stay in place while we are working on it.
Now use a “pointy tool” to make the segment lines running from the dent to the bottom of the pumpkin. If you are making several pumpkins to be displayed together I think it looks better to vary the number of segments and how deep they are. That is one way to easily make each pumpkin look different.
Now take a tiny ball of the same clay and make a tiny ball then a teardrop from it for the stem. Place it in the dent in the top of the pumpkin and use a tool to help smooth the joint between the pumpkin and the stem. You can shape each stem a bit differently and add lines/texture to some.
Now carefully move the pumpkin to your baking surface.
The second pumpkin I show you how to make is a taller skinnier one. For this one start with a ball of clay again but after you make a ball roll it to make an oval shape.
Now use the dotting tool to add the dent on the top.
The “pointy tool” to add the segments.
And finally add the stem.
The third pumpkin I made on the video was a flatter version. For this I like to start with a smaller ball of clay since they do spread in diameter when you shape them.
Make a ball like before but this time use your fingertip to flatten the ball as much as you want for your pumpkin.
Now proceed with the same steps as before, add the dent.
Add the segment lines, I do like this shape to have deeper segment lines but that a personal choice.
Then add the stem.
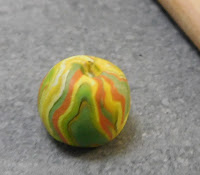
The last pumpkins I made on camera was the marbled one. For the on-camera on I wanted to focus on the dark reds and the other warm colors. For the one I did for the pictures I used some of the greens along with the yellow and white. We have made marble on the channel several times before and there are many ways to get this effect. I just did a very simple process for the video to get the look I was after.
Once you get the marble to look the way you want it to proceed exactly the same way as before. The only real difference in how I made this one was that I wanted it to be the star of the collection so I made it much bigger than the others.
Make a ball.
Add the dent in the top.
Add the segment lines.
And finally add the stem.
To bake the pumpkins use the temperature stated on your clay package. If you are using multiple brands of clay with different temperatures use the lowest temperature stated. I baked the smaller pumpkins for 20 minutes and the 2 larger ones for 45 minutes. That way I was sure everything was baked all the way through. Allow all the pumpkins to cool to room temperature before moving to the next step.
I
really wanted to add some gold stems to a few of my pumpkins and to do that I just used some gold acrylic paint and carefully painted just the stem. You could of course paint other details on some of your pumpkins. You could use another color of paint, just be sure to stick with acrylic paint for the baked polymer clay. Allow the paint to dry completely.
All that is left to do is add a coat of clear finish to your pumpkins. You could do different finishes on different ones to give even more variety just be sure that you only use polymer clay safe products. I decided to just use the Satin Mod Podge this time since it has been a hectic week and I needed to finish up.
But here you can see the pumpkins displayed all together along with the plastic ones we re-did on Wednesday's video and a couple of other fall items we made last year on the channel.
As always I do want to sincerely thank all of you for watching my videos and reading my blog posts. It means so much to me that you are supporting me in this way. If I could ask you all to do just a bit more by subscribing to the channel and liking the videos and leaving comments. Those help more than you can imagine. Also if you could pass the links on to your friends I would appreciate it so much.


No comments:
Post a Comment