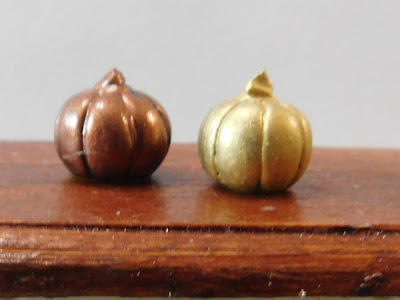
A while back I got some little plastic pumpkins in a couple of the sets of blind bags and I said when I opened them that I would try to remember to do a tutorial on how I decided to re-do them. So today that is what we are doing. As I say in the video though this is actually tied to what I have planned for the Sunday tutorial too because I want to make some decorative pumpkins for the dollhouse to create a fall tabletop display. You see in real life I accidentally started collecting ceramic pumpkins a few years ago. I wasn’t planning to collect them I didn’t even realize I had an actual collection until I took a look at them last fall. I was just buying them in the fall because I love how they look. As I was putting out a few of them a few weeks ago in my living room I decided it would be fun to make some for the dollhouse also. So we are staring today with the repaint of these two cute little pumpkins. This same method could be used on any plastic items you want to re-do so even if you can’t find similar pumpkins I think this will be useful.
The first thing I like to do is add a handle to any small objects that I am trying to paint. That way I can move the object around and not have to touch it and interfere with my painting. My favorite way to do this is to use some of that poster tack stuff and attach the object to a regular craft-stick. This works really well for me and is is easy to remove when I am done with the project. Do try to make sure that the poster tack doesn’t block the areas you want to paint though.
Once the pumpkins were on their individual handles I cleaned them with just a bit of Isopropyl alcohol. This will not only remove any dust/dirt on the surface but also any oils from either handling them or from the manufacturing process allowing the paint to adhere much better. I do this will all plastic items I am going to paint and I use either the alcohol or distilled vinegar depending what is handy at the time. I find both work pretty much the same although the alcohol does dry faster so I can get on to the painting (fun) part quicker. Allow to dry.
Now we can give the pumpkins a base coat of a black craft-paint. This will allow the finish coat of color to really pop. Do a thin coat so as not to hide the details on the pumpkins and allow it to dry completely.
Now for the fun part of the project we are going to add the color to our pumpkins, this time I am using gold and copper. I chose those colors for a couple of reasons. One being that I have both of those colors in my ceramic pumpkins and they are among y favorites. Also since I don’t have any copper paint so I am using the nail polish for that color this was a good place to use that since on Sunday we are probably only going to be making our additional pumpkins from polymer clay.
You will want to use 2 thin coats of whatever color you choose that way the details will not get filled in and will still show. Allow to dry.
Now we have the first 2 of hopefully a nice collection of pumpkins for the dollhouse family to display for fall.
As always I do want to sincerely thank all of you for watching my videos and reading my blog posts. It means so much to me that you are supporting me in this way. If I could ask you all to do just a bit more by subscribing to the channel and liking the videos and leaving comments. Those help more than you can imagine. Also if you could pass the links on to your friends I would appreciate it so much.


No comments:
Post a Comment