This week for the tutorial we are making a fall plaid table cloth for the dollhouse. I started off camera by creating a table cloth the same way I did in the video you can find here. In that video I show you not only how to make the table cloth that can be draped to look realistic but I talk about how to size it to your table.
This video was supposed to go up on the channel last week and I had all but the end of it filmed when I made a huge error that ruined my table cloth that I couldn’t easily fix. I actually got to the same point twice, making the same mistake. So I decided I needed to build a way to fix that mistake into the project.
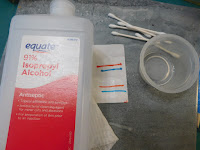
So you might be asking what was this mistake. For the plaid design I am using alcohol markers. I use these because they are a medium that won’t run if the table cloth gets wet and are not likely to come off onto other items in our miniature collections. I also find them much easier to work with than paint for adding details. Since I know that I can remove the ink with Isopropyl alcohol I figured that if I made any errors with my design they should be easy to remove. I was very wrong. In both of my first two table cloths I had placed a line in the wrong place and when I went to correct it all I did was make a huge mess. The ink soaked into the fabric so much that it just smeared instead of removing. That told me that I needed to seal the fabric. So I decided to use a coat of white paint on the fabric. Initially I was just going to do that but as I was working on the table cloth for the video I did some testing and decided that I wanted to add the extra precaution of the layer of Mod Podge to further seal the fabric. This way I was able to clean up any misplaced lines as I show later in the video.
I used my normal technique of using tape, sticky side up to hold the table cloth in place while I worked on it. Since I really wanted it to stay in place I used the widest masking tape I could find, and I did add a third strip at the top off camera. I also folded a piece of printer paper to fit under the table cloth that would stick out on the top and bottom. The paper will help my tile that I work on to stay much cleaner. You will also need to have the table cloth attached to a surface that you can rotate to do the lines like the tiles I usually work on.
The first step on the video is to add a coat of white paint to the table cloth surface. I used some white fabric paint simply because I have an entire bottle of that and my white craft paint is getting really low. In the end I do like the color of the paint more than the color of the fabric I had used. They are both white but the paint make a much crisper white color that I was happier with.
Now we can add that coat of Mod Podge, I used Satin in the tutorial mainly because it was on my table and I didn’t have to go find the almost empty bottle of Mat that I had just put away the day before. In my opinion the Mat would have looked better in the end but it is not a big deal the Satin looks good also. Allow the Mod Podge to dry completely.
To make the lines that form my simple plaid I used the Bic alcohol markers that I got at Walmart a few years ago. You could use any alcohol based marker. I have seen a lot of fall table cloths in real size advertised that are teal and orange and I find them so pretty so those are the colors I went with. Specifically the color names are- Hot Aqua and Sunset Orange.
Start by marking the center point of each edge on the tape/paper that is under the table cloth.
Then pick which color you want to start with and make a line across the middle lined up with the marks you made. Be sure to stop and stop all the lines off the table cloth, this will prevent getting a blob of ink at the points you started and stopped. Working from the center line to the top edge make lines ½” apart. Then turn your surface the table cloth is attached to 180° and work from the center line to the opposite end of the table cloth.
Now
turn the project 90°
and repeat the same steps to put lines across the table cloth. Again
working from the middle to one edge, turn the project and work to the
other edge.
Now you should have a table cloth with a grid of one color of lines. In my case the Aqua color.
Once the first set of lines is in place it is time to add the second color in my case the orange. To do this starting again in the center add a line ¼” away from the middle line and work to each edge just like before. This way your second color lines will be alternating with the first set forming our very simple plaid design.
Once the ink is dry which will be pretty quickly remove the table cloth from the tape and do any trimming needed.
At this point in the video I show you how to correct any mistakes and why I sealed the fabric like I did.
As you can see where I sealed the fabric with both the paint and the Mod Podge it was easy to remove the ink so if I had made a mistake I wouldn’t had to start over like I did when I didn’t seal it.
Now on to putting the table cloth onto the table which I also showed in the original tutorial for the table cloth in more detail than I did on this one.
And now let’s see a few options for the table with the table cloth and various projects we’ve made on the channel in place on the table for a scene in your dollhouse or room-box.
As always I do want to sincerely thank all of you for watching my videos and reading my blog posts. It means so much to me that you are supporting me in this way. If I could ask you all to do just a bit more by subscribing to the channel and liking the videos and leaving comments. Those help more than you can imagine. Also if you could pass the links on to your friends I would appreciate it so much.


