Check back often

Have you checked out all my blogs?


Dollhouse Minis: http://joannesminis.blogspot.com


18” Dolls: http://joannes18dolls.blogspot.com/


General Crafts: http://joannes-place.blogspot.com/


Cooking: http://joanne-kitchen.blogspot.com/


Also if for some reason I can't post I will try to give a head's up on the Facebook page so check there too.

Sunday, August 13, 2023

Dollhouse Miniature BBQ Grill pt 3


Watch the video here.


This week we start by creating the legs that will support the BBQ Grill. For this we will need:


4 pieces of printer paper 4” by 1 ¼”

4 slim sticks cut 3” long

2 slim sticks cut 2 ¾” long

2 slim sticks cut 1” long.


Then using some thick tacky glue adhere the slim stick pieces to the paper pieces as shown. Be careful that the ones using the shorter pieces are an opposite pair so they will fit on the grill correctly. Use a scrap piece of the same slim sticks to act as a spacer between your pieces so that the legs will be able to fold around the grill. Allow the glue to dry.


Once the glue is dry we can fold the paper around the sticks as shown and trim. It is best if you have some space down the middle of the pieces when you get the paper glued down. This will make the legs fold easier when we put them onto the grill and therefore look much better. Allow to dry.


Now we are going to add a frame around the bottom half of the grill. This is the half that we added the ledge for the rack to. For this step we will need more of that heavy weight cards-stock we used last week. This time we need 2 pieces that are cut 3” by 1” and 2 that are 2 ½” by 1”. Use a tool to score ¼” from one end of the each of the 2 ½” pieces then use your grill to mark a second score spot of each one. This way it will fit your grill just right. Now glue these two pieces to each end just using a line of glue across the top edge. Wrap those scored parts around to the front and back of the grill. I was sure I had taken a picture of this step but I discovered when I was all done with filming this week that I missed this one.


Now we can add the two 3’ pieces gluing one to the front and one to the back of the grill. Just add glue to the top edge and the ends. Allow the glue on this step to dry.


While that glue is drying we can add the wheels to the shorter set of legs we made earlier. I used some wooden ½” buttons from my stash but any button of the same size would work. If you use a plastic button use a glue that will hold plastic like e6000.


 Line the holes of the button up with the end of the leg and clamp until dry. Be very careful to line the buttons up the same on both legs and to also make sure you have the leg pieces right side up so you still have legs that will wrap about the grill correctly. Allow this glue to dry completely.


Next we are going to add the legs to the grill. We start with on leg with a wheel and one plain one. Fit the legs in place without glue first so you know where you need to place them so the other side of the leg will fold around to the end. Be sure that the short side of the leg with the wheel on it is on the end of the grill. Add the glue and just glue the parts to the front of the grill making sure you will be able to fold the rest over to the ends in the next step. Allow the glue to dry enough that the legs will not move when you glue the next step. You can add a clamp to help hold the leg in place while glue dries if you wish.


Add glue to the ends of the grill and fold the rest of the leg around and glue in place. Clamp if you feel you need to.
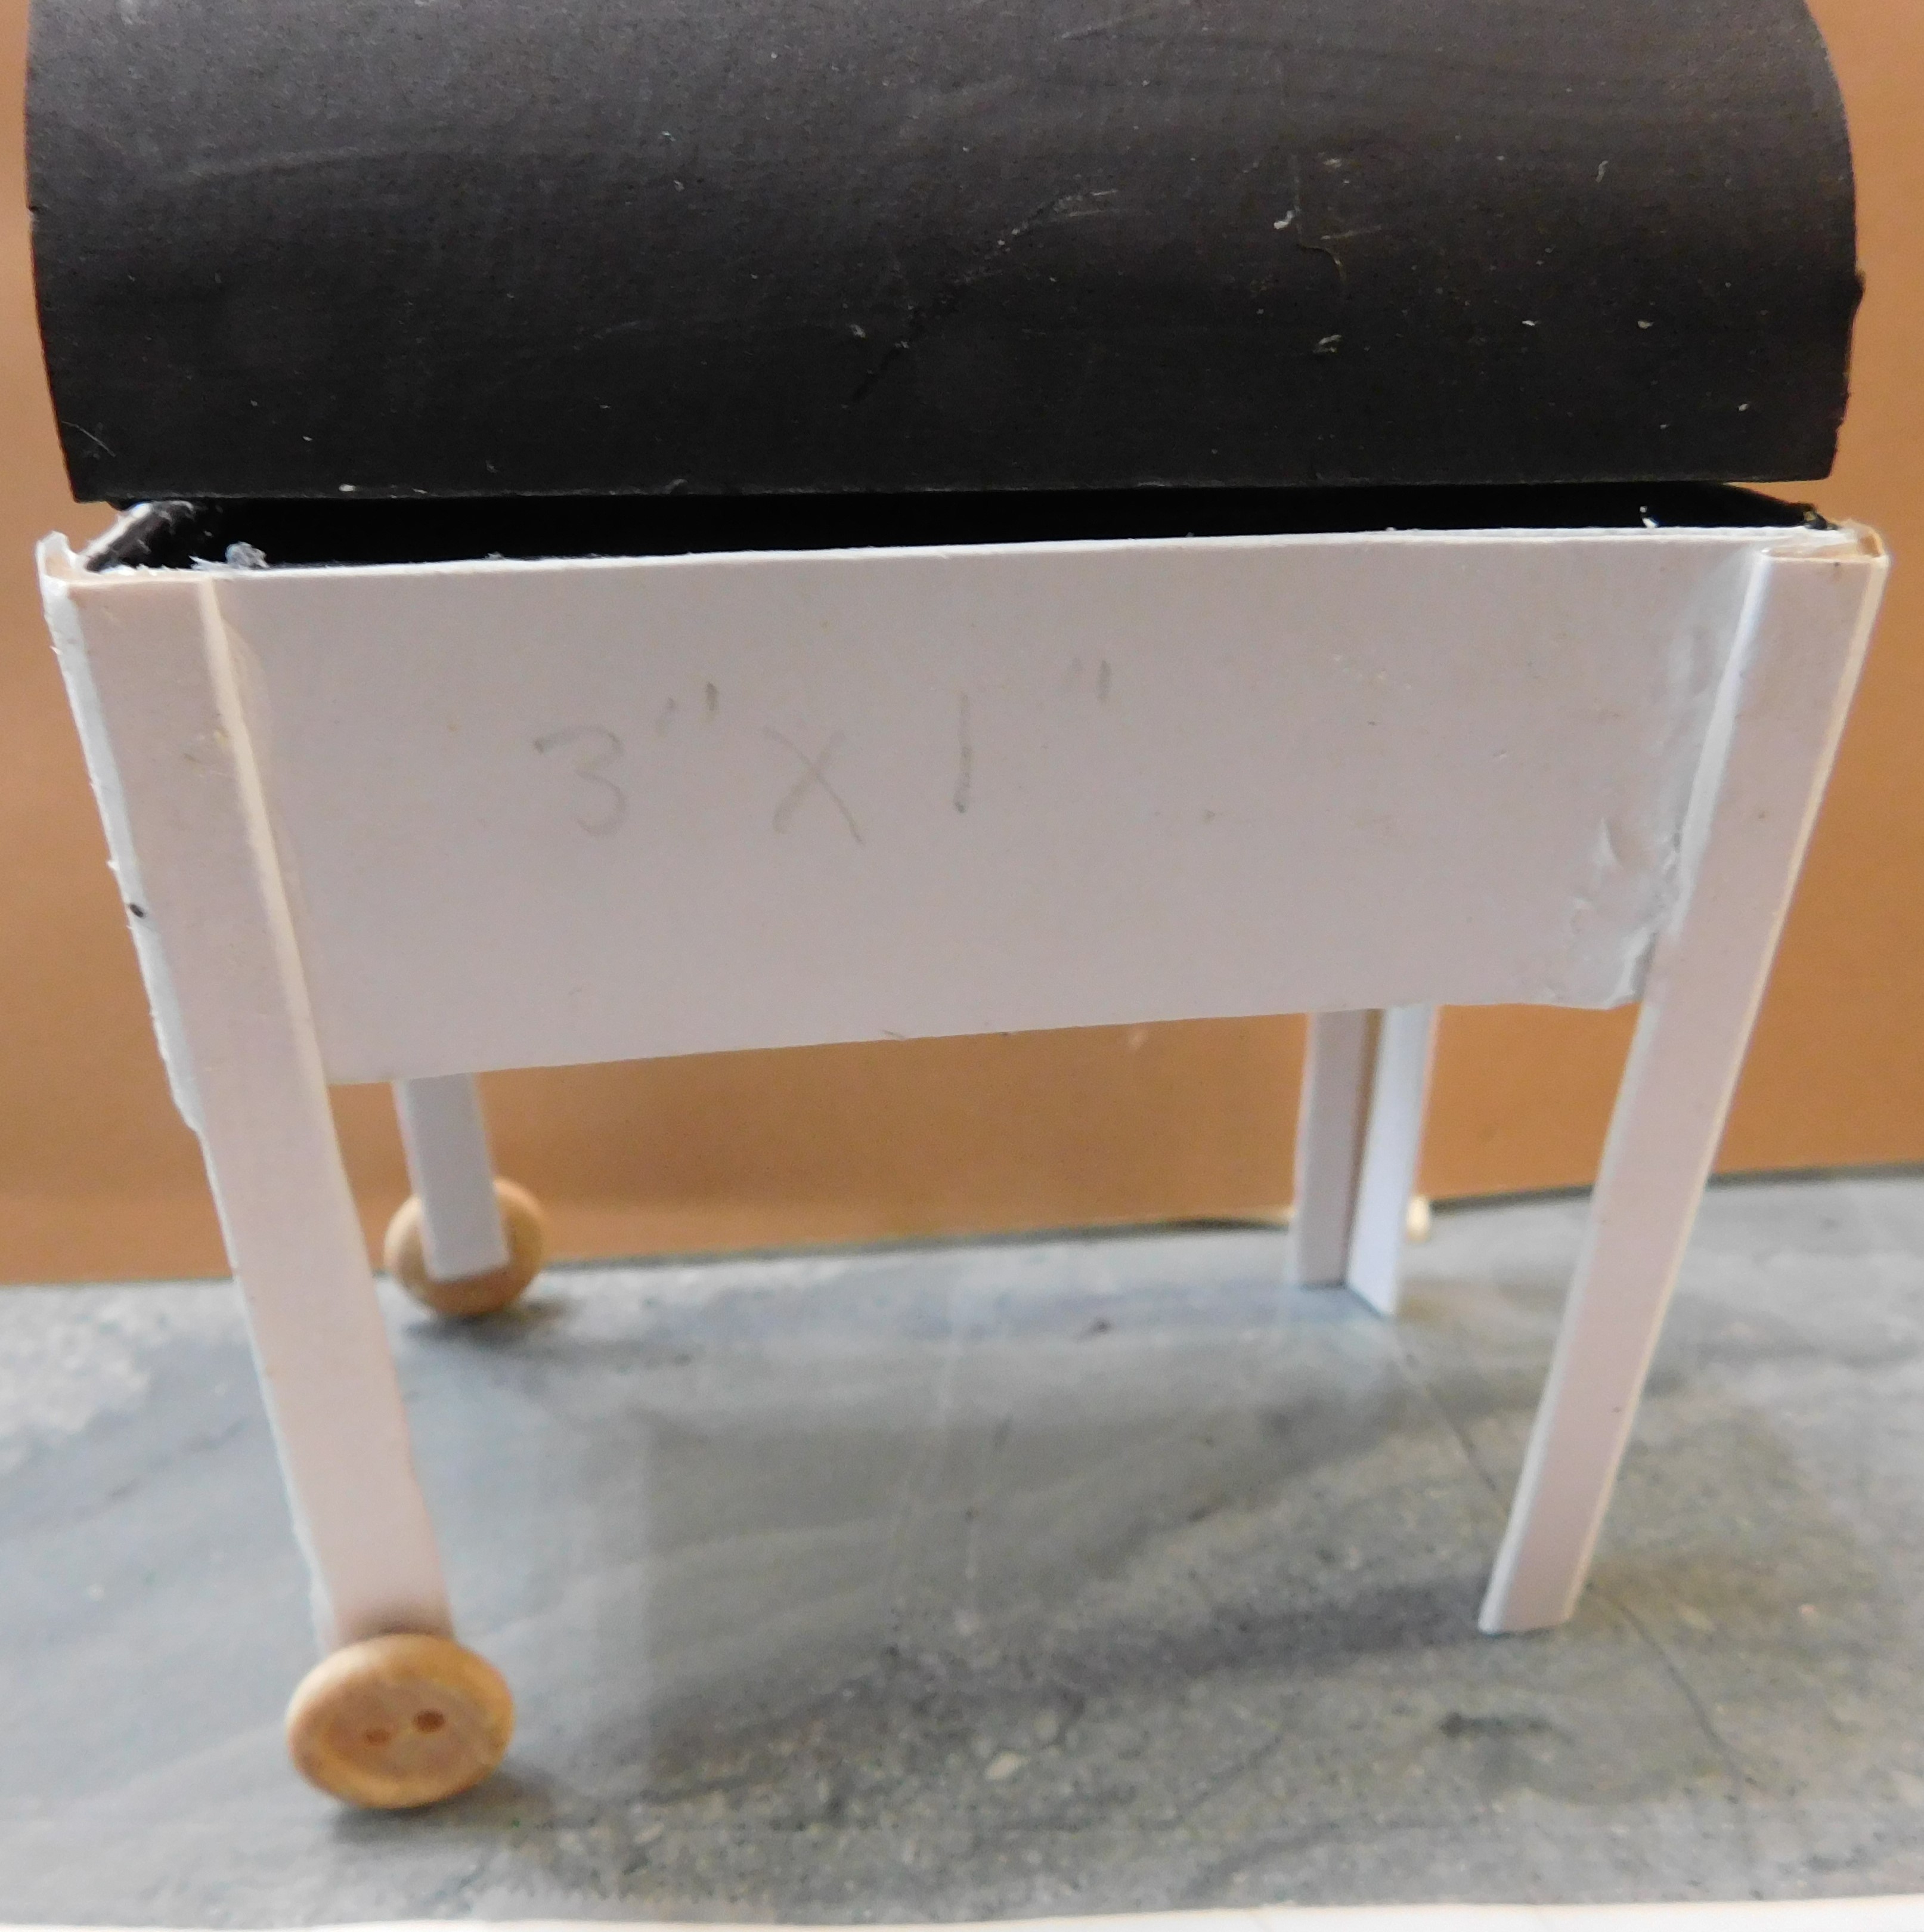


Repeat with the other two legs on the back side of the grill being careful to add the leg with the wheel at the same end on the back as on the front. Allow the glue to dry.


Now we can make a shelf to add to the bottom of the grill. This shelf will not only add some storage to the grill but it will also make the entire grill a lot more stable. I used the rack I made last week for my measurements. I cut 2 regular size craft-sticks (the ones from the dollar store) the same length as the rack and 3 the same size as the width of the rack. I used the same tape covered graph paper that I used last week to make the rack to line up my shelf pieces. Since the craft-sticks are thicker I did use an extra stick to help the short pieces glue on flat to the long piece. Allow to dry.


Once dry add the other long piece to the shelf frame and allow the glue to dry.


Once dry flip the frame over so the long pieces are now on top. I found that 3 craft sticks were just a tiny bit too wide to fit between my long pieces so I sanded one of my pieces down to fit perfectly. If you use different craft sticks you might need to adjust the number that will fill this space on your shelf. My sticks are cut the same length as the long sticks already in place. Just glue in the number of sticks you need to fill the area between the long ones. Clamp and allow to dry.


Trim any pieces that were cut too long and sand if needed.


I found the easiest way to make sure my shelf glued in place level was to use something under the shelf to hold it in place. I used one of the little containers I have on my table to put paint/glue onto. Anything that is just under 1” tall will work. Add glue to the legs and put the shelf in place as level as possible with whatever you are using as a brace to help hold it until the glue dries. Once the glue dries add just a bit more glue to the joints and allow that to dry also.


Now it is time to paint the parts we added this week with the same black craft paint we have been using all along. It will probably take two coats. Just make sure you cover all the paper and wood that show on the grill and allow it to dry.


Next week we will add some details to our grill.


As always I do want to sincerely thank all of you for watching my videos and reading my blog posts. It means so much to me that you are supporting me in this way. If I could ask you all to do just a bit more by subscribing to the channel and liking the videos and leaving comments. Those help more than you can imagine. Also if you could pass the links on to your friends I would appreciate it so much.


Wednesday, August 9, 2023

Dollhouse Miniature Apple Sign

Watch the video here.


I have another free pattern for you to download so you can make the project. You can find the file here. In the download there are 3 files: a PDF for hand-cutting of the pieces, a PNG to use with your electronic cutting machine and a text file with handy hints and tips (and the sizing information) to use the PNG.


As with most of these projects I cut all the pieces from medium weight white card-stock, the kind used to make cards and such. This is way more economical than having to purchase a bunch of colors and in my experience the paint colors are a lot more stable than the paper colors. I rarely get noticeable fading with the painted projects.


You are free to use the pattern as many times as you wish and even to sell the finished project. But, please don’t give away or sell my patterns. I spend a lot of time creating them and the only compensation I get is from people watching the videos and checking out the blog post. I really want to keep offering these for free so please if someone else wants to make one send them to the video and blog so they can get their own copy of the pattern.


I do highly recommend on this pattern in particular that you mark the top side of each piece before you remove it from your cutting mat if you use an electronic cutting machine or before cutting if you are cutting by hand. These pieces look a lot alike but are not interchangeable.


Once everything is marked and cut (and removed from the cutting mat if needed) you are ready to glue. I like to use a thin even coat of a thick tacky glue. This is what works the best for me. You will need to glue the pieces into units each made up of the 3 identical pieces. Allow the glue to dry completely before moving to the next step.


Now we are going to paint the pieces. For this project I painted everything with a nice bright red at this step. Any bright red will do, use enough coats of paint to cover the marks we made earlier on the pieces. Allow the paint to dry.


Once the paint is all dry we can start to glue the “boards” onto the full apple shape. I like to do just three first (the 2 edge pieces and the center one) then give the glue time to dry. This way I am more apt to get the pieces spread across the apple evenly and have even gaps between the boards.


Once the glue holding the first set of boards is set up so they won’t move around add the last two boards the same way. This time we need the glue to dry completely because next we are going to be doing some more painting.


Next I painted my stem with some brown paint but I did change the color of the stem later in the video, I just wasn’t happy with the color I used at this point.


Now we are going to start to age/dirty up the apple sign. I wanted this to look like it was made of old wood and had maybe been around a while. To do this we will need a warm/orangy brown color. I didn’t have any paint the color I wanted so I mixed two colors (a brown and an orange) to get a color I was happy with. Then it is just a matter of dipping your brush into water then just touch the paint and use the result as a wash on the sign. Be sure to always paint vertically on this step on this sign. Do thin coats and allow to dry in between. Then add more if you feel you need to.


Now we are going to add a wash with a dark brown paint, concentrating on the spaces between the boards. Paint on the wash then use a paper towel (or a dried out wet wipe) to wipe away excess. This way the spaces between the boards stand out and don’t disappear on the sign.


At this point in the project I decided that I was really unhappy with the color I had used for the stem so I used the same dark brown to paint over the stem and I am much happier. Allow the paints to dry completely.


Once dry finish the piece on both the front and back with coats of Mat Mod Podge. This will seal the paint and also help all those layers to blend together. Allow to dry.


Now if you wanted to take the project a step further this would be a good time to add either the last name of your doll family to the sign or maybe a message like welcome or home. Use a pencil to first write out whatever you want your sign to say then use white paint to do the final painting of the lettering. Once dry add another coat of Mat Mod Podge.


And here we have our sign on the front porch of he Beachside Bungalow along with last year’s apple projects.


As always I do want to sincerely thank all of you for watching my videos and reading my blog posts. It means so much to me that you are supporting me in this way. If I could ask you all to do just a bit more by subscribing to the channel and liking the videos and leaving comments. Those help more than you can imagine. Also if you could pass the links on to your friends I would appreciate it so much.


Sunday, August 6, 2023

Dollhouse Miniature BBQ Grill pt 2


Watch the video here.


This week we are doing more work on our BBQ grill. I have to say I am really pleased with ow this is turning out so far and I can’t wait to share the next part next Sunday. I am still not sure how many parts the project will take to complete. I am trying to keep each video between 20 and 30 minutes and to end in a logical place each time.


The first thing we are going to do this week is make the grill rack that will go into our grill so the doll family can use it to cook some delicious foods.


I thought about this process for a while before I started the project. I wanted to make the rack as well as the rest of this project from materials all of you could easily get and work with. I am trying to avoid things on this project that require special tools or special glues. So for the rack I am using Slim Sticks from Hobby Lobby, these are their version of skinny sticks (or coffee stirrers) they are slightly narrower and a bit thinner than a standard skinny stick.


Cut three pieces of slim stick to just fit inside your grill going front to back on top of the ledges we put in place last week. Then cut two pieces that are just a tiny bit shorter that the lengthwise measurement of your grill, again to fit on top of the ledges we put in place.


The exact size of the pieces that fit your grill might be slightly different than what fit my grill.


The other thing we need for this step is a way to line up all the pieces of the rack easily. I decided that some 8 square to the inch graph paper would be the best tool for this since it is super easy to get. I used a sheet I printed from a free PDF that I got online. I use graph paper a lot to help size items on both of my channels. This time since I was going to have to tape the rack to the paper I covered a piece with some clear packing tape so that I can re-use it for a long time to come. I can see this being a very useful tool for many projects.


Now tape your covered graph paper to your work surface and then line up one of the longer pieces of slim stick you cut. Make sure it is lined up with the lines f the paper. Use some tape to hold it in place being sure to avoid putting tape in the middle or at the ends of the stick. Now put some glue onto the end of one of the shorter pieces and add it to the end of the long piece. Being careful to line up the short piece with the end of the lone piece and use the lines on the graph paper to help you get a nice square corner. Repeat with a second short piece on the other end of the long piece. Allow this glue to dry completely so it doesn’t get moved in the next step.


Once the glue dries carefully add the other long piece of slim stick to form the frame that we will be building the rack on top of. Allow this glue to dry before moving on. I know it already seems like this week’s part of the tutorial is a lot of waiting for glue to dry and it is. That is because we need to make this frame as carefully and as accurately as possible and I have found over many years of doing minis that the key to that is patience. Line up each piece and allow the glue to dry so you don’t move something and ruin the entire project.


Now it is time to add the 3rd short piece we cut to the middle of the rack frame. Now be very patient and allow the glue to dry completely, even if you fudged a bit and only let your glue get set up on earlier steps this time it has to dry all the way because we will be moving the frame for the next step.


Now flip the frame over and tape it to the covered graph paper this time with the long slim sticks facing up. Again be sure to line up with the grid, this will make adding the rest of the rack so much easier. I used round toothpicks for the top bars on the rack, they are a good size, easy to get, and easy to work with. Cut one to the size you need and then use that one to measure the rest of the pieces. I used 19 toothpicks for my grill so you will probably need around that many I would think.


Now dip both ends of one of the toothpicks in glue and add it to the top of the frame. I like to start in the middle and work out to the ends. I find this way the project turns out much better and I can place them much more evenly. Only glue a few (like 3 or 4) at a time and allow the glue to set up. I just had this on my table and every time I walked by during the afternoon I added a couple of toothpicks. This way I wasn’t just waiting for glue to dry and the project got done as I was doing other things. Allow the glue to dry completely before the next step.


Now flip the rack over and using a craft knife cut any pieces of toothpick that are sticking past the sides.


Then using a piece of 80 grit sandpaper carefully sand the long edges back. Be very careful to brace the rack in your fingers so you don’t break it. Sand a bit and try it in the grill. Keep sanding until it fits into the grill on top of the ledge.


Now we are going to cut some pieces of heavyweight card-stock. It should be labeled as heavyweight and rated at 100 lbs. This will be the outside layer on most of the grill that will be seen when the grill is finished. Cut a piece that is 1 1/8” wide by 4 ¼” long. And a piece that is 3 1/8” by 3”.


At this step we are just going to anchor the ends of the pieces in place so run a bead of glue on edge and glue as shown in the video. Be very careful that the pieces are lined up so they will go on straight. This will be the finished surface of the grill. Allow the glue to dry completely. 


Now using some thick glue spread a thin layer onto the card-stock and smooth the card-stock into place. Allow to dry.


Once the glue has dried we are finishing up this week by painting all three pieces (the grill body, the rack, and the side firebox) with a black craft paint. Be sure to get all the nooks and crannies so no white or wood shows. Also be careful to wipe up any drips as you go.


So here we have the grill as it is at the end of today’s tutorial. I am loving how this is coming together. Be sure to come back next week when we add the bottom part to the grill.


As always I do want to sincerely thank all of you for watching my videos and reading my blog posts. It means so much to me that you are supporting me in this way. If I could ask you all to do just a bit more by subscribing to the channel and liking the videos and leaving comments. Those help more than you can imagine. Also if you could pass the links on to your friends I would appreciate it so much.

Wednesday, August 2, 2023

Dollhouse Miniature Beach Gnome


Watch the video here.


I have another free pattern for you to download so you make the project. You can find the file here. In the download there are 3 files: a PDF for hand-cutting of the pieces, a PNG to use with your electronic cutting machine and a text file with handy hints and tips (and the sizing information) to use the PNG.


As with most of these projects I cut all the pieces from medium weight white card-stock, the kind used to make cards and such. This is way more economical than having to purchase a bunch of colors and in my experience the paint colors are a lot more stable than the paper colors. I rarely get noticeable fading with the painted projects.


You are free to use the pattern as many times as you wish and even to sell the finished project. But, please don’t give away or sell my patterns. I spend a lot of time creating them and the only compensation I get is from people watching the videos and checking out the blog post. I really want to keep offering these for free so please if someone else wants to make one send them to the video and blog so they can get their own copy of the pattern.


So this time we have the normal pieces for the gnome that if you have been following these projects you will be familiar with. The only extras are the round life preserver our little gnome friend is holding and the pieces to create his sunglasses. These pieces will need to be glued into “units” made of 3 pieces each with the exception of the back piece which has 4 pieces to add strength. Here are all the pieces as cut.


And here are all the units after being glued. I use a thick tacky glue because that is what works best for me. Do note that there are a couple of units that you make two of, and there are 6 of the pieces to create them. On my first gnome (off camera) my Cricut had a bit of an issue with the sunglasses frame and it only cut 2 of them successfully. I found that was fine so as long as you have one of the frame pieces you will be fine. I just make the standard 3 because that is what I normally do and if needed you would have enough to make it if you machine gets cranky.


Be sure to allow the glue to dry completely before moving on to the next step. I have found if the glue is at all damp the paper will stick to the tape that we put it on to hold it still for painting.


Speaking of that the next step is to place all the pieces onto some tape that is glued down to your work surface sticky side up. I like to group my pieces by paint color to make it easier to get everything painted correctly.


For the ring and the beard paint them white. Then I like to streak in just a bit of gray on the wet beard paint to make it look a bit less flat. Next we have the flesh colored pieces, the sunglasses and finally the hat and background/body piece. Allow the paint to dry.


Once the paint dries give the life preserver ring a coat of mat Mod Podge. This will seal the paint so that if any mistakes come in the painting of the red areas they will be easier to fix.


Once the Mod Podge dries we can add those iconic read stripes to the life preserver. I like to pencil in the areas first to make sure I have them spaced the way I like them. Them use some red paint to fill in the areas and allow to dry. If you get any red where you don’t want it use a cotton swab that has been dipped in water to clean up.


While the red paint dries we can do the first gluing step. We are going to assemble the glasses and add the beard to the back/body piece. Allow everything to dry.


Now we can add the hat and feet to our gnome friend. This is also a good time to paint the outside edge of the sunglasses and add the lines to create the flip-flops that our gnome friend is wearing to the beach. I used a tiny dotting tool for the lines. Allow everything to dry.


Once all the glue and paint has dried it is time for to glue everything else onto our gnome. This included his nose, sunglasses, the life preserver, and his hands. Allow the glue to dry completely.


Now a quick light coat of satin Mod Podge to give our gnome a finished look and to help seal everything together.


Next I added just a drop of clear nail polish the the lens area of the sunglasses. This gives just a bit more shine and sparkle.


Now he is ready to join our other beach items on the porch of the dollhouse.


As always I do want to sincerely thank all of you for watching my videos and reading my blog posts. It means so much to me that you are supporting me in this way. If I could ask you all to do just a bit more by subscribing to the channel and liking the videos and leaving comments. Those help more than you can imagine. Also if you could pass the links on to your friends I would appreciate it so much.