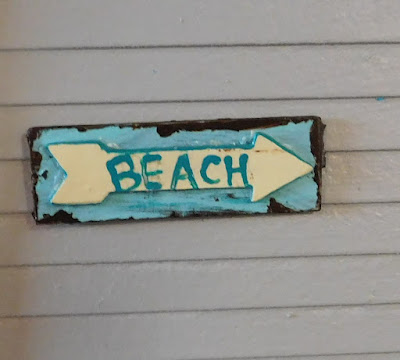
I have another free pattern for you to download so you make the project. You can find the file here. In the download there are 3 files: a PDF for hand-cutting of the pieces, a PNG to use with your electronic cutting machine and a text file with handy hints and tips (and the sizing information) to use the PNG.
As with most of these projects I cut all the pieces from medium weight white card-stock, the kind used to make cards and such. This is way more economical than having to purchase a bunch of colors and in my experience the paint colors are a lot more stable than the paper colors. I rarely get noticeable fading with the painted projects.
You are free to use the pattern as many times as you wish and even to sell the finished project. But, please don’t give away or sell my patterns. I spend a lot of time creating them and the only compensation I get is from people watching the videos and checking out the blog post. I really want to keep offering these for free so please if someone else wants to make one send them to the video and blog so they can get their own copy of the pattern.
This is a really simple little sign and I think it might be fun to do other variations for other themes. There are only 2 pattern pieces with one having 5 layers and the other 4. I decided to add the extra layer because of the shape and the size of the sign. I wanted to give it a bit more bulk and make it a bit more durable.
Just like with the other projects like this that I have created for you start with the pieces and glue them together to create the units the project will be make from. I like to use just a bit of a thick tacky glue applied with a toothpick. Allow the glue to dry completely before going to the next step.
Now we get to give the pieces the first coat of paint. For the Arrow I wanted a pale yellow but didn’t have the color I had in mind. So I mixed some of my palest yellow with some white to get a color I was happy with.
For the rectangular backboard I am starting with a coat of dark brown paint.
Once the paint is dry add a bit of a light aqua to the top of the backboard. I again didn’t have the color I wanted so I mixed some white with my aqua. (more on this i a bit)
At this time I also painted just the edges of the arrow with the full strength aqua paint. Allow to dry.
Once the paint dried I decided the color I had mixed for the backboard was too dark so I mixed some more white paint with just a tiny bit of the aqua to make a much lighter color and again painted the backboard. Allow to dry.
Since I am going to be painting the word beach on the arrow and I am not the best at lettering I gave the arrow a light coat of Mod Podge to seal the paint this way if I did have to either erase the pencil lines or wipe off paint it would be much easier. Allow to dry.
Now for the fun part. Use an emery board to take off some of the light aqua on the backboard and away from the edges.
Once you are happy use the same brown paint as before to make sure the edges all the way around the sign are brown. This is one time you want to be a bit on the sloppy side and allow that paint to come over the edge just a tiny bit. Allow to dry.
For the word beach on the arrow I like to start with a pencil so I can get my letter size/spacing the way I want it. Then I come back with a tiny round dotting tool and some paint to go over the letters I penciled on I used the same aqua paint I’ve been using for the rest of the project. Allow to dry.
Now glue the arrow onto the face of the backboard using some more tacky glue and allow to dry.
A final coat of Mod Podge, I used Matt this time, to give the piece a finished look and you are done/ I do like to coat the back with the Mod Podge as well as the front for durability.
As always I do want to sincerely thank all of you for watching my videos and reading my blog posts. It means so much to me that you are supporting me in this way. If I could ask you all to do just a bit more by subscribing to the channel and liking the videos and leaving comments. Those help more than you can imagine. Also if you could pass the links on to your friends I would appreciate it so much.


No comments:
Post a Comment