Check back often

Have you checked out all my blogs?


Dollhouse Minis: http://joannesminis.blogspot.com


18” Dolls: http://joannes18dolls.blogspot.com/


General Crafts: http://joannes-place.blogspot.com/


Cooking: http://joanne-kitchen.blogspot.com/


Also if for some reason I can't post I will try to give a head's up on the Facebook page so check there too.

Sunday, February 28, 2021

Building the Beachside Bungalow part 04


Watch the video here.


This week we begin the process of building the shell of the dollhouse. I start by priming the wood pieces that will be used in this step.


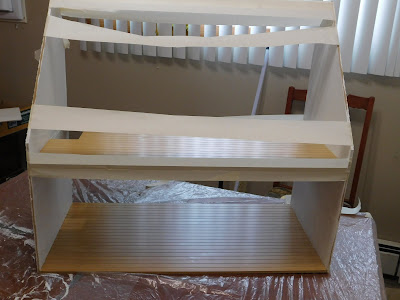
After the primer is completely dried we begin the process of gluing the shell. I highly recommend that if possible you get a buddy to help with this process. I was able to get it in the end but it would have been much easier if I had an extra pair of hands and eyes. The pieces are large and it is hard to make sure everything it lined up correctly in all areas while the glue is still workable. This is especially true of the hot glue. I don't normally get anywhere near a hot glue gun for my mini projects. However in this case I needed something that would hold the pieces until I could glue them. I did have to peel off glue in places and reapply because I wasn't fast enough and the hot glue set up. I am glad it is so easy to peel away. (side note I am proud of myself that for once I didn't burn myself with the glue gun) Also there were many words uttered that could not be in the final video, LOL.


Be sure to use plenty of masking tape to help hold the house together while the glue dries.


On this kit it is important to assemble it with the back of house against your work table. There is supposed to be a bit of the floors that comes out past the side walls that will attach to the front piece. I am not confident that mine sticks out as much as the directions say but we will cross that bridge next week.


I did do a dry fit of the front piece before the glue from today's work had dried to make sure everything will line up next week. I am really looking forward to seeing this project come together. I really need to start making my finial decisions about paint color in the very near future.


As always if you have any questions be sure to ask me.


Also feel free to share the links to the video and blog with your friends that would enjoy it. I really want to grow both the blog and the YouTube channel over the next few months.

Friday, February 26, 2021

Primer and Why I Am Using It


I have gotten more than a couple of questions privately about why I am using primer on the Beachside Bungalow build. I am aware that the kit manufacturer states that primer is not necessary and they site the reason that paint will stick to the wood just fine without it. In my opinion that is just one of the reasons to use primer and in this case it is not even on my list of reasons.


So why do I use primer?


What ever is the first coat on those pieces of wood is going to soak in much more than later coats. The first coat seals the wood surface for the later coats. Primer is typically a little bit thinner than the paint I will be using for the final finish and is designed to soak in. For the exterior of the house I will be using latex paint that is designed for use in real size houses, the kind you would use to paint the interior walls with. This paint is designed to work best over a primer. In fact most of the latex paints will cure which means they undergo a chemical change as they dry. This chemical change is dependent on the paint drying at a normal rate. If the surface is not sealed the paint soaks into the wood and therefore dries much faster. This will effect how the paint cures, how it looks and how well it holds up over time.


If you have watched any of my build videos before then you know that I paper all of the interior walls of my projects. This of course requires some kind of glue. Just like I don't want the paint to soak into the wood I don't want my glue to soak in either. Without primer the glue I use to adhere the wallpaper might not work correctly, it might cause my paper to bubble, to not discolor, or possibly even to not stick at all. In any of these cases I would then have to take all the paper I had put up down and start over.


Another purpose of the primer is to help hide my tape-wire. If I decided to use a light colored paper on the walls that the color of the tape-wire shows through I can simply paint a coat of primer over the tape-wire to help hide it. If the wall was not primed this would be a much more involved process.


Also for me starting with the plain white coat of primer allows my imagination to flow much better. I can “see” more options for what I want to do with the house if it is all a very neutral white, like a blank sheet of paper.


So those are at least some of the reasons I am priming all the surfaces on the Beashside Bungalow as I build it.

Sunday, February 21, 2021

Building the Beachside Bungalow part 03


Watch the video here.


This week we are continuing the work on the Beachside Bungalow, specifically the front porch. We start by priming the porch floor. I got to use my new mini paint roller and tray that I picked up at Walmart. I am really impressed with how well it works and we will be using it a lot next week. I also shared my favorite tip for paint rollers, that is to wrap and freeze them between uses. There is a lot of paint soaked into the roller cover and I had to wast it by washing the roller out each time. By freezing it I can wait until I am done to deal with it.


Then we glue the porch floor to the foundation that we put together in an earlier video. As per the instructions I temporarily taped the main floor to the foundation just to keep everything square.Be sure to add some weight to the porch floor to make sure everything stays in place while the glue dries. 


The last job this week was to cover the porch, foundation, and porch post bases all with a base coat that will match the finish coat I am going to use on them.


I did go back and give those all a second coat off camera. They are looking great. I did forget to do the front step, I will catch it up to the rest of the porch off camera.


Next week we will be moving to building the main body of the dollhouse. I am so excited to see this come together. It doesn't matter to me how many times I have built dollhouses I always get excited watching them come together.


Sunday, February 14, 2021

Building the Beachside Bungalow part 02


Watch the video here.


This week we are starting to assemble some of the pieces that will make up front porch.


First we assembled the railings. There are 3 separate parts to the railings, one long section and 2 short ones. The gluing guide included in the kit made this part of the project really easy. In the past when I wanted to glue parts like this I first had to make myself a jig to help with the gluing. This was much easier and faster.


The next parts we worked on were the post bases. These are what support the porch posts and I am going to use the same fun finish on them that I will be using on the foundation. These were again really easy to put together. If you make this kit up be sure to watch that you are making mirror image post bases for the ends. Also take you time in lining up the pieces and check that the everything is nice and squared before the glue dries. 


And lastly we assembled the porch posts. When I started filming I had not intended to do these this week. I was going to do them next week. But as I sat down to edit the video I decided it just made more sense to work on them this week. They only took a short while to make and I am glad to have them ready to go. 


I hope you are enjoying the build so far, if you have questions be sure to ask.


See you next week.


Sunday, February 7, 2021

Building the Beachside Bungalow part 01


Watch the video here.


I want to preface this project by saying that although I am reading the directions provided in the kit I am also using my own judgment based on experience building dollhouse kits for my plan of attack. That might mean that some of the things I choose to do might cause me problems later on. If they do I will show you how I fix those issues too. If I had never built a dollhouse before and was going this alone I would probably be following those directions step by step. Over the years I have learned some things that work better for me while building and I will be sharing my way of doing things.


This week we are doing the very beginning of the building of my new dollhouse kit. I start out by showing you how I marked each piece in the kit. I did this because before we can start building we need to make sure that all the parts that are supposed to be in the kit are actually there. I am happy to report that my kit does contain all the pieces that are supposed to be included.


I used a pencil to lightly write the name of each piece on the larger pieces. I was careful to do this on the back of the pieces and in a corner. I tried to stay consistent with the corner I marked also. I did this for a couple of reasons. I used the pencil because I know I can erase it in the future as I build and it won't leave any marks that I have to hid later. That is also why I am emphasizing that I wrote lightly, I was careful to not write hard enough to leave any dents in the wood. Also if I have used a pen it might have left marks that I would have trouble removing in the future. You don't want to have to worry about hiding those marks later so use a pencil and be careful to write lightly.


On the small parts that there were several of each I bagged them by type (1 type per bag) and marked the bags. That way I will know which bag has the parts I need each time I need to work with them.


When I build a dollhouse kit that is made of the thin plywood I always prime the pieces on both sides before I do anything else mainly to prevent warping. On this kit since the parts are made of MDF and are thicker I am not as worried about warping. For that reason I will prime some parts after doing small bits of construction, like with the foundation today. On other parts I will be priming both sides prior to construction It will depend on what steps I am doing and what seems logical to me at the time. I will try to remember to explain my “why” each time. This week it was simply because I felt it would be easier to prime the foundation after it was glued together rather than trying to prime both sides of the long skinny pieces.


Now on to why we prime. Primer is used to seal the wood. In this kit and with dollhouses that are made of ¼ “ plywood we are sealing to both help to save on the amount of paint we use to finish the dollhouse (primer is generally cheaper than paint, not always but generally) and to give our final coat of paint a surface to grip to. The primer also seals in any stains that might come out of the wood either from pitch or from the manufacturing process. In the case of the thin plywood that I have worked with in the past the primer also helps to prevent warping as I mentioned earlier.


I decided to use Gorilla brand wood glue on this project for most of my gluing. I had purchased it a while back and I am really liking this glue for wood to wood bonds. It works really well and cleans up nicely.


The wood floors are milled into the wood pieces in this kit. I am used to laying a wood floor from thin strips of wood so this will be a new way of getting a wood floor if I decide to go that route. Since I haven't decided on a color scheme/decorating scheme for the project yet I haven't decided what I am going to want for floors. For that reason I went ahead and added the protective coat of clear poly-urethane to the floor pieces like the directions said to do. That keeps my options open until I do decide.