Check back often

Have you checked out all my blogs?


Dollhouse Minis: http://joannesminis.blogspot.com


18” Dolls: http://joannes18dolls.blogspot.com/


General Crafts: http://joannes-place.blogspot.com/


Cooking: http://joanne-kitchen.blogspot.com/


Also if for some reason I can't post I will try to give a head's up on the Facebook page so check there too.

Sunday, August 26, 2012

Celery for the Dollhouse


So this week I decided to challenge myself and you as you follow along with this produce series. I chose to make some celery. This is a project that will require a lot more patience from you as you work on it because of the details. My best advise is to bake often, I think most of my bunches of celery saw the inside of the oven at least 4 times. Be sure you are baking at the correct temperature, usually 230 degrees Fahrenheit because of the translucent clay. I only baked for about 3 minutes each baking until the final one then I gave a final 5 minutes to make sure everything was baked through.

Speaking of clay, I used Fimo in this project. The first time I tried this project I was out of Translucent Fimo so I tried it with some Premo translucent that I had on hand. It was way, way too soft for this project so I really recommend using Fimo on this one. Fimo soft is just a bit more firm than the Premo so I was able to get the celery to hold its texture, the Premo was so soft that the texture just disappeared on me.

The clay blends used:
The white- Fimo White 1 part
Fimo Translucent 3 parts

Green- Leaf Green 1 part
White mixture (above) 1 part
Yellow 2 parts


It will really help to have some celery on hand to match the color to, you may need to tweak your color mixture a bit to match your celery.

This project also really needs to bake on a surface like a paper plate to avoid ruining the bottom side that rests on the baking surface.

As I mentioned in the video, this project really surprised me in the amount of clay it actually took to make. I am usually pretty good at judging how much clay I will need and can almost always mix up really close to the right amount. Sometimes I will mix in two batches so I can show you on the video how to mix it but I do that on purpose and know how much to mix. This time I ran out of clay twice and mix a third batch. So either mix more than you think you will need or at least have extra of the colors so you can mix more.

I hope you enjoyed this project, be sure to check out the Facebook page for the latest updates and to share your pictures of your projects. 


Friday, August 24, 2012

Farm-stand Project- the greenhouse floor


One of the things that for some reason took me an awful lot of time was to decide how I wanted to finish the floor in the greenhouse area of the farm-stand. I haven't decided for sure what will be sold out there, I know I will be probably be putting some kind of plants out there but not sure what yet.

Anyway it has been many years since I have been inside a greenhouse so I looked online at several different options. The one I found that I liked the best was made up of concrete slabs with moss growing between. It was so pretty in the picture that I decided that was what had to be in this greenhouse. So concrete slabs are easy, egg cartons are the perfect material and I decided to leave the color alone. I also love the fact that this is a free craft material. So I got out a stack of egg carton lids that I have been saving. You can see from the picture I have a few, and started cutting 1” squares. 


When I had enough squares to cover the floor I spread a thin layer of tacky glue on my primed floor piece. I had primed the floor piece ahead of time with gray primer so it would be ready when I needed it. I actually got two floor pieces in the kit so both are primed. I then placed the squares of “concrete” in place. I didn't mark out a grid or anything because I want this to be a floor that is just laid out on a sand base so they could have shifted a bit over time.

When the squares were in place I spread some blended turf that I got at a local model railroad store over everything. 


Because I have had so much of this kit that was warped when I unpacked it I decided I had better clamp the floor while the glue dried. I used some clothes pins and simply clamped it together with the other floor piece. This will do 2 things. First it will make sure the squares lay flat and it will also encourage the floor to stay flat. Since the glue is covered with a pretty heavy coat of “moss” I'm not too worried about the two pieces sticking together but I will un-clamped them before the glue dried all the way.


The next step was to carefully cut any overhanging squares away from the edges and give a top coat of Mod Podge to seal everything. I used the Matt finish variety so it will seal without giving a lot of shine.

Then when the Mod Podge was dry I decided that there needed to be a lot more “moss” between the concrete slabs, So time for plan B, I used my tacky glue to fill all the spaces between the slabs. Then I went through with a toothpick to even out these lines a bit and to make sure they were down into the the spaces.


Then I remembered to set the floor on a piece of paper so I could save the extra moss. I then spread a nice thick layer of moss over the floor and used my hand to pack it down just a bit. I let this dry for about a half hour then dumped the excess moss onto the paper under the floor. I then put this excess back in the bag.


Now the floor just needs to dry overnight then I can start assembling the greenhouse.

Thursday, August 23, 2012

Farm-stand Project

I finally got around to working on the building my farm-stand and therefore all the produce I have been making will go in. The kit has been sitting here in its packaging for months and I kept putting off getting started. I had a bunch of excuses; I couldn’t decide how I wanted to add a door on the one side, I didn't have room until I got my office/workroom set up, it was too hot, it was too cold, etc, etc, etc. I'm sure you all know how that goes.

Since I am semi moved into my new workroom I decided that I needed to get started. A few days ago I opened the packaging and took out all the pieces. I did discover that some of the parts are terribly warped but I decided to go forward anyway. I think by the time I am done it will pull together just fine. I have a few tricks up my sleeve. In fact I solved a lot of the warping by adding the outside wall treatment. If it continues after I install the main beam at the back opening I can add some more support on the inside.

I did forget to take any pictures of the early work (sorry) I just got into the job.

The first hurdle I had to get past was to open up a door opening in the side of the building that will lead to the greenhouse addition I am also using. The wall already had 3 windows and at first I thought I would just turn the center window into a door way. The problem with this idea was that the opening was way to short to act as a door. I played with the idea of just using it that way anyway but it just didn't look right. In the end I ended up cutting the wall from top to bottom at each side of the center window opening and then using some jumbo craft-sticks (ends cut off) to make a splice at the top. I centered the first piece of craft stick over the opening and then cut pieces to extend to each end of the wall. This wall now looks like it has a beam at the top on both the inside and outside of it. I think it worked pretty well. I will paint it to match the wall to help it blend in better.

I am loosely (very loosely) basing the farm-stand on a real produce market I shop at frequently. Mostly the wonderful bright red paint with white trim for the exterior color. I want this to look like it belongs in a farming area and as I look at most of the older barns and other out buildings in the area where I live I find they were constructed using what is called Batten Board (or Board and Batten depending on where you live). This type of construction in real life is created by alternating wide boards and narrow wooden strips (the battens) . Most of the time (at least here) these boards run vertically and the boards are about a foot wide with the narrow boards much narrower. The battens are there to cover the seams between the boards making the structure weather tight. In mini we can copy this look by simply gluing on the narrow boards (1/8” square strip-wood in this case) on the side of the walls. I played around with placement and decided to put mine 3/4” apart. This measurement fit the best with all 3 of the sides of the building and worked out with the existing window openings. By adding these battens to outside of the walls I was able to straighten them out a lot. Also the walls feel much sturdier from technique.

At this point I have the main structure glued together. I did end up adding some 3/8” by 3/8” strip wood inside the building at the corners. Without those the warping was pulling the front corners apart terribly. I haven't decided yet how I will handle these vertical beams when I finish the interior. I will figure it out when I get to that step I guess. 

side with the added door opening

back opening, you can really see the warping here


Yesterday I stopped by the local Lowes store and picked up a sample size container of paint to use for this project. If you haven't checked out the this as an option for painting your dollhouse you should. They can mix almost every color they have available in the sample size (7.6 oz) and it is real paint. It comes in satin finish and goes on wonderfully. I paid under $3 for the can and there will be plenty left over. The color I chose for the farm-stand is “Fabulous Red” and it really is fabulous for this building. I have one coat of the paint (over my primer of course) in these pictures. I think I will probably only need one more coat but I can't tell until the second coat is on. Red is a hard color to use and takes more coats than some other colors. I think this red will look absolutely fantastic with the white trim. 


So that pretty much catches up with where I am with this project. I try to be better about posting and taking pictures of the building as it goes together.

Sunday, August 19, 2012

Dollhouse Miniature Peaches


This week I am showing you how to make some farm fresh peaches for the dolls in your dollhouse. I think this would be a project that would take well to sizing up for Barbie too. So have fun and make the size you need.

I used the following clay colors:

Premo- Alizarin Crimson
Cadmium Yellow

Fimo Soft- Tangerine

The flocking I am using is from Studio G, it comes with 4 little tubs of flocking on a round cardboard. The colors seem to be random but the price (at least in the stores here) is usually around $1 for the set of 4. They also have glitters in the same packaging.

This week the video is a bit late because I have been busy getting my new office/craftroom set up and moved into. When I am finally moved all the way in I will do a tour for you. I might post some pictures and tell about some of the adventures I encountered this week.


Sunday, August 12, 2012

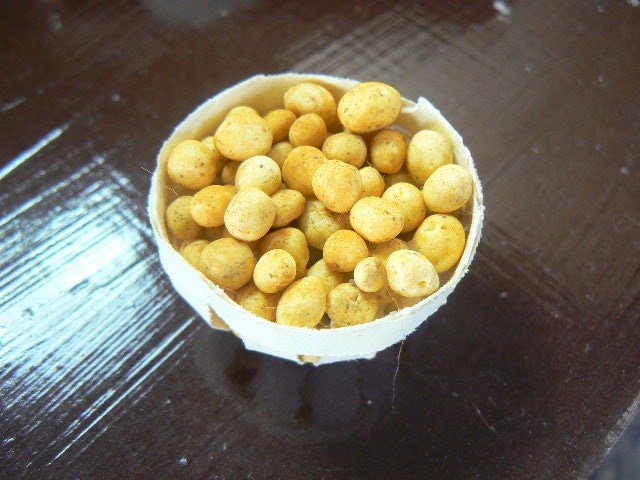
Dollhouse Miniature Potatoes


This week I decided to show you how to make some potatoes. I had 3 varieties in my pantry so that is what I am demonstrating how to make. You can make whatever variety of potato you want although it is easier if you have the potato in front of you.

The basics are going to be the same, so take what I show you on these three and adapt it to your favorite variety.

For the base clay mixture for most of the potatoes I used a combination of equal parts White Fimo and Transparent White Fimo with just a bit of Yellow Ocher Fimo to warm it up a bit. For the Yukon Gold potatoes I replaced the Ocher with some Premo Cadmium Yellow. Be very careful with adding the yellow a little bit goes a long, long way. I ended up with one batch that was way too yellow and had to start over. So be patient and add just a bit of yellow to your white/transparent mixture. Also be aware that the Premo will make your clay mixture much stickier than the straight Fimo.

I decided to use the Artist Loft chalks, which I believe is a Michael's store brand. I find them to be a very useful set of chalks for several reasons. I love the sheer number of colors (36 in my set) and the fact they are not too overly pigmented. I pull out this set of chalk when I want a lighter touch with the chalk application. I actually have several sets of chalks of different brands and use them depending on how much coverage I want to achieve.

In making potatoes remember that they are a product of nature and therefore not perfectly shaped. They are not perfect balls. They have eyes (the spots where roots can grow) they can dents and scars. I found the simple toothpick to be the best tool for adding these spots to my potatoes.

I need to come up with a larger basket for the russet potatoes and made up on really quickly the same way I have been making the smaller baskets. After filling it I find the cardstock was not heavy enough to support the size. I will need to figure out a fix for that soon, or else just stick that basket in a corner of the produce stand.

We now have a lot of variety on produce in our little stand. I will continue to work on some more for a while and then I think we will move on to other things at least for some weeks. I also really need to get the structure of the produce stand built so I know how much produce it will hold.
the red potatoes
russets

Yukon gold


Monday, August 6, 2012

Repainting a resin figure


I have been working on a display piece for the last month or so. More about that in a later blog post.

Today I thought I would talk about a portion of the project. For the scene I am making I needed an elderly gentleman that could sit in a chair. I also needed him to be wearing a suit. I found a doll that was very close at Miniatures.com (Charles #43020 ) he was practically perfect except for one thing. Charles is a causal kind of guy. He is dressed in a dark blue sport coat and beige slacks. I tried to convince myself that this would work for my scene. The more I thought about it and looked at him in my partially completed scene the more I knew that he had to have a suit. I talked it over with some friends online and they concurred that for this scene the sport coat had to go.

I have painted (and re-painted) many dolls and resin figures over the years. I have my system down and it works really well for me. So I thought you might like to see how I do it in case you want to try to attempt this yourself.

Now, I do have to say the dolls that I have painted have held up but they really aren't played with. I simply use them in scenes. So if you are going to handle your doll I am not sure how well this will hold up to constant handling.

My first step to wipe down the doll with some rubbing alcohol on a cotton ball. This removes surface dirt and oils that may be on it. Don't skip this step because if you paint over the surface dirt and oil your paint will come off very easily. I find the alcohol also dries almost instantly so I can get right to work.

I use good quality craft paint from the craft store. My preferred brand is Delta Ceramcoat, but any good quality acrylic paint will work. As important as any other step is choosing the right brush. Get some tiny brushes in the best quality you can afford and take care of them They will last a long time if you take care of them. Pick the right size brush for the area you are painting. I used 3 brushes for Charles (a #6 flat sable brush and a small round brush and a tiny round brush- sorry the numbers have worn off the handles so I don't know what size they are) Paint the doll in small areas and allow the paint to dry thoroughly before you come back to do more. Just be sure to wash those brushes.

Depending on the type of doll and how it will be used, you may need to seal it with a matte or satin finish brush on sealer. Since I am not going to be handling Charles once he is glued into the scene and I only painted the clothing I am not going to seal him this time. If I was going to handle him I would have found some matte sealer for the fabric areas.

Here are some before, during and after pictures of Charles.
before
first coat of white   

first coat of dark blue

Finished


I also recently re-painted the arms only on the doll I use to display my mini foods. Since I wanted the skin of her arms to match the rest of her I sealed her with a satin sealer. Here is a before and after of her: 


notice the marks on her arm

much better now


Sunday, August 5, 2012

Dollhouse Miniature Cantaloupe


This week I am making another fruit that was requested, the cantaloupe. I had never made cantaloupes before so I did a lot of experimenting before I found the right method. I did come up with several ways that seemed like good ideas but just didn't work out. I think some of them will be useful for other items later though.

To me the things that I wanted in my cantaloupes were the layers of color and the heavy texture. The color layering was pretty easy, I knew I wanted a darkish green for the under-layer so I went directly to leaf green. For the outside I knew that I needed a light beige type color and the Sahara seemed to be correct after trying a few other colors. Another plus to the Sahara is that it is one of the soft clays. The soft texture allowed the texturing to break through and expose the dark green of the under-layer.

Now it was onto finding the right tool to give the texture I had in mind. I tried several things and was just not happy with the results. A few that were close to what I wanted were crumpled up aluminum foil and a peppercorn. Then I remembered I had bought the scrubber to use for texturing a while back. As soon as I tried it I knew it was just what I was looking for.

The cantaloupes need no coating because the skin on the real thing is very matte finished so once you bake them they are ready to display.