Check back often

Have you checked out all my blogs?


Dollhouse Minis: http://joannesminis.blogspot.com


18” Dolls: http://joannes18dolls.blogspot.com/


General Crafts: http://joannes-place.blogspot.com/


Cooking: http://joanne-kitchen.blogspot.com/


Also if for some reason I can't post I will try to give a head's up on the Facebook page so check there too.

Sunday, January 28, 2018

Dollhouse Miniature Front Porch pt 1


This week we are beginning work on our new project series where we are going to be making a dollhouse scale front porch. It is designed to be a freestanding display. This was a request from one of the wonderful members of my Facebook page. It is very loosely based on a kit that was available many years ago. I say very loosely because it is a porch and it has the basic components of a front porch. I think it is about the same size but I'm not sure.

I don't remember who made the original kit but there used to be lots of pictures of the porches made from the kit around. Some people set them up and never changed them. Then there were those that decorated their porches for every season and some went all out on that decorating.

There were a few things about that long ago kit that I never liked. One was the way the door and windows were not next to each other but rather on adjoining walls. The other big thing for me was that you could look right through those windows to whatever was behind the display. I have been thinking for a couple of years how to change both of those things.

This week we are working entirely with foam core and I am using the type from the dollar store. I really do prefer it over the craft store variety and usually have at least a couple of sheets on hand for projects. In addition to the foam core you will also need whatever door and window(s) you plan to use. Here are the cutting dimensions for the project:

Back wall unit:
2 pieces @ 13 ½” tall by 13” wide
2 pieces @ 13 ½” tall by 1 ½” wide

Side wall:
2 pieces @ 13 ½” tall by 9” wide.

back wall unit
Be sure to cut the window/door openings before you glue the back wall unit together.

I am using plain old Tacky glue and cheap sewing pins to glue the pieces of foam core together. The pins make for a much better bond and keep everything lined up while the glue dries.


back wall unit


I am making the side wall from two layers of foam core just to make it more durable.
sidewall pinned
top view of back wall unit


Next week we will be adding the siding so think about what kind of siding your house should have. Right now I am planing to use the cardboard strips like I did for the corner roombox to create lap siding. You can use any type of siding you wish. We will be adding a foundation, porch and base in future weeks.


Sunday, January 21, 2018

Dollhouse Miniature Window


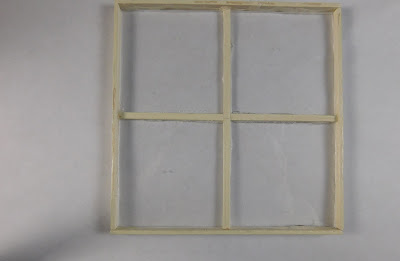
This week we are making a window to use in the project that I plan to start next week. This is a really simple window, nothing that opens. And again we are just finishing the front side since there won't be an interior that we can see on the project. If you need a window with a finished back side just repeat the same steps on the reverse side.

My window was cut from the same piece of leftover plexi-glass that I used for the door. I cut it 4 ½” square.

I used some strip wood that was about 1/8” wide by 1/16” thick for the interior strips. I glued them on and cut to size after the glue set. The outer “frame” was just skinny sticks.


I did pre-paint all the pieces of wood with an ivory craft paint then coated with satin Mod Podge. We will be making the visible outer window frame when we install the window.


I used Beacon 3-in1 glue for this project. I found in a quick test that it held the wood to the plastic and did not fog the plastic. I hope that the hold will remain over time since I haven't been using this glue for a long time I am going by what others have said about it lasting. 

Sunday, January 14, 2018

Dollhouse Miniature Door


Watch the video here.


This week we are going to be making a door that I will be needing for an upcoming project. The door I need for this is non-working so that is what I am making today. This door could be made to be working by making just a few changes which I talked about in the video.

I only finished the front of my door since that is all that will be seen once I install it in my project, you can choose to finish both sides of your door or just the front depending on how you are going to use yours.

For the door we need the following pieces of wood:


From 1/16” wood:
4 @ ½” by 6 ½”
1 @ ½” by 3 ¼”
2 @ ½” by 2
1 @ 2 ½” by 3 ¼”

From Jumbo craftstick (or 1/16” by ¾” stripwood)
6 @ 1 ½”

From skinny sticks (or 1/16” by ¼” stripwood)
1 @ 2 ½”
2 @ 3”

1 piece of plexiglass or clear plastic from packaging
1 @ 2” by 2 ¾”

For the door frame:

From 1/16” by ¼” strip wood
2 pieces the height of the door (sides)
1 piece the width of the door + the side pieces (top)

From a regular craftstick
1 piece the same length as the top piece.


This project is really easy if you pay attention to how I laid out the pieces. Be sure to measure very carefully! That is really the key to success on this project. I did try to make all the dimensions easy to measure. Dry fit all pieces before you glue also and make adjustments as needed.