Check back often

Have you checked out all my blogs?


Dollhouse Minis: http://joannesminis.blogspot.com


18” Dolls: http://joannes18dolls.blogspot.com/


General Crafts: http://joannes-place.blogspot.com/


Cooking: http://joanne-kitchen.blogspot.com/


Also if for some reason I can't post I will try to give a head's up on the Facebook page so check there too.

Tuesday, November 27, 2018

My Absence from YouTube/Blogs

I know I have been gone from Facebook, my YouTube channels and my blogs for a while now. I wanted to let you all know what is going on and why. But first I want to say I will be back I'm just not sure when. I want to get back to posting like before eventually.


This last year, starting with the month of November 2017 has been by far the hardest of my life. While there have been some fantastically wonderful things happen (like my first grandson being born) there have been some very hard things happen also.

The deaths of several people close to me has hit me harder than I could have ever imagined. I have also watched people I care about suffer from mental/emotional issues and I have to say the feeling of helplessness that you are left with watching that is indescribable.

There have also been some financial worries in my life that have caused me more than a few sleepless nights.


I know I have been on the brink of depression for most of the last year and many days have been a battle just to get up and do what needs to be done.


I'm not telling you all of this for sympathy or anything else other than to let you all know what has been going on and why there have been so few videos.

I actually have several videos filmed or partly filmed (some from back in August) that I just haven't had the energy to finish. For whatever reason the idea of starting the editing just seems so hard right now.

I will make it up to all of you and the porch series will continue.

I am starting to feel better about life and more like myself the last few weeks. I will get back on track. I want to thank all of you that have stuck around while I have been absent.


Sunday, August 5, 2018

Dollhouse Miniature Front Porch pt 11


This week we are going to be adding the “soil” to the planting areas as well as the “grass” to the lawn.

For the soil I went to my standby- coffee grounds. I love the ease of using them, there are always more on hand (at my house at least) and since they would normally either end up in the garbage or the compost they are a free material. They also look great when glued down on our mini projects. If you would like to learn more about the process of using the coffee grounds here is a link to a video I made a while back explaining the process.

For the grass in my lawn this time I decided to try something new, at least new to me. I found a really cool sheet of moss in the floral department of the craft store. I picked the smallest package, the sheet of moss was about the same size as a sheet of normal paper. I really like the more natural feel and look of the moss. This was absolutely the first time I have used a sheet of moss in this way so I have no idea how it will hold up long term but I am in love with it right now.


The biggest thing I learned was to work with as large a piece as you can for any given area and to make sure to pick off the extra layers in the thickest spots.

Because the moss is natural and it has various thicknesses throughout the sheet it automatically makes for a more rolling surface. One of the things I hate about a lot of mini landscaping is that the surfaces are too often perfectly flat. The real world is not perfectly flat it rolls up and down and has holes in it. The moss that I added adds to the realism a bit in that respect. It also has areas that look more green and some that are brown and look dead, again a bit more realistic. 
 

The biggest drawback I think is the mess that the product creates, it is really messy. I really wish I had worked on this outside, it would have made cleanup a lot easier.

If you don't want to use the moss and would like to use my method of adding the lawn with a terry cloth towel here is a link to video where I show you how to do that. (it is toward the end of the video)

So that is where we will leave the project for this week. I hope you are enjoying the process and picking up a few tips along the way.

As always thank so much for watching my videos and reading the blog.

Thursday, August 2, 2018

Dollhouse Miniature Front Porch pt 10


This week we are working on a couple of small parts of our front porch project.

First we are adding these cute little screw eyes to the wood strip we put in last week that runs around the porch ceiling. These will give us a place to hang things like bird feeders and plants to the porch later. I have been adding something similar to all my dollhouses I construct for years (the ones that have a front porch)


I got the idea from the hooks my dad put on our real house when I was in high school so my mom could hang plants. It worked so well in real life I figured it would work in mini too.

The other things we are doing are placing the walkway up to the step. I wanted to make this look like a sidewalk type walkway but you could use any of the other types of walkways I have done in past projects in place of what I do this time. In fact the egg carton stones would look great here too.


The other thing we did was to base coat the base with a dark brown paint in preparation for our flower beds and lawn areas which we will begin working on in the next video.


Video Problems

I want to address an issue I am having with my computer and let you know that at least some of the videos in the coming weeks may be uploaded in lesser quality. As some of you might know my desktop computer died a while back. My son wasn't able to fix it and has promised he will build me a new computer. He is taking his time to get the best items for the best price he can so it might take a while. In the meantime I am using my (formally) retired laptop for everything. It has many issues including randomly shutting off. It also has a tendency to overheat badly.

Currently, here in Oregon we are experiencing a very hot summer. The software I use to create my videos takes a lot out of my computer and the laptop is struggling.

The video I am posting today I have been trying to finish the last step of the editing process for 3 days. I was finally able to get it finished by getting up at 5AM when the temperature was a lot cooler. Even then my laptop just couldn't handle the work of rendering the video at the normal High Definition quality. When I tried at 480p it was able to get through that (it took 2 tries) without shutting off.

So in future weeks, I will try to make the videos at the higher quality first. BUT if that causes the laptop to shut off I am going to output them at 480p instead. This is not an ideal situation but it is the best I can do for the time being.

What I really want is to be able to give you all high quality videos every week. But I have compromise somewhere, so if I can't do that I will still do my best to get you the videos as often as I can.

Please be patient with the process until I get the new computer. I am doing the best I can right now.

Thank you all for watching the videos and reading the blog posts.

Tuesday, July 24, 2018

Dollhouse Miniature Front Porch pt 9


When I first started this porch project I had an idea in mind for how to make the porch posts and a railing. I had it all figured out, at least I thought I had it all figured out. When I did a dry fit of my idea 2 things occurred. First it was very obvious that the porch was just too small to add railings to and still be able to see what was sitting on the porch. So I decided that there would be no railing. Okay, that was fine. Then I stepped back and looked at the porch with what I had been envisioning for the posts and I immediately hated it. In my mind it was going to be so cute but in reality it just didn't work.

I posted a photo to the Facebook group and they all agreed it just wasn't going to work as I had planned it. Darn, back to the drawing board as they say.


I did some shopping and came home with several choices which I narrowed down to 2. I then put those two up for a vote on the Facebook page. The square post won with with 39 votes (at the time I started filming) as opposed to the 5 votes that the round post I had also considered got.

As for prep work, I painted the post with the same Ivory craft paint I have been using for the trim on the project. I also painted a strip of 1/16” by 1/4” wood and the ceiling area of the porch.

the strips added to the ceiling
I cute the post to the same height as the porch ceiling is at the walls. I used some of my Beacon 3 in 1 glue to firmly glue the post in place. I did use a brick to weight down the porch roof so that the post will hold the ceiling level.

After the glue was dry I added the narrow strips all around the ceiling even with where the post sits. This will be helpful in a step we are going to be doing soon.

Sorry my videos are short and far apart right now. I am still using my old laptop and it just can't handle the editing software so everything takes way too long to do.

Sunday, June 24, 2018

Dollhouse Miniature Front Porch pt 8


This week we are proceeding on with the front porch project by adding the base. I decided to use two layers to make up the base because I really wanted to have a base that would support the project but I still needed to be able to easily add the landscaping. So I dug out a piece of ¼” MDF (at least I am fairly certain it is MDF) which I cut the size of 11” by 15”. I then cut a piece of foam core to the same size and glued the two together.

Now the size I chose might seem to be a bit random but I had my reasons. Well, kind of reasons. You see I had to move the porch project the other day and I happened to set it on top of my tablet of watercolor paper. I really liked the size of the tablet as a base so that is the size I went with for the base. Before this happened I had been going back and forth about what size I should use.

When you cut the layers don't stress about perfect cuts, we are going to be completely covering the layers and adding a trim piece around the outside edge so these pieces will not really be seen when we are finished.

Once the glue has dried draw a pencil line a ½” from the back and side edges to help you line up the porch structure.


I used tacky glue for the project today mainly because it was within reach. Any liquid glue that is foam friendly will be fine for this part of the project.

Once you have the porch structure glued onto the base add some weights to help hold it down flush and let the glue dry thoroughly. I left mine overnight to be sure it was dry.


That is all we are going to get done this week. I am still using my old laptop and I am bit afraid to try to edit a video that is very long.


Next time I hope to get the railings on the porch.

Sunday, June 17, 2018

Dollhouse Miniature Front Porch pt 7


This week we are finally back working on the front porch project. This is actually the second I filmed part of this video because my computer crashed a few weeks ago and I lost all the footage I had. I talked about it in the blog just before this one on here. If you are interested and want learn more about what is going on there be sure to read that blog too.

Anyway, back to the porch. I decided to make a porch and the foundation look like it is made of poured concrete. To this I used some of the pink insulation foam (sometimes called “builder's foam” by crafters) I did have to make a run to Home Depot to get more since I had used up my supply in the footage I lost. Here's a link to product on the Home Depot site so you will know what to look for if you are not familiar with this stuff.

As for the cutting sizes here is the list of pieces of foam I cut
All pieces are cut from 1” thick foam insulation

5 ½” by 11” - porch floor
1 ¾” by 13” - foundation piece 1
½” by 9” - foundation piece 2
½” by 4” - step

To turn the pink foam into something that looks like concrete you will need some craft paints.

The first coat is done with black, this not only acts as our dark base color but hides the pink color of the foam.

Next we layer on 3 or 4 (or more) shades of gray craft paint. You need at least a dark, a medium and a light shade. I ended up adding an additional very light shade of gray to really get the look I was after.

You can use any three colors of gray as long as they are in the 3 shades.

Working from the darkest to the lightest use a sponge to apply the colors being sure to leave some of the colors underneath showing. You will use less of each color as you move through the colors.

Try to not have much paint on the sponge when you paint with it, dab it off until there is very little paint left.

The last step is to glue the structure we have been working on for the last several videos to the foam “concrete” I used tacky glue for this. 


I love how this is turning out so much, I hope you do too.

Wednesday, June 13, 2018

Missing in Action


I know I have been absent for a while again. I had some stuff going on in my life and took some time off from all my blogs and youtube for a while. Oh, in case you didn't realize I have multiple blogs and Youtube channels. The links for all my blogs are at the top of this blog so if you are interested you can go check out the rest if you haven't before. Anyway, I had taken some time off them started posting on most of them again. I had been writing and filming for all the blogs/channels then my computer crashed. I had somewhere between 10 and 15 blog posts/videos in process. Since I normally don't backup posts or videos until they are complete I lost all of the ones I was working on along with all the photos to go with them. YIKES!!

I am still without my main computer. My son, Erik, (my IT guy) says he is fairly sure he can get my files off my old hard drive later. In the meantime he is working on putting together a new system for me. But because he is working full time and trying to keep the price as low as he can it will take a while. Currently I am using my old (previously) retired laptop, it is really slow and not terribly reliable (it tends to shut off randomly)

I am doing my best to get back up to where I can post on all my blogs and channels but it might take a while yet before I get back on any kind of “normal” schedule. Please be patient I should be back soon. In the meantime I will be posting when I can with what I can.


Sunday, May 6, 2018

Dollhouse Miniature Front Porch part 6


This week we are going to add the roofing to the front porch. I am using my favorite material for roofing, simple sand paper. This week I am using 100 grit from the dollar store. It is really important that you do spray paint/seal the sandpaper before you use it but that is really all there is to do.

I love how this looks like a modern day roof and is so easy and economical to use. I usually paint mine black because I prefer how it sets off the whatever color I have used on my siding but a quick drive around the neighborhood would give you a lot of color ideas.

Here is a picture of the markings I did on the back of the pages. I have come up with the color system to make it easy for me to keep straight what lines I cut and how far. You can use any 3 colors of marker to do the same thing.


The lines on the roof start 1” up from the bottom edge and then are ½” apart all the way to the top.

After the marking and cutting are done it is just a simple job to glue the strips to the roof being sure to offset the shingles like on a real roof.


Thursday, May 3, 2018

Why I use the stuff I do


I wanted to take a few moments to talk to all of you about something I get asked about a lot. Pretty regularly I get messages or comments on videos questioning why I use things like foam core, paper board, etc. I will say some of those messages have actually been on the mean/rude side although most are very polite and just wondering.

Really the reason is super simple. Dollhouse miniatures are my passion. I love the hobby so much and I want to share that love with as many people as possible. I go out of my way to come up with projects that are as approachable as possible on a regular basis. That being said I also offer some projects that are more advanced and take some skill to complete. But especially with the building projects I want everyone to have a chance at doing them and being able to afford them.


With the current project, the front porch. I could have used wood instead of foam core. Then only those with access and the skills to use power tools could have done the project. Also the cost would have been much higher, especially since I am using the foam core from the dollar store. I have very little money invested in the project but I am still very happy with how it is coming along.

It is up to you if you want to make things like the door from the inexpensive materials I used or do you want to hop on over to the mini store and spend around $20 for your door. Do you want to take some inexpensive strip wood and some plexiglass to make a window or again spend your money on one from the store (again probably around $20)

If you have the skills and the access to power tools you could be making the porch project from wood. I figure those that can will figure that part out on their own though.

Personally I love to create, it is something that I actually need to do to feel like myself. I love to make things and the thrill of taking something inexpensive and turning it into something spectacular is really enjoyable for me. Even when things don't turn out exactly like I planned I still enjoy the process. I hope that you all do too.


Also I know that a lot of my viewers don't have a local miniature store to pick up things at. They either have to rely on the normal craft store or order online.


So I am going to continue to use recycled boxes and I am going to continue to re-purpose things that are easy to find in normal craft stores and the dollar store so that as many people as possible can enjoy this wonderful hobby.


Sunday, April 29, 2018

Dollhouse Miniature Front Porch part 5


This week we are getting the window and door installed to our front porch project as well as attaching the brick.

I did get a lot of work done off camera to bring the project to where we are. In the previous videos we had started the siding and I demonstrated how to make the brick also. Off camera I did get all both of these done on my project as well as I painted the structure. I decided to only add the lap siding the front and side of the piece and added a tissue paper finish to the back. I was running low on both the upholstery trim strip and time and the tissue paper was a lot faster and I had it on hand. This time I used some cheap tissue from the gift wrap area of the dollar store and it worked really well.

For the painting of the main structure I first base coated (primed) with a white craft paint (I used Ceramcoat from Delta for all the paints this week). This gave me a consistent color base to work over and I felt the light green paint looked better over the white than over the plain cardboard strips.

For the green I used Ceramcoat in Light Foliage Green and since this is a matte finish paint I followed it with a coat of Matte Mod Podge to give it a slight sheen and to seal the paint.

Also off camera I gave the area where I will be putting the roofing a coat of Black craft paint. I will be putting a black roof on and didn't want the white of the foam core to show between the shingles. Since I know I am a messy painter I wanted to get this done before I did any of the work today so it wouldn't get black paint on it.

For the faux curtain behind the window I used the flap off a cardboard box that I had gotten in the mail. Recycling at its best. I did find that one side of the cardboard peeled off a lot easier than the other and left a nice surface that looks like the back side of a window drape. I simply coated it with 2 coats of the same white craft paint.

After gluing the “drapes” in place the window and door were glued in place and then trim was added. For the trim I raided my stash of strip wood for whatever looked like it would work. The strip wood is 3/8” wide and about 1/8” thick so it looks nice and substantial. For the trim over the door I used a piece of dollhouse crown molding that has been in my stash for years. I do wish I had cut it just a tad longer but it is okay the way it is. I decided against trying to film the cutting of the trim since I am sure I not doing it the correct way. I usually start with my pieces too long then cut a bit off until they fit.

I used some Light Ivory craft paint (Ceramcoat) to paint these followed by a coat of Satin Mod Podge.

All of the gluing was done using Beacon's 3-in-1 glue which has quickly become my very favorite glue.


Sunday, April 22, 2018

Dollhouse Miniature Front Porch part 4- Prepping the Front Door


Sorry I have been absent for so long, I have just been really busy and really tired. Hopefully I am back on track now though.

So this week we are going to add a curtain to the window on the door for the porch project. I love the look of these little curtains in real life and I have wanted to use one on a dollhouse project for a long time. This is my chance and I am so glad it worked out.

For the sheer curtain I am using some of that 6” wide tulle from the fabric/craft store. It is usually fairly inexpensive and you get a lot on the spool. If you don't have this any sheer fabric will work.

First step was to cut a piece about 6” by 6” then fold in half and make a ¼” seam on the edge opposite the fold. This will form a sleeve from your fabric.

Now trim the sleeve to about 3 ½” wide.

Use a glue that will hold the tulle to glue toothpicks to the top and bottom then glue to the inside of the door.

The ribbon to gather the center is optional but that was the style I was going for here.

It really is that easy.

Sunday, March 11, 2018

Dollhouse Miniature Exterior Finishes


This is a long video but I had so much I wanted to share with you all on the subject. After last week's front porch video a lot of you said you would like to see other options for the exterior finish of the project (or any miniature building for that matter)

I thought about how to present the different options in a way that would make sense and give the feel of the finish on a “building” without having to actually build an entire building. I decided to make a cube out of foam core and use each side for a different finish. I think it turned out to be a good way to demonstrate the techniques in a single place and I have a cool display piece out of it. I think this format might be fun for other techniques too, maybe interior walls or floors or??? What do all of you think?

So let's talk a bit about each technique here:

First up was the brick. Now really important when you do this for your building use a pencil where I used the pen. I just wanted you to be able to see the lines so you could follow what I was doing.

The lines for the bricks are ¼” apart and the bricks are each ½” long. Be sure to offset every other row to create the pattern if you are making the same brick pattern I did.


Next that wood siding from the 70's, I think the builder called it T1-11 when my folks built their house in 1977. If you drive through any neighborhood around here that was built at that time it is what covers most if not all the houses. Does anyone want to use it for a dollhouse, maybe. I'm not sure but I thought I would include it here. It is really easy to do and uses the same tack strip we used for the lap siding last week.


Now onto the tissue “stucco” or at least it kind of looks like stucco, maybe. Whatever I love this one and I used it on my big dollhouse (the Harrison) it looks great and a lot of people ask how I did it.


I couldn't do this tutorial and not do the egg carton stones. You can make them any shape you want, I decided to go with a more free form stone this time. Since the material is basically free and you can cut it any shape you want you can make any type of stone you want with this one. Feel free to use regular grout if you have it on hand or the caulking I used today.


Another stucco like finish can be made by adding sand to regular paint to make thick textured paste that can be applied to the walls. This also looks great especially when painted a pale color. I think it would also benefit from a light wash of a yellow tone but I didn't have time this week.


Since we just did the “lap siding” last week I applied that to the cube off camera and just painted it on camera this week.


So now you have 6 options for the exterior of you miniature building. It would be fun to mix some of these to create a really special building.


If you have another finish you would like to see me do let me know. Maybe when we get 6 more ideas we can do another cube full of them.


Sunday, March 4, 2018

Dollhouse Miniature Front Porch part 3


This week we are finally going to be starting to add the siding to our front porch project. I am sorry I haven't been very regular in my video schedule life has been crazy lately. Between the new job, getting sick and then being snowed in I haven't gotten anything done the last month. Hopefully I can get back on my normal schedule soon. I do thank you for your patience in the meantime.

I am using a lap siding on my porch with an area of brick on the wall under the big window. I decided to add the brick after being stuck in a batch of roadwork a few weeks ago. I ended up sitting in front of a particular house for almost a half hour and as I sat there I was studying the front porch. I really liked the look of the brick so I decided to use it in this project.

Please let me know if you would like some other exterior wall finishes also. I can add some short demos of other types of siding if you would like. Just let me know what you would like to see. Pictures would be great too so I know what the look is you are wanting.


Sunday, February 11, 2018

Dollhouse Miniature Front Porch pt 2


I want to start by saying I am sorry I was out of frame and that I didn't get much done this week. I have still not been feeling great after being sick last week.

So this week we are going to add the roof to the front porch. I almost forgot to get this done before I added the siding.

For the roof area we only need to cut 4 rectangles of foam core.
1 @ 12 ½” by 6 ¾” (roof)
1 @ 12” by 6” (ceiling)
1 @ 12” by 2” (back)
1 @ 6” by 2” (sides) – this is cut on the diagonal to make 2 pieces

We will also need a scrap of foam core to fill the area between the roof piece and the front wall of the “house” I decided to do this this way so that the roof could have a flat area where we join it to the house. It should all make more sense as we move work on the area in coming weeks.

I know I said I was going to trim the roof piece along the side but I totally forgot until I had it glued to the house. It looks fine so if you want to trim yours go ahead but it will work either way. I blame the mistake on my cold medicine and the fact there was about 5 days between when I filmed the parts of the video.

Next week we should be moving on to the siding. Let me know if you would like a video on different options for dollhouse siding.


Sunday, January 28, 2018

Dollhouse Miniature Front Porch pt 1


This week we are beginning work on our new project series where we are going to be making a dollhouse scale front porch. It is designed to be a freestanding display. This was a request from one of the wonderful members of my Facebook page. It is very loosely based on a kit that was available many years ago. I say very loosely because it is a porch and it has the basic components of a front porch. I think it is about the same size but I'm not sure.

I don't remember who made the original kit but there used to be lots of pictures of the porches made from the kit around. Some people set them up and never changed them. Then there were those that decorated their porches for every season and some went all out on that decorating.

There were a few things about that long ago kit that I never liked. One was the way the door and windows were not next to each other but rather on adjoining walls. The other big thing for me was that you could look right through those windows to whatever was behind the display. I have been thinking for a couple of years how to change both of those things.

This week we are working entirely with foam core and I am using the type from the dollar store. I really do prefer it over the craft store variety and usually have at least a couple of sheets on hand for projects. In addition to the foam core you will also need whatever door and window(s) you plan to use. Here are the cutting dimensions for the project:

Back wall unit:
2 pieces @ 13 ½” tall by 13” wide
2 pieces @ 13 ½” tall by 1 ½” wide

Side wall:
2 pieces @ 13 ½” tall by 9” wide.

back wall unit
Be sure to cut the window/door openings before you glue the back wall unit together.

I am using plain old Tacky glue and cheap sewing pins to glue the pieces of foam core together. The pins make for a much better bond and keep everything lined up while the glue dries.


back wall unit


I am making the side wall from two layers of foam core just to make it more durable.
sidewall pinned
top view of back wall unit


Next week we will be adding the siding so think about what kind of siding your house should have. Right now I am planing to use the cardboard strips like I did for the corner roombox to create lap siding. You can use any type of siding you wish. We will be adding a foundation, porch and base in future weeks.


Sunday, January 21, 2018

Dollhouse Miniature Window


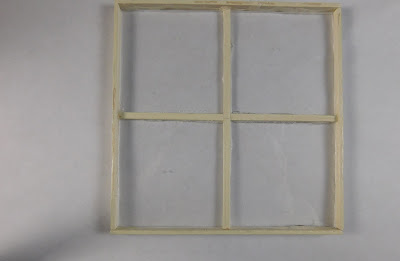
This week we are making a window to use in the project that I plan to start next week. This is a really simple window, nothing that opens. And again we are just finishing the front side since there won't be an interior that we can see on the project. If you need a window with a finished back side just repeat the same steps on the reverse side.

My window was cut from the same piece of leftover plexi-glass that I used for the door. I cut it 4 ½” square.

I used some strip wood that was about 1/8” wide by 1/16” thick for the interior strips. I glued them on and cut to size after the glue set. The outer “frame” was just skinny sticks.


I did pre-paint all the pieces of wood with an ivory craft paint then coated with satin Mod Podge. We will be making the visible outer window frame when we install the window.


I used Beacon 3-in1 glue for this project. I found in a quick test that it held the wood to the plastic and did not fog the plastic. I hope that the hold will remain over time since I haven't been using this glue for a long time I am going by what others have said about it lasting.