Check back often

Have you checked out all my blogs?


Dollhouse Minis: http://joannesminis.blogspot.com


18” Dolls: http://joannes18dolls.blogspot.com/


General Crafts: http://joannes-place.blogspot.com/


Cooking: http://joanne-kitchen.blogspot.com/


Also if for some reason I can't post I will try to give a head's up on the Facebook page so check there too.

Sunday, November 25, 2012

Dollhouse Miniature Pot of Chili

Watch this week's video here

This week I am going to show you how to make a really simple pot of chili for the dolls in your dollhouse to enjoy on a cold winter day.

For the pot I am using one of those pre-painted blue pots that are fairly easy to find in some craft stores. They are also pretty inexpensive so it is fun to make a bunch of these with different things in them for display.

The first step is to fill the bottom part of the pot with some scrap clay. I used a brown mixture that was leftover from some other project. Be sure to either put some TLS in the pan first or else to glue the clay in after baking. At the same time bake off some small chunks of green and brownish or brownish red clay. I try to have some of these chunks of baked clay on hand to add texture to foods, a very handy thing to have.

Now you need to use a cheese shredder (one that is only used for clay- look at the dollar store) to shred enough of the baked clay to fill the rest of your pot. I added in a few tiny beads that were on my work table too. For the sauce of our chili I am using Gallery Glass paint, I love this stuff for so many food items. This time I mixed two colors (orange poppy and cocoa brown) to get the right red-brown for a pot of chili. Just mix the two colors in about equal amounts then mix into the shredded clay and use to fill the pot. Don't worry about the color it is when it comes out of the bottle, it will become much darker and more clear as it dries. After you have the chili in the pot the way you want it leave it alone overnight.

I decided that I needed to add a can that the chili came from. I used my Easy-cutter to cut the eraser portion off a pencil. I then removed the eraser and painted the bottom with some silver paint. After adding a label and a smear of the extra “chili” it was ready to set on the stove top next to the pot. 


Wednesday, November 21, 2012

Online Miniature Groups

Since I am posting my annual video of the opening of my Birthday Swap box from one of my online mini groups I thought this would be a good time to talk about some of those groups.

I am a member of many online groups but I am limiting my discussion here today to the 3 main ones that I belong to and am active in. Most of the others I just read the digests and don't really do much else (that would be lurking)


The groups I belong to are all part of the yahoo groups community. If you aren't familiar with yahoo groups you can check them out online. They are free to join and take part in. There are groups for just about anything you can imagine. Some are great and just like in life some are far from great.

The first group I am going to talk about is Swap Shop (direct link to join) and it is run by my good friend Fern. This is the group that the birthday swap comes from. Fern runs a wonderful swap group and is open to new members. She does have rules but the best swap groups do have rules that need to be followed in order to function. She does swaps every month (except at Christmas) and also has the birthday and a yearly swap too. She runs mostly swaps in 1/12th scale but also has some 1/48th scale swaps running most of the time too. The group is fairly active and always very helpful. I started doing online swaps long before I sold my first mini and it was a wonderful training ground for making minis. If you are just starting out in minis and want to add to your collection swaps are wonderful for that. Especially if you are careful to only sign up for what you are actually collecting for. LOL It is easy to caught up in swapping and sign up for swaps that you will never be able to use. It was through swapping that I was able to hone my skills in making minis especially making multiples of the same item.

The second group is the The Camp (direct link to join) and it is run by the ever present Den Mother (DM for short) this is a huge group that spans the globe. If you have questions this is probably the best place on the web to ask. The members are all skill levels from some rather famous artists to beginners and everyone in between. Everyone there is very helpful and very friendly too.

The third group is the Roomboxes group (direct link to join) also a large group but not as active as Camp. This is actually one I co-own with a good friend, Sherry. Again there are people from all over the world and they are ready to help you whenever you need it. All you have to do is ask.

Joining a yahoo group is pretty easy, you will need to have a yahoo id. If you have a yahoo email address you already have the id if not it is easy to sign up.

I hope to see you on the groups soon. 


Sunday, November 18, 2012

Dollhouse Miniature Bacon


This week we are continuing with making some breakfast for the dolls in the dollhouse. I thought bacon would be a nice thing to make. And besides I'll use any excuse to eat a slice of bacon. LOL

Bacon is really easy, it just looks complicated. Take a close look it is really just a rectangle and it has some alternating strips of meat and fat. This is one of the times when you really need to either have a piece of bacon or some really good photos to look at for reference. I think my clay colors came out really close to the slice I had. You might find your bacon is slightly different color. That's okay, just match the slice you have as closely as you can.

First we are making the raw bacon then we will make some cooked bacon.

For the raw bacon we need to mix up some clay colors.

The first one we will refer to as Bacon 1- it is the raw fat color and is a mixture of equal parts Fimo white, Fimo translucent and Fimo flesh pink. Mix this well and set aside.

For the next color (bacon 2) we will mix equal parts Fimo Indian red and Fimo terracotta. This color will not be used on its own it is the base for the next 3 colors.

For Bacon 3 (the darkest of the meat colors) mix equal parts Bacon 1 with Bacon 2.
For Bacon 4 mix equal parts Bacon 3 with Bacon 1
For Bacon 5 mix equal parts Bacon 4 with Bacon 1.

You will need to look at your slice of bacon to determine how much of each of these colors you will need.

To make cooked bacon I decided to use the same cane, I just made it a bit smaller and then used both chalk and Amber Gallery Glass to give it the cooked color. 


Sunday, November 11, 2012

Miniature Artist's Easel


 I am taking a break from the breakfast series this week mainly because I needed to finish these easels and didn't have time to get the next breakfast item made too.

This week I wanted to show you how to make a cute and simple artist easel for the artist in your dollhouse.

The basic easel is made of an 1/8” by 1/8” basswood strip. You will need 2 pieces cut 6” long, 1 piece cut 5 ¾” long and one piece 2”. You will also need a piece of skinny stick that is about 2 ¼” long, a 2” length of jewelry chain and 3 head pins. Some pliers, wire cutter, and glue round out the supplies needed to complete the easel.

This easel is very adaptable to a lot of different scenes, do you want to make it taller or shorter? No problem, just adjust your measurements. I think this would be cute to hold a sign for a little cafe too.

I chose not to add any kind of finish to my easel but you can paint of finish yours any way you desire. Maybe you want to add some paint splatters to yours to make it look well used. Or is yours new like the one I made?

As a bonus I also show you how to turn some of those fancy toothpicks into some paint brushes for that mini artist. The ends can be cut to represent almost any shape of brush. And again you can either make new brushes or old ones that are paint stained or ones that are filled with paint and being used in the scene.

In the picture I did use one of those wooden shapes from the craft store to stand in for the painter's canvass. The one I used was 3” by 2” and just labeled as a rectangular sign.


finished brushes

the brushes before they were painted


Sunday, November 4, 2012

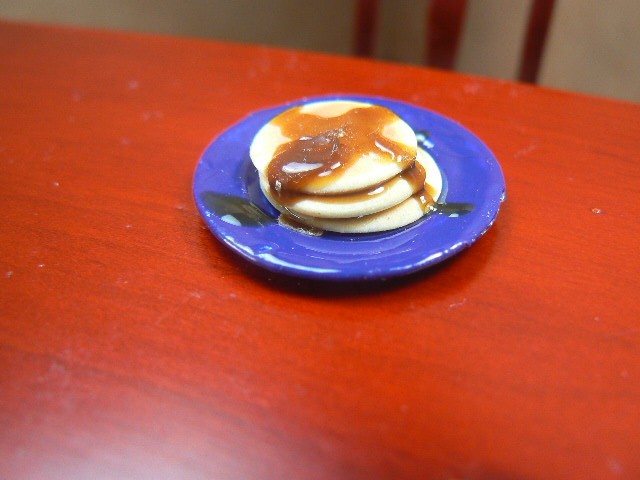
Dollhouse Miniature Pancakes


This week I am still in breakfast mode and we are making a stack of pancakes. I found that Fimo's Vanilla color clay was almost a match for the real pancake it just needed to have a touch of white added to bring the color to the correct hue.

Start by thoroughly mixing that clay, then you have to decide how big your pancakes are going to be. Remember pancakes come in all sizes from tiny little “dollar size” to ones that cover the plate. I choose to make mine somewhere in the middle of that range of sizes. For my pancakes that ended up about ½” in diameter I started with a ball of clay about ¼” in diameter so use that as your guide. Really smash the clay down onto the paper plate too, you want them fairly flat to look in scale. Keep your finger coated with the cornstarch too, it will really help in this task.

For the chalk color I find it best to layer the colors starting with the yellow ocher (golden yellow) and working toward brown. It really does make a difference in the quality of the color of the finished pancake (or any food) so take the extra moment to layer.

I did try several different colors of glass stain paint for the syrup. I really do prefer the glass stain paints for this and I used to have the perfect brown for it. When I went to do this project I found the bottle of my favorite “syrup color” was completely dried up. I made a trip to the craft store to re-supply only to find that they no longer carry the off brand paint I had. I checked all the ones available and bought a couple that looked like good candidates for syrup. None of the ones I bought really looked right. I found that by combining my Amber Gallery Glass with my Cocoa Brown Gallery Glass I got a really good syrup color. I do mix Gallery Glass paints all the time, it mixes very nicely and allows you to do so much more with a limited number of colors. Since this is a product I use a lot and I do recommend you buy some of the basic colors it is nice to not have to buy all the colors they have. I would recommend a bottle of Amber, Cocoa brown and one of the reds to start. They will give you a lot of different effects in making mini foods.