Check back often

Have you checked out all my blogs?


Dollhouse Minis: http://joannesminis.blogspot.com


18” Dolls: http://joannes18dolls.blogspot.com/


General Crafts: http://joannes-place.blogspot.com/


Cooking: http://joanne-kitchen.blogspot.com/


Also if for some reason I can't post I will try to give a head's up on the Facebook page so check there too.

Sunday, July 29, 2012

Miniature Tomatoes


Watch this week's video here

Last week in the process of doing the prep work to make the strawberries I had dug out all the red clay I could find, which wasn't much. Over the weekend I happened to hit a couple of stores that had Fimo on sale so I stocked up on some of the reds that were missing from my stash. I also picked up a package of Premo Pomegranate since it was such a pretty red too. So all of these packages of red clay were sitting on my work table waiting to find their way to my clay storage tubs. Also over the weekend I had picked up some tomatoes to make a salad from. So with all that red clay staring at in my in one room and the tomatoes in my kitchen I decided it was only natural to make some mini tomatoes this week.

I did a bake test again since I had all new packages of clay. I find that red especially tends to shift color when it is baked so I wanted to see how the colors would look when baked. I am finding myself doing bake tests a lot more recently, they only take me a few seconds and I can be sure of what my clay is going to look like. I hate those times I have worked really hard on a project only to find the clay didn't do what I thought it would and I have wasted a bunch of clay and my time. So I grabbed an index card, a pencil, my packages of clay and my little tile with TLS. I wrote the names of the three clays I wanted to test on the card, kneaded a tiny bit of each color dipped this sample into the TLS and adhered it to the card just under its name. I then baked it for 5 minutes while got my work area set up to make my project. When the card came out I found that Fimo Indian Red was a good match for the main color of my tomato. I wanted to add some variety to my basket of tomatoes so I also mixed some of the same red with some Sunflower Yellow. I noticed I still had a bit of the Fimo Carmine out from last week's strawberries so I mixed that with a bit of the same yellow for a bit more variety.

Now I was ready to make tomatoes, or was I? Not quite, I next measured the tomato I had with me and made mental note of the shape. Now I was ready to make tomatoes.

The shape of the tomato is basically that of a ball. Some varieties are more round some have a definite flat shape and some are really longer and thinner. I chose to make mine fairly round.

The making of the tomatoes is pretty easy to grasp from the video I hope. After some things we have made these almost make themselves. So have fun with them.

The tops made of Fimo Leaf Green are probably the hardest part of the project and with a little practice even they are really easy. I think the green leafy parts are what make the project too so don't give up, you can do them.

When the tomatoes had cooled from their final baking I again used Future Floor Finish to coat them. I love the finish this stuff gives to my mini fruits and vegetables. It is a really subtle shine, it could almost be described as a glow not a shine. If you can't get this product or don't want to buy a big bottle just for a few minis go ahead and use a satin finish that is compatible with the baked Fimo.

This week's photos:


Mrs Doll is bringing the basket to join the rest of our produce for sale.


This picture of the basket of tomatoes is my favorite shot of all the ones I have taken so far of the produce projects. 
 

Remember to request what you want to see.

Find us on Facebook too!

Sunday, July 22, 2012

Mini Strawberries


Watch this week's video here

This week I decided to show you how to make some farm fresh mini
strawberries. Since strawberries are one of my favorite summertime
treats I am not really sure why I put them off for so long. I had
intended to make them in June but somehow forgot. Thankfully a viewer
reminded me this week that I hadn't done them yet.

Strawberries are really fairly simple. I think the two most important
pointers I can give is to be careful on the size and to work with a
firm clay. A soft clay is not going to work well for this project so
dig out your Classic Fimo instead of the Soft variety this week. I
found that Carmine Red was a good match for the real strawberries that
I had in my kitchen so that is the clay of choice this week. The firm
clay is a lot more resistant to fingerprints so that works in our
favor. The texturing is relatively simple with a toothbrush. I have
tried for a long time to figure out a way to give the texture a hint
of color (like the real seeds on the real berry) but so far all my
efforts have come out way too heavy so I am leaving them plain. If you
really want to add the hint of color you might try a very watered down
yellow paint but my experiments came out looking painted. Let me know
it you solve this issue. The trick will be to just get the color inside the texture and not on the surface of the berries.

The basic shape of our berries is very similar to the basic shape of
the mini peppers we made a few weeks ago. The berries are just smaller
and a little more pointed. If you look at real fruits and vegetables
you will start to identify that most of them are really just
variations on similar shapes. The size and color is what really sets
each apart from the others.

Be prepared and have some wet wipes or a damp towel handy because the
red clay (and the red chalk for the un-ripe berries) will stain your
hands really quickly. It also stains clothes and just about all other
surfaces so try to be neat and clean up as you go.

Another caution with red clay is that I find it to be the color that
seems to shift the most when baked. If you over bake these they will
turn really dark on you so watch them carefully and under-bake if need
be. Also be sure to double check the recommended oven temperature for
your clay. I sometimes bake at slightly under the recommended
temperature to avoid the color shift with the red. Baking at 5 degrees
cooler won't hurt and it may save your project. We are baking these a
total of 3 times if you are using TLS to adhere your berries to
whatever container you going to display them in. I used a time of 5
minutes for each of these bakings (for a total of 15 minutes) so I
know my berries are baked through.

On to the pictures: 
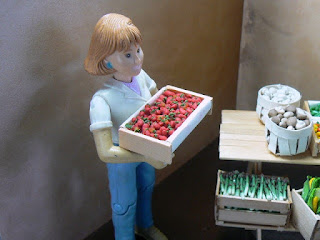
 Mrs Doll is coming in the box of fresh berries. Don't they look yummy?


The display is really filling out quickly for me. I really hope you are enjoying this series as much as I am. 


An close up of the berry box. The TLS really shows up in the photo but in person is not really noticeable even with a magnifying glass. I'm not sure why it shows so much in this picture. 
 

Sunday, July 8, 2012

Dollhouse Miniature Broccoli


This week I decided to show you how to make some broccoli. I made this decision for a couple of reasons but mainly because I wanted to show you another use for that metal wire strainer I used to make the corn last week. This time I use it differently and get a really different look using the same strainer. Also we eat lots of broccoli here so it seemed natural to get it in the produce stand.

One of the first challenges anytime we are making something out of polymer clay is to pick the correct color of clay. I went through a few steps to determine which color clay I was using for this project and felt I should probably share those steps with you so you can use them too.

First it was obvious that I would need green clay of some kind. I also knew I would need a fairly soft clay since I was going to be using the strainer. I pulled all the packages of green clay I could find in my stash (I also determined I am missing a box of clay but I am sure I will find it someday) Next I got out a clean paper plate. I took a small ball of each of the colors of clay, dipped them in TLS and then stuck them to the clean paper plate. Since I was testing several colors I labeled each one as I went. Next I baked the test batch of clay for about 5 minutes. I found that none of my colors were a great match but that two were close I then mixed each of those colors with white clay added them to the plate and re-baked the plate.

Through this test I found that the package of Sculpey 3 in Moss mixed with an equal amount of Fimo Soft white was a workable color.

Through experience I have learned that clay colors (some more than others) will shift somewhat in the baking process. That is why I did the baking test of the clay. 
 

I am thinking that when I have time I am going to take this procedure a step further and bake off index cards with samples of all the colors of clay I have on hand and keep those in a file box for reference when I am choosing colors for a project. That will definitely have to wait until I have some time to dedicate to the project though.

Back to the broccoli that we are making today. This would be an easy project to make in Barbie size, what I made as stalks of broccoli would be the perfect size for Barbie to snack on too.

I hope you can see in the video how I got the clay to push up through the mesh of the strainer and how to brush just the top with the darker green chalk. I like this method so much better than the method I see a lot of people do where they start with a ball of clay and try to add the texture to the solid ball.

I think the only bit of advice on this project I can give is to first be patient with yourself this does take some practice. Once you get the hang of it though it is really easy. Also keep wet wipes on hand because between the soft clay and the chalk you are going to be messy and to avoid getting that mess all over everything wipe up as you go.

I don't think there is much new I can say about the pictures this week other than to apologize for not getting a better picture of the broccoli by itself. It really doesn't show up very well in the basket in the picture and I didn't have time to go back and take another one yet. 


Friday, July 6, 2012

Has it really been 2 years???


First I want to thank all of you that read this blog and watch the videos on YouTube and of course those of you that have “liked” the joannesminis' Facebook page. You are all so wonderful and you have no idea how much your support and the wonderful things you say mean to me.

Since it has been 2 years since I started the YouTube channel (July 5, 2010) and posted that first video (the Harrison Tour) I would like to take a few minutes of your time and give you a look inside what has happened and maybe a peak at what might be coming.

Before I posted that first video I had toyed with the idea of making the channel and posting the video tutorials for at least 6 months. Every time I would talk myself into it I would turn around and talk myself back out of it. I am my own worst critic and I was sure no one was going to watch or listen to me. Thanks to some very good close friends I did start the channel. Back then I didn't have a real video camera just my digital still camera. It takes videos but not very good ones and there is so much I couldn't do even if I had known how or what I wanted to do. That was why I did the first 2 videos as picture tours of my dollhouses. After they were up I had to figure out how to take an actual video. I was so nervous, I made sure I was home alone and I made a video. It felt so weird to sit there talking to the camera. LOL And I cringed when I re-watched that video (Ghost) a while back. I have definitely learned a lot in 2 years.

About that same time I had committed to a sales table at the local mini show (another first) and I decided that any profits would go towards a video camera. I was so happy when that camera came in the mail. I did have to learn to use it, then I had to learn to convert the video to a format that my computer could use. All a huge learning curve for me.

I am so glad I did start the channel and start making the videos.

I still remember when I got my first subscriber on YouTube! I was so excited that someone I didn't even know wanted to watch my videos. A year ago I was just reaching 100 subscribers on the channel and now as of the posting of this blog there are 664 subscribers! I wish I could personally thank each and everyone of you.

Some of you have found the Facebook fan page I started, 109 people have liked the page so far. I love being able to talk a little more one on one on Facebook with those of you that have found us. I am hoping more of you will post pictures on the wall showing me (and everyone else) what you are making. I really do want to see your projects too.

This blog is the latest in addition in my way of trying to connect with all of you. I am happy to see that we now have 33 people following the blog. Not bad at all since I just started posting recently on here. I hope to grow this area also along with the YouTube and Facebook portions too.

To celebrate the 2 year birthday of the channel I did a small makeover on the videos. You will find my new logo in the title screen now along with new music. The new video look will start on next Sunday with the video I post then. I hope you enjoy the new music, I tried to pick something light and happy.

I did have to draft my son to help me with the new logo. You can see the finished logo at the end of this post. That is my son, Erik, holding the small house in the silhouette. I did everything from take the picture to the finished product all by myself on it. I am proud of the new logo and hope you like it too. The reason I made it was I needed new business cards and I want to do some screen printed shirts for my daughter and I to wear when we man my table at the upcoming local mini show. I hope the shirts turn out. I'll try to remember to post some pictures of them so you all can see when the time comes.

Now on to what is coming up...
Well, I have tons of ideas for new videos to make and post to YouTube I want to do lots more in the fruit/vegetable series. I need to get started on my produce stand and show you all how to do some new things on it too. And so many other ideas too.

I may get to do an interview with the very nice lady that owns the local mini show too. I am still working out the details on that one. I will also do at least one video at the show too when it comes around (early October)

I am also trying to get some videos done to make into DVDs to sell too. I want to do some more complicated projects for those and I hope to have at least the first one done soon.

Well that is about all for today. Thank you so much for watching and reading and I hope we can continue this for a long time to come.

Be sure to request what you want to see too! 


Sunday, July 1, 2012

Mini Corn on the Cob


This week I show you how to make some ears of corn for your mini project.

To be honest I wanted the striping on the corn husks to be a lot more subtle and made a test ear with the colors I liked but when I photographed it the husk looked completely one color. So since I am doing these tutorials for you, so you can see what I did I made the decision to make the stripe much more bold. In person they look almost cartoonish but they do show up in the photographs. It is a fair trade I think. So when you make your corn you will have to decide how bold you want the colors in the husks.

The ears of corn themselves are made of Sunflower yellow color soft Fimo. No mixing needed on this one at all. I also use a fun tool to get the look of the corn kernels, a wire mesh strainer. I got mine in the kitchen section of the local Dollar Tree. I actually use the strainer for several different projects so it really is a handy tool. Just don't ever use it for food again after you use it for your clay.

For the silk on the corn I am using some yarn I had on hand for another project. Here are pictures of both the label and color name. I do like to have this yarn on hand for lots of things too. It is cheap (usually under $3 for a mini lifetime supply) and comes in so many colors. I think I will also be using this same color later to make hair for some dolls for the little girl in my dollhouse to play with. If you can't find this I am sure some embroidery floss in a similar color would also work nicely.

For this project we bake the ears of corn multiple times, as long as you stay in the recommended temperature range you can bake your items as many times as you need to. The main reason I like to use multiple bakings is to protect delicate details (like the corn kernels) from being ruined as I add on more details. It would be next to impossible (for me anyway) to add the husks to the ears of corn without smashing the detail. It also helps when we are anchoring bits onto the ear (the silk in this case) so it will behave itself while we add the rest of the bits.

Let's look at those pictures I put at the end of the video a little closer.


First we have Mrs. Doll coming in with the box of fresh corn. 

 
In this close up you can see how bold the stripe colors are. 
 
All the produce we have made so far. It is getting to be a good variety already. 
 

I hope you are enjoying this series of videos. Be sure to check us out on Facebook if you haven't already.

If you have a project you would like to see me do a tutorial on be sure to request it.