Check back often

Have you checked out all my blogs?


Dollhouse Minis: http://joannesminis.blogspot.com


18” Dolls: http://joannes18dolls.blogspot.com/


General Crafts: http://joannes-place.blogspot.com/


Cooking: http://joanne-kitchen.blogspot.com/


Also if for some reason I can't post I will try to give a head's up on the Facebook page so check there too.

Sunday, December 30, 2012

Dollhouse Size Table for the Kids


This week we are making a small table for the kids that live in the dollhouse. This project came about because I found some cute little chairs at Dollar Tree (thanks to a ti on one of the mini groups I am on) that were perfect for the kids in the dollhouse. The chairs had originally been a stacking game and since there were only a dollar for 10 kid size chairs I couldn't pass it up. Now that the kids had some chairs I knew that they would need to have a table to sit at. Right?? So this is the table that I came up with to go with them. I know several people have shared with me that they are working on projects like day care centers and the like so I thought this table would be perfect for those settings.

The table top is simply 2 of the wooden rounds that can be found at the craft-store, I used the 3” size. I decided that I would need to glue two of the rounds together both to make it look more realistic and also to accommodate the pegs used for the legs. The legs are simply labeled as 1 ¾” Shaker Pegs. I found that the top of the pegs was just about 7/32” so I was able to use a regular drill to make my holes. After sanding the top I wanted a totally smooth top so I used my favorite Yes glue to add some scrap-booking paper to the top, this was cut to size when the glue dried.

As soon as I looked at the edge of the table it reminded me of the metal edge that some many tables have so a quick coat (or 2) of silver paint and we had a table with a metal edge. I did use my finger to apply the paint, I find I have much more control in areas like this with my finger and I don't have a brush to remember to clean.

After the paint dried I used Mod Podge to coat the table. I sprinkled some various nail are glitters in the wet Mod Podge to add a nice decorative element to the table. When this dried a few more coats of Mod Podge and the glitter was embedded in the table top. I really love the way it turned out. You probably noticed I used my finger to apply the Mod Podge, this was for a couple of reasons. First no brush to clean and secondly no brush marks. I find I can get a much more even coat with my fingers on small areas like this.

I hope you can use one of these tables in your scene.


Sunday, December 23, 2012

Dollhouse Miniature Breakfast Sandwich


This week's project is a really easy breakfast in both mini and real life, the breakfast sandwich. We are again using some of the English muffins we made a few weeks ago, that video is here if you haven't seen it yet.

I think most of us have eaten a breakfast sandwich at some time or another either homemade or from the local fast food joint. I figured your dollhouse family might need to have the same convenience of a quick to grab breakfast. This is a super easy project you can tell that partly by the short length of the video. This would be another great beginner project and a subject that a lot of younger miniaturists can identify with.

Again we are using some left over clays for some of the elements.

For the meat layer I used a bit of the clay that was left over from the Bacon video, I am pretty sure this was the lightest of the clay colors from that project. The directions for that mixture are here. Really though the exact color isn't critical in this just make up a light brownish pink color.

For the egg I used a bit of the white/ translucent mix that I use a lot for food. Just equal parts of the two colors are all you need.


For the cheese I found that some Sculpy III in the color sweet potato was perfect. Also the fact that the clay is so soft won't be a problem in this project. Just use whatever clay you have in a cheesy color. Be sure to roll the cheese layer out very thin to get the melted cheese look.

In fact getting the clay thin enough is probably the hardest part of this project. We are going to have 5 layers by the time we have the sandwich completed. Each layer needs to be thin enough or your sandwich will be way to tall to look believe able.

At the very end it does help to coat just the cheese with some kind of gloss finish to make it look a bit greasy and melted. 


Sunday, December 16, 2012

Eggs Benedict for the Dollhouse


This week's project uses some of those mini English muffins we made last week. If you didn't catch that video you can watch it here. This is the perfect place to use some of the English muffins that maybe the texturing didn't turn out as well as you had hoped. We will really only see the sides and a bit of the top (depending on how much hollandaise sauce you add)

I have to admit this is my very favorite breakfast so this one was especially fun for me to make. I did make my son and I the real thing for breakfast the day I filmed too. We decided that we had to make the scarify for the video LOL.

As to the clay colors I used:
For the meat layer I used a bit of the clay that was left over from the Bacon video, I am pretty sure this was the lightest of the clay colors from that project. The directions for that mixture are here. Really though the exact color isn't critical in this just make up a light brownish pink color.

For the egg I used a bit of the white/ translucent mix that I use a lot for food. Just equal parts of the two colors are all you need.

For the sauce I am using Scribbles brand shiny fabric paint. I love the fabric paints for making sauces. They come in a bunch of colors, are realistic in texture and drip-ability. They are my go to product to make sauces of all kinds. They are also inexpensive and a tiny bit goes a long way.


Thursday, December 13, 2012

New YouTube channel

I just wanted to give you all a heads up that I have added a new off topic YouTube channel. I have found myself watching a lot of the vlog channels that my favorite YouTubers have so I decided that I wanted to join in the fun.

I won't be posting there as often as on my mini channel (at least that is the plan currently) and these videos will be non mini related. Just stuff we are doing and things that I find interesting and want to share.

I posted the first video over there this morning and here is the link to it  if you want to take a look. If you are interested in watching more of the vlog videos be sure to subscribe to that channel too.


Glass Paint Comparison


I have been planning to do this video and blog post for a while but hadn't gotten around to it. I decided that the time had to come to get myself in gear and get this done because I have heard reports from several people that their Michael's stores are in the process of discontinuing the Gallery Glass that we all use so much.

So far I am happy to report that the Michael's I shop at has not started to discontinue their supply.

The reason I wanted to do this comparison in the first place was that I had noticed that there are currently 3 brands of glass paint in my local craft store and I wanted to know for myself how they compared. I decided to do this as a video/ blog post because I thought you might find the process I use to test this kind of thing helpful. Also hopefully the results will be useful to you also.

The brands of paint I am testing today are: Gallery Glass, Martha Stewart crafts, and Deco Art Glass Stain. I kept the test to 2 colors from each line. Since the 2 colors of Gallery Glass I use the most are Amber and Clear I was hoping to test those. However, only Gallery Glass has an Amber. Both of the other brands have an orange and brown and Amber falls in between those two colors. Since I already had a brown in the Deco Art brand I chose to try the orange color in Martha Stewart. The prices of the 3 brands were comparable at my store with Gallery Glass at $2.79, Deco Art at $2.99 and the Maths Stewart didn't have a shelf tag but rang up at $2.44 on sale (30% off regular price, you can do the math) 


I didn't really like the packaging on the Martha Stewart brand because it seemed to be overkill. The bottles were both shrink wrapped and there was a paper/foil seal on the bottle. Also the opening on the actual bottle is really small as is the opening on the nozzle top.

The Deco Art just had the paper/foil seal on the actual bottle top and I think that is sufficient.

If I remember correctly Gallery Glass just has the shrink wrap not the paper/foil seal.

As for the openings of the nozzles on the bottles the Gallery Glass seems to be the middle sized. The Deco Art is a bit large and I can see where the product could come out too fast from the bottle. On the other end of the spectrum the Martha Stewart nozzle is really too small. I actually had trouble getting the product even out of the bottle.

To set up for the test I decided that the bacon and fried eggs that I made recently would be good tests for the paints. I mentally divided up a paper plate into 3 areas and put one egg and one slice of bacon cane in each area. I used some TLS to adhere the clay to the plate so they will stay in place after baking so even if I manage to drop the plate I will still know for sure which is which.

After the clay was baked and cooled I labeled the three sets of clay with the initials of the product. Any notes you need to keep your info straight works here. I do the same thing when I am testing color mixtures of clay but I write down the colors or brands of clay used.


Next step was to apply the paint to the clay pieces. I used my finger being sure to clean up between colors/brands with a wet wipe.


Now we needed to just wait for the paints to dry. I found no information on the bottles on how much time to expect this to take so I just had to wait and check back every once in a while.

The paints all were dry in a short time I'm not sure how long it took since I had to leave the house to run some errands and all were dry when I returned.

The Gallery Glass is definitely the winner in this test. It dries smooth, the color is just what I need for projects, etc.
 
Gallery Glass sample as applied

Gallery Glass sample after drying is complete


The Martha Stewart, the dried finish on this one is a bit on the grainy side and I really wish it had a bit more shine. The biggest downfall though is the lack of an amber color. Also I really dislike the bottle! This one runs at a distant 2nd to the Gallery Glass.

Martha Stewart as applied


Martha Stewart after drying is complete


The Deco Art is really grainy in my opinion when dry, for some uses that might be a good thing but not for the applications we are testing today. I do prefer the bottle but because of the texture of the product once I dry I have to place it last in the ratings.


Deco Art as applied
Deco Art after drying is complete

I hope this was helpful to you, if there are other products you would like to see me test let me know and I'll see what I can do.

Also as a side note, I am looking into other sources for Gallery Glass for all of you. If it does become harder to locate I have a few ideas but that is in the future. 


Sunday, December 9, 2012

Dollhouse Miniature English Muffins


This week I decided to show you how to make some English muffins to go along with the breakfast foods for the dollhouse. These are another simple project that is made with polymer clay. I am using Fimo again this week, only three colors needed: white, translucent and golden yellow, the same colors we used last week for the fried eggs.

I would imagine you have noticed how often I use the basic clay mixture of equal parts white and translucent clay. It is so basic to so many things we make in clay that I try to keep a large batch mixed up and ready to go. When I find a sale on clay I buy a block of each of the two colors and mix the blocks together. Just be sure your work area is perfectly clean (you don't want to ruin 2 entire blocks of clay even if they were on sale). I then store the mixed clay in a well marked zip lock plastic bag. It is so nice to be able to just pull off the amount of pre-mixed clay that I need for a project.

On a side note if you noticed my son whistling in the background please comment either here or on the comment section of the video. He doesn't believe me that it came through on the video. LOL

Be sure to make a few extra mini English muffins because I am going to use them in the next couple of weeks as the base for some more breakfast items.


I love to take pictures of the mini with the real thing.

Breakfast is coming along nicely!


Sunday, December 2, 2012

Fried Eggs for the Dollhouse


This week I am continuing on the breakfast theme with some fried eggs. These are the typical “Sunny Side Up” eggs that my dad loved to eat for his breakfast. In real life they can be kind of tricky to get them cooked just so but, in mini they really couldn't be easier.

In my opinion these fried eggs are probably the easiest food item I have ever demonstrated for you (hence the short length of the video) but at the same time one of the coolest when finished.

You only need 3 colors of clay (white, translucent, and a golden yellow) I used Fimo but any brand would work for these. The only other material you will need is some clear glass paint, I used Gallery Glass because that is what I have and I know how it works.

Since we are coating the cooked clay with the glass paint I cooked the eggs on a tile. I find that when I cook my foods on a paper plate and then coat with the glass paint the paper from the plate sticks to the dried paint and makes a mess. I really dislike baking on the tile but it is just easier for this project.

Since these are so easy they would also be really easy to re-size to another scale. Just work up or down in size.

One tip, don't make the balls of white/translucent clay to perfect, you want the egg white to have an interesting shape. Also don't put your yolks all dead center on the whites. Think about how a real fried egg looks, they are never perfect.

Above all HAVE FUN!!!!


Sunday, November 25, 2012

Dollhouse Miniature Pot of Chili

Watch this week's video here

This week I am going to show you how to make a really simple pot of chili for the dolls in your dollhouse to enjoy on a cold winter day.

For the pot I am using one of those pre-painted blue pots that are fairly easy to find in some craft stores. They are also pretty inexpensive so it is fun to make a bunch of these with different things in them for display.

The first step is to fill the bottom part of the pot with some scrap clay. I used a brown mixture that was leftover from some other project. Be sure to either put some TLS in the pan first or else to glue the clay in after baking. At the same time bake off some small chunks of green and brownish or brownish red clay. I try to have some of these chunks of baked clay on hand to add texture to foods, a very handy thing to have.

Now you need to use a cheese shredder (one that is only used for clay- look at the dollar store) to shred enough of the baked clay to fill the rest of your pot. I added in a few tiny beads that were on my work table too. For the sauce of our chili I am using Gallery Glass paint, I love this stuff for so many food items. This time I mixed two colors (orange poppy and cocoa brown) to get the right red-brown for a pot of chili. Just mix the two colors in about equal amounts then mix into the shredded clay and use to fill the pot. Don't worry about the color it is when it comes out of the bottle, it will become much darker and more clear as it dries. After you have the chili in the pot the way you want it leave it alone overnight.

I decided that I needed to add a can that the chili came from. I used my Easy-cutter to cut the eraser portion off a pencil. I then removed the eraser and painted the bottom with some silver paint. After adding a label and a smear of the extra “chili” it was ready to set on the stove top next to the pot. 


Wednesday, November 21, 2012

Online Miniature Groups

Since I am posting my annual video of the opening of my Birthday Swap box from one of my online mini groups I thought this would be a good time to talk about some of those groups.

I am a member of many online groups but I am limiting my discussion here today to the 3 main ones that I belong to and am active in. Most of the others I just read the digests and don't really do much else (that would be lurking)


The groups I belong to are all part of the yahoo groups community. If you aren't familiar with yahoo groups you can check them out online. They are free to join and take part in. There are groups for just about anything you can imagine. Some are great and just like in life some are far from great.

The first group I am going to talk about is Swap Shop (direct link to join) and it is run by my good friend Fern. This is the group that the birthday swap comes from. Fern runs a wonderful swap group and is open to new members. She does have rules but the best swap groups do have rules that need to be followed in order to function. She does swaps every month (except at Christmas) and also has the birthday and a yearly swap too. She runs mostly swaps in 1/12th scale but also has some 1/48th scale swaps running most of the time too. The group is fairly active and always very helpful. I started doing online swaps long before I sold my first mini and it was a wonderful training ground for making minis. If you are just starting out in minis and want to add to your collection swaps are wonderful for that. Especially if you are careful to only sign up for what you are actually collecting for. LOL It is easy to caught up in swapping and sign up for swaps that you will never be able to use. It was through swapping that I was able to hone my skills in making minis especially making multiples of the same item.

The second group is the The Camp (direct link to join) and it is run by the ever present Den Mother (DM for short) this is a huge group that spans the globe. If you have questions this is probably the best place on the web to ask. The members are all skill levels from some rather famous artists to beginners and everyone in between. Everyone there is very helpful and very friendly too.

The third group is the Roomboxes group (direct link to join) also a large group but not as active as Camp. This is actually one I co-own with a good friend, Sherry. Again there are people from all over the world and they are ready to help you whenever you need it. All you have to do is ask.

Joining a yahoo group is pretty easy, you will need to have a yahoo id. If you have a yahoo email address you already have the id if not it is easy to sign up.

I hope to see you on the groups soon. 


Sunday, November 18, 2012

Dollhouse Miniature Bacon


This week we are continuing with making some breakfast for the dolls in the dollhouse. I thought bacon would be a nice thing to make. And besides I'll use any excuse to eat a slice of bacon. LOL

Bacon is really easy, it just looks complicated. Take a close look it is really just a rectangle and it has some alternating strips of meat and fat. This is one of the times when you really need to either have a piece of bacon or some really good photos to look at for reference. I think my clay colors came out really close to the slice I had. You might find your bacon is slightly different color. That's okay, just match the slice you have as closely as you can.

First we are making the raw bacon then we will make some cooked bacon.

For the raw bacon we need to mix up some clay colors.

The first one we will refer to as Bacon 1- it is the raw fat color and is a mixture of equal parts Fimo white, Fimo translucent and Fimo flesh pink. Mix this well and set aside.

For the next color (bacon 2) we will mix equal parts Fimo Indian red and Fimo terracotta. This color will not be used on its own it is the base for the next 3 colors.

For Bacon 3 (the darkest of the meat colors) mix equal parts Bacon 1 with Bacon 2.
For Bacon 4 mix equal parts Bacon 3 with Bacon 1
For Bacon 5 mix equal parts Bacon 4 with Bacon 1.

You will need to look at your slice of bacon to determine how much of each of these colors you will need.

To make cooked bacon I decided to use the same cane, I just made it a bit smaller and then used both chalk and Amber Gallery Glass to give it the cooked color. 


Sunday, November 11, 2012

Miniature Artist's Easel


 I am taking a break from the breakfast series this week mainly because I needed to finish these easels and didn't have time to get the next breakfast item made too.

This week I wanted to show you how to make a cute and simple artist easel for the artist in your dollhouse.

The basic easel is made of an 1/8” by 1/8” basswood strip. You will need 2 pieces cut 6” long, 1 piece cut 5 ¾” long and one piece 2”. You will also need a piece of skinny stick that is about 2 ¼” long, a 2” length of jewelry chain and 3 head pins. Some pliers, wire cutter, and glue round out the supplies needed to complete the easel.

This easel is very adaptable to a lot of different scenes, do you want to make it taller or shorter? No problem, just adjust your measurements. I think this would be cute to hold a sign for a little cafe too.

I chose not to add any kind of finish to my easel but you can paint of finish yours any way you desire. Maybe you want to add some paint splatters to yours to make it look well used. Or is yours new like the one I made?

As a bonus I also show you how to turn some of those fancy toothpicks into some paint brushes for that mini artist. The ends can be cut to represent almost any shape of brush. And again you can either make new brushes or old ones that are paint stained or ones that are filled with paint and being used in the scene.

In the picture I did use one of those wooden shapes from the craft store to stand in for the painter's canvass. The one I used was 3” by 2” and just labeled as a rectangular sign.


finished brushes

the brushes before they were painted


Sunday, November 4, 2012

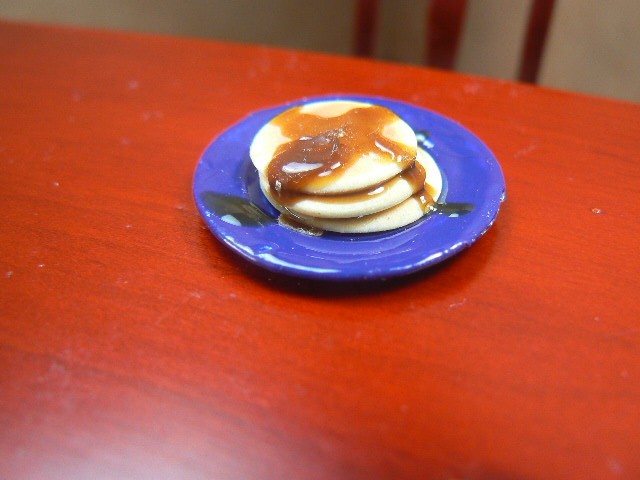
Dollhouse Miniature Pancakes


This week I am still in breakfast mode and we are making a stack of pancakes. I found that Fimo's Vanilla color clay was almost a match for the real pancake it just needed to have a touch of white added to bring the color to the correct hue.

Start by thoroughly mixing that clay, then you have to decide how big your pancakes are going to be. Remember pancakes come in all sizes from tiny little “dollar size” to ones that cover the plate. I choose to make mine somewhere in the middle of that range of sizes. For my pancakes that ended up about ½” in diameter I started with a ball of clay about ¼” in diameter so use that as your guide. Really smash the clay down onto the paper plate too, you want them fairly flat to look in scale. Keep your finger coated with the cornstarch too, it will really help in this task.

For the chalk color I find it best to layer the colors starting with the yellow ocher (golden yellow) and working toward brown. It really does make a difference in the quality of the color of the finished pancake (or any food) so take the extra moment to layer.

I did try several different colors of glass stain paint for the syrup. I really do prefer the glass stain paints for this and I used to have the perfect brown for it. When I went to do this project I found the bottle of my favorite “syrup color” was completely dried up. I made a trip to the craft store to re-supply only to find that they no longer carry the off brand paint I had. I checked all the ones available and bought a couple that looked like good candidates for syrup. None of the ones I bought really looked right. I found that by combining my Amber Gallery Glass with my Cocoa Brown Gallery Glass I got a really good syrup color. I do mix Gallery Glass paints all the time, it mixes very nicely and allows you to do so much more with a limited number of colors. Since this is a product I use a lot and I do recommend you buy some of the basic colors it is nice to not have to buy all the colors they have. I would recommend a bottle of Amber, Cocoa brown and one of the reds to start. They will give you a lot of different effects in making mini foods.


Sunday, October 28, 2012

Dollhouse Miniature Breakfast Sausage


This week we are embarking on a new series of food videos. I thought it would be nice to make some things that can be either cooking in the dollhouse kitchen or plated up and ready to eat. These sausages would look really good in a mini diner scene also. I decided to start with the sausages for a couple of reasons. First off they are really easy to make but look really good when placed in the scene. Secondly a lot of you have asked for foods that can be used for meals in your dollhouse scenes. These sausages are really versatile, they can go in almost any time period and any place where people are going to be eating. You could use the same sausages for dinners, with pasta or even on a bun. So have fun and be sure to let me know about your projects.

I used a mixture of approximately equal parts Flesh Pink and Sahara Fimo. To this mixture I mixed in some pre-baked dark green (I think mine was a leaf green but any dark green will work) clay.

To show that the sausages have been cooked be sure to add both the little line of brown chalk to each one before you bake and then coat with the Amber glass stain paint. The glass stain paint also acts as a glue to hold the sausages to the pan and gives a nice greasy look to our pan. 


Thursday, October 25, 2012

Repairing and Dressing a Dollhouse Bed


Okay, first off I know this is way long but I had so much I wanted to cover and explain. I hope you all can in through the end and that most importantly you learn things you can use in your mini projects.

This video is the one I was planning to post the week I didn't have a video. I decided to post it as a bonus video this week since I am currently working on two other videos that are both food related.

The bed was given to me by a friend that used to have a mini store. It was broken and therefore not really worth much for sale as it was. I decided to use the opportunity to show you not only how to dress a bed (well one way there are other methods to cover later) but also how to do the simple repairs. Face it, things break and instead of throwing the broken piece away you can do a lot simple repairs yourself. Also sometimes you can save a bunch of money if your local store has an “as is” shelf with broken pieces.

I won't giving you the measurements for the bed spread because that you will have to size to the bed you are using. Just use the one I showed you to see how it worked and draw on to fit your bed.

The pillows were cut the following sizes:

floral- 2 ½” by 5”
dark green- 2” by 4”
light purple- 1 ½” by 3”

The dark purple neck roll pillow
dowel 7/16” by 2”
fabric- 5” by 2”


Monday, October 22, 2012

Just something I need to say

This post is somewhat of a rant about one of my pet peeves. If you have watched my tutorial videos you know that I very often tell you to have whatever you are making in front of you. If that isn't practical having a photo of the real item is just as important. This is especially true when you are making something you are not really familiar with.

As I was cruising around on YouTube the other day I came upon a video tutorial for making a doll size of a certain item. I am not going to say what this item was just that is is something I know and have handled all my life. This is an item I know really, really well. I was curious since the person that made the video usually does a really decent job on his/her projects. As soon as I saw the intro to the video it was obvious to me that this person had probably never even laid eyes on the object they had made, it was that far off. Now the video was well done just the process and finished item was so far off it should not even had been called what he/she thought they were making.

So where am I going with this? I want to impress on all of you, if you are making something in mini (any scale) know what it looks like. For an example, let's say you for some reason need to make a mini self sealing stem bolt but you have never actually seen one. Well, first step should be to find a picture or better yet many pictures. Go online, find out all you can about these self sealing stem bolts, don't assume anything. Don't assume how big they are. Don't assume what color they are and especially don't assume that any grooves in them can run any direction you want them to.

Why should you do the research? Because if you are going to make something and call it that you need to know what it looks like so you know you are actually making what you think you are. If you are going to turn around and tape a video tutorial and post it on the internet to teach someone else how to make something it is probably about a million times more important to actually know what you are talking about.

Okay, I feel better getting that off my chest, now back to doing research and making videos.

Sunday, October 21, 2012

Metal Minis for the Dollhouse


Today I wanted to share with you how I work with the metal minis that are available to use in our dollhouse scenes. These come unpainted and can be used in so many ways. I have been purchasing mine from the same source (Dollhouse Portal) for several years. There are many places to get these I would suggest checking out your local mini store first to see if they carry them. If they don't or you don't have a local store just use your favorite search engine to find them or just check out the Dollhouse Portal and buy from there.

You do need to keep in mind that these do contain lead so you need to be careful to wash your hands with soap and water after handling them (especially before you have sealed them with paint) and NEVER give them to children that might put them in their mouths.

As you can see I usually place a good size order when I do order these. I do this for a couple of reasons number one I can save a bit on postage this way. The other reason is that it does take about a month to receive your order so I try to have on hand the things I use most often.

The first step when the package arrives is to check what you receive against the invoice. Mistakes can happen in packaging so I always check ans at the same time I look over each piece to check for breakage. These do break and if they arrive broken or something is missing I send an email to the company I purchased from letting them know right away. I have never had any problems that weren't immediately corrected.

Next I wash, or rather soak the metal minis in hot soapy water. This removes any residue left from the molding process and after they are completely dry they are ready to sort and put away to use in projects.

When I am ready to use the items I decide what color I am going to paint them and use an appropriate color of spray primer for the first coat. I don't normally prime ahead of time because I wouldn't know what color primer to use until I decide what color the finished item will be. I prime with a white primer if I will be using a light color paint and with either a gray or black for items that will be painted with a dark final color.

I usually use a spray paint for the main painting of these because I can get a better coverage with a much thinner coat of paint. I do sometimes use craft paint to further decorate the items. And some items will be coated with a high gloss spray finish to make them look like ceramic.

In the next few weeks (possibly months) we will be making some foods that will be in some of these metal minis. If you can't get the metal minis feel free to use what you do have that is similar. I just wanted to start this with the instructions to use what I will be using.

I have found that most of the metal minis cost between $1 and $4 each so they aren't horridly expensive. There are many more things than just what I show you in this video too. If you have checked out my Dinner for Two scene I used not only the plate, cup, saucer, and silverware that were metal minis so were the black portions of the bench that is in the scene.

I hope that you can find lots of uses for metal minis in your projects. 


Just a few of the pieces I got


Before and after