Check back often

Have you checked out all my blogs?


Dollhouse Minis: http://joannesminis.blogspot.com


18” Dolls: http://joannes18dolls.blogspot.com/


General Crafts: http://joannes-place.blogspot.com/


Cooking: http://joanne-kitchen.blogspot.com/


Also if for some reason I can't post I will try to give a head's up on the Facebook page so check there too.

Sunday, July 28, 2013

Dollhouse Miniature S'mores


This week we are continuing our summertime treat by making the s'mores. I am sure the kids (and grownups) in the dollhouse will enjoy them just as much as we do in real life.

If you didn't watch last weeks video you will need to do so in order to get the directions for the graham crackers. You will also need to bake those off before starting to assemble your S'mores from this week's video. We are pre-baking the crackers so that they will retain their shape when we smoosh down the soft marshmallows. If we didn't pre-bake them they would also squish out of shape and that would ruin the effect. It just takes a few minutes to do this step but it is so important to the final product.

Here is the link to last week's video so you can watch and get the instructions if you need to.  Dollhouse Miniature S'more Ingredients

So this week I again start with the white clay (and I was able to get a new package of white that so far is clean with no little weird bits running through it). If you are going to put some marshmallows onto sticks to roast over the fire we will do that first. We start out just like last week except we put them onto a “stick”. I am using some wire, I wish I knew what gauge it is, it is probably around 18 gauge. It just needs to be heavy enough to hold up straight with the marshmallow on the end. I like wire in place of wood for this simply because a piece of wood that thin would be way too brittle. If you are scaling up to Barbie size you might be able to use some thin wood. I have always used the wire when I have made these in the past for sale with no real complaints. Now like I said in the video if you are making the marshmallows to be roasted they can (and should) be a tiny bit bigger than the the un-roasted ones. This is because the do expand with the heat. So make these a tiny bit bigger and place them on the “sticks” now you will want to add some color. Just use the same chalks we always use for coloring clay the golden yellow (ochre) that we use on bread is the first step. How dark you go is up to you. I always make at least one that is chalked in black or very dark brown to replicate those marshmallows that caught fire.

Now we need to make the marshmallows that will go into the finished s'mores. For those add a bit of TLS (Transparent Liquid Sculpey) to your white clay. You don't want much TLS just enough to make the clay slightly soft and sticky. This will help in making them look melted when you assemble the S'mores. Again make these a tiny bit bigger than the un-roasted ones and color them a bit with the chalks. You can just leave them in ball shapes, no need to shape them further.

Now the best part the chocolate! Mix a tiny bit of TLS with your Chocolate color clay, you want the same texture as the last step for the cooked marshmallows. Roll this mixture out thin and cut into about ¼” by ¼” squares.

Now time to assemble. Lay a graham cracker (pretty side down) place your soft chocolate square on this. Add your soft marshmallow, and then top with the second graham cracker (pretty side up) now carefully squish it to form the finished s'more. You can fiddle with the edges a bit if you need to.

Now bake at about 235 degrees Fahrenheit for about 10 minutes.

I am sure the dolls are going to love these!


Be sure to check back next week to see part 3 of this little project. 


Thursday, July 25, 2013

Dollhouse Miniature Flower Vase


This week for Trash to Treasure Thursday I show you how to turn the lid to an Avon lipstick sample into a cute and colorful flower vase.

Of course you can leave it plain clear and use it that way but adding color is so fun and easy I think you will want to do that too. I used nail polish and glass paint in my vases. I am sure you can find other ways to color yours. I like both of these products because once dry they will stand up to some use. Both become water resistant so you can use fake water in the vase if you want to when you add flowers.

The nail polish has the advantage of being much easier to find in a wide range of colors. It is also usually much cheaper, the bottles I used in the video were all purchased at Dollar Tree for $1 per bottle. Nail polish comes in a wide range of colors. It also dries fairly quickly so you can get the project done and move on to something else. Nice for those days when you have a limited time to craft but really want to get something done.

The glass paint also has some advantages, the primary one in my opinion is that it is water clean up while wet. So if you get the paint in the wrong place you can clean up easily before it dries.

Which is better, either will work just fine so use what you have on hand. That is the idea of Trash to Treasure projects, being able to use what you can find to make something.

Did you notice that I tap (or bang depending on how you look at it) the vase on the table after adding the paint. This will help to force the paint to run down the inside of the vase. When I am not trying to do this on camera I also sometimes swirl the paint by turning the vase sideways and tapping. Just play with it and see what you like and what gives you the effect you are looking for.

You can also paint the entire inside of the vase with a solid color if you want. That also looks really pretty. Especially if you do a few of them and line them up on a shelf in the dollhouse. 


Are you working on an entry for my T2T challenge? This time it is just for fun but if we get enough participation I will do it again and offer a prize. You can read about it here in my Three Year post and see the item you are challenged to use. I hope to see your entry soon.


Tuesday, July 23, 2013

Sharps Container

I am including this in my Tools series simply because I don't think any work area should be without one. The container in the photo is my current sharps container which I made last year. This time I used an empty container from Yes Paste but any container with a lid that you can cut a slot in will work.

The first step to creating this little tool is to clean out what ever container you are going to use. It could be a plastic container from the kitchen, a paste container whatever you find that you want to use. Cut a slot in the top that is about 1” long and 1/8” wide. If the lid splits (like mine did its okay) If you want to decorate the outside of the container go for it. I just put some sticky shelf paper on mine but you might want to do something fancier after all it is going to be sitting on your craft table for a while. Next use a really strong glue (I think I used E6000) and glue that lid securely back on the container, you don't want it to come off.

Now whenever you have anything sharp like a craft knife blade, x-acto knife blade, even sewing machine needles put it in your sharp container. When the container is full cover the opening with some strong tape and toss it in the trash knowing that those sharp bits won't hurt anyone.

No more having needles or blades poking holes in the trash bag and ending up where someone can get hurt by them. 


Monday, July 22, 2013

Mini Garden Finds


I took the time this weekend to stop into my favorite craft store (Craft Warehouse) just to look around. I am always on the lookout for things that will spark an idea for a future project that can be a video to share with you. I tend to wander in all areas since you never know what might be perfect for something. As I wandered the garden/ fake plant area I came across some items to use in amongst plants (real or fake) are perfect for mini use. I thought I would share with you what I got. I picked up a package of 2 little buckets and a watering can. All of these are made of metal. They are really cute and although a little large they will fit into a 1/12th scene just fine since buckets come in all sizes. I am thinking I might adjust the handle on the one (the one with the red wooden piece on the handle) since it is a bit tall for the bucket in my opinion. I'll wait until I have a place to use it before I decide for sure though. I also think I will add a bit of rust and dirt since they look a bit too new for my taste. I guess it will depend on how and where I use them. The buckets are the following sizes: 1” tall (not including the handle) by top diameter of 1 ¼” and the other is ¾” tall (again not including the handle) by top diameter of 1”. The watering can is 1” tall (2” if you count the handle which is fixed in place) by a diameter of ¾” and has a spout that is about 1 ½” long. 


The other package I got was a set of 3 pair of rubber boots. Where I live we would call them barn boots since that is the primary use I would use them for in real life. I know a lot of you use them for gardening too though. The package I got has a pair red boots, a pair of black and a pair of yellow. The boots stand 1 3/8” tall and the foot area is 1” long. Although I don't think you could get them onto a doll's foot they would be awfully cute standing by the door or in the garden shed. They also have a nice texture detail to the sole so the dolls would have good traction on wet surfaces. I am really tempted to add a bit of mud to the sole to give them a lived in look. 


The bucket set was on sale for $3.50 and the boot set was $2.50, I can't wait to put them into a scene someplace. These items were on sale since it is summer and they are starting to make way for the fall stuff.

There were also other pieces that I didn't get. They had some really cute bird baths that I just really couldn't see myself ever using. There were also several sets of garden furniture (chairs and such) I debated buying a couple of chairs but decided against getting them. I am sort of wishing I had so if I get near the store while they still have them I will probably pick up some of those too.

I have been planning to do the landscaping around my Harrison for several years and just haven't gotten to it yet. I really do need to get around to it maybe these items will be the incentive to get me in gear.


Sunday, July 21, 2013

Dollhouse Miniature S'more Ingredients


This week's project is actually the first half of a 2 part series to make s'mores. This week are making the ingredients and next week we will be making the finished s'mores in all their gooey deliciousness.

One of the lessons to learn this week is to always start your work with the lightest color clay and work through to the darkest color. This way we don't stain our lightest colors of clay. Of course this is assuming that you cleaned all of your tools up last time you used them.

I also talk a bit in the video about being careful to really look at your packages of clay before you buy them. Learn from my mistake and check the blocks through the package so hopefully you don't end up with a huge block of white clay with little flecks of blue stuff running through it. I hate that I didn't check more carefully but it is my own fault and I really hate to buy another expensive block of clay when I still have this one. I have been able to work with it so far but I am getting to the point where I am running out of clay that is useable. I can still use it to mix with other colors but I am going to have to get some white clay for when I actually need white.

To help measure the snake of clay is my drill bit gauge from Home Depot. I love this thing and I know on the my Tools of the Trade post a few weeks ago I showed you the regular plastic circle template and both items do the same thing. There are a couple of reasons I like having both of these in my workroom. First off the circle template has bigger holes in it and is clear(ish) and really useful for a lot of tasks. I could use it to measure this clay and sometimes I do if it is out. On the other hand, the drill bit gauge has smaller holes and more importantly for this job is not made of plastic. I'm sure if you are aware that raw (ubaked) polymer clay reacts with some plastics. For example did you notice the tray on my work tile that the chalks were in? I left a bit of clay laying on the thin edge of that overnight. By the next morning the clay had started to melt the edge of that plastic. Yes, unbaked polymer clay will melt some types of plastic. One time I saw a video online about using TLS and the person doing the video recommended using the small jars made for cosmetics to store them in. These are cute little jars with screw on lids I got a bunch off eBay and started using them. I only used a few and watched them for a couple of months and since I saw no damage I went ahead and used more. I had a bunch of these little jars with all colors of TLS mixed with clay to use for all kinds of things. Then something started to happen. I didn't check them for a while because I was doing other things that didn't require using TLS. When I had to move them I found that a lot of them (but not all of them) the clay mixture had slowly eaten through the bottom of the jars. I had a huge mess to clean up and wasted a lot of TLS and clay. I threw the rest of the filled jars away and moved the empty ones to another use. Will the clay melt the circle template, I don't know and I'd rather not learn. When I do use it for clay I am really careful to wipe it off completely with a wet wipe right away. With the metal drill bit gauge this isn't a problem and if I am going to be working on a project for a couple of days I feel fine leaving everything ready to go again.

Now onto clay colors used in this project. I used Fimo this week in the following colors:

Marshmallows: white

Graham crackers: white
Ocher

Chocolate: chocolate

I hope you join us next week when we make some s'mores for the dolls in the dollhouse to enjoy around the campfire. 


Thursday, July 18, 2013

Dollhouse Miniature Antique Frame


This week for Trash to Treasure Thursday I wanted to show you how to recreate those wonderful antique carved frames that were so popular in the past. I have been working my way through all of my mom's belongings that I inherited and there are a bunch of pictures of all kinds in this type of frame. They are all sizes and the designs are all very different. The things that they all have in common are they all have a carved design (some very detailed and some very plain) they were made of wood and painted with a brass or gold paint to look like what they are not and they have all gained a wonderful patina of age over the decades that they have been around. Most of them have a slight blackish coating on them and that is what I think makes them look so warm and wonderful.

Since I would bet a lot of families have some of these frames either displayed or stored away I thought it would be nice to show you how to make some for the dollhouse.

I think I will be putting mine in the attic of one of my dollhouses at least for now.

I mentioned on the video that I also think this could easily be translated to a fun project for real size. I know when my kids were little I had them make most of the gifts they gave at least to family and I think this would have been a winner with both the kids in making it and the grandparents receiving it. Just pick a rather plain frame and some heavy laces that are wide enough for the frame. Let me know if you do this I would love to see the results.


Now onto the project.

The frame in the video is made with craft skinny sticks, a staple for a lot of us. I love them because I can find them almost everywhere that has any craft supplies (even my grocery store has them) and they are cheap. Some packages are better than others and try to peak through the packaging to make sure you are getting relatively straight sticks. The other frame I showed was made with another craft room staple, craft sticks. These are also easy to find and cheap and if you eat frozen Popsicles at your house they are free.

This is one of those projects that really does require the two glue method and is much easier to do on a tile so you can let it stick down while it cures. As you see in the video it is easy to pop back off the tile when dry. Since the glued area is so small I decided to add the insurance of gluing on some card stock to the back. I wanted to make sure my frame wouldn't fall apart while I painted it and also since I haven't decided if I will add a picture of not to the frames I felt this was important. If you know you will be gluing your frame to a mirror or picture and want to skip the paper backing feel free to do so.


When choosing lace you could use any flat lace that will fit on the frame face. The more depth to the design the more detailed your frame will look. The lace on the craft stick frame has a mesh between the motifs and on the frame looks less detailed than the heavier narrow lace on the projects made with the skinny sticks.


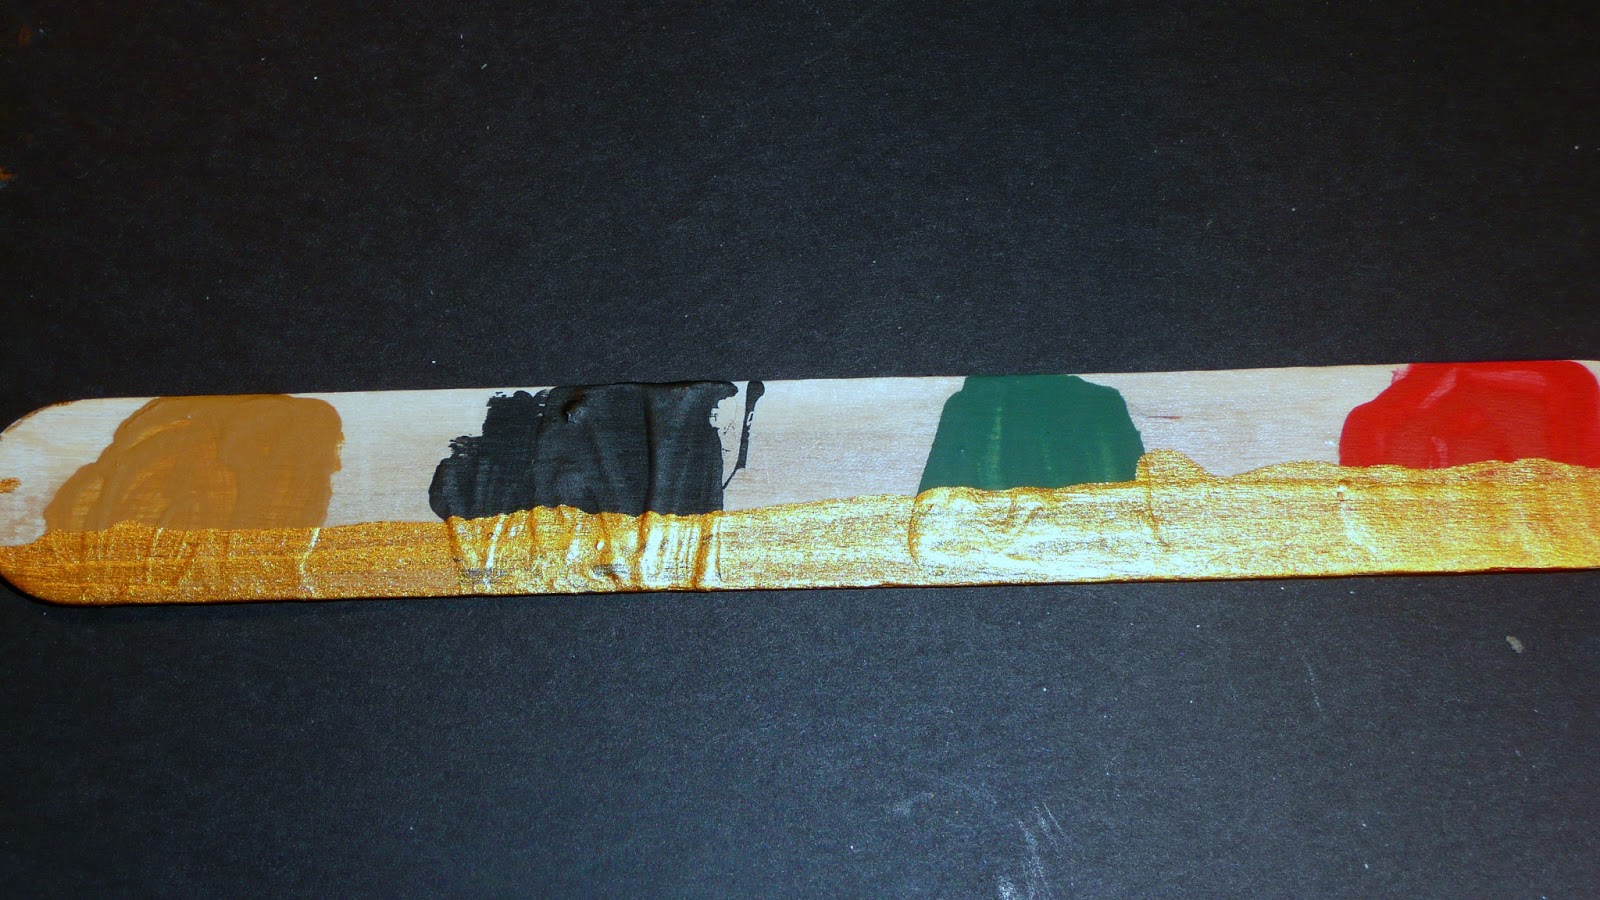
I almost always do a base coat of some kind under metallic craft paint. I find it is a bit thinner that the regular craft paints so it doesn't cover as well. Also it is usually a bit more expensive so I prefer to base coat with a regular paint and save the metallic for special use. Your base coat paint won't really show but if you look closely it may add a warmth or coolness to the finished color. I did a test strip of 4 different choices for base coat. Use what you have on hand or do a test strip if you are looking for a certain effect. Be sure to not clog up the holes in the lace with paint, blot out any excess so the texture is still visible.

After all the paint is dry it is important to add the black wash to finish off the frame and make it look old. For this wash I simply had a small container of water and dipped my brush back and forth between the black paint and the water to get a very thin wash. Then I used a dabbing and I guess swabbing technique to coat the frame. Follow this immediately with a dabbing and wiping with a paper towel to remove excess wash. Repeat these steps until you get the finish you want.


Paint colors used in this video

Deco Art Hunter Green

Ceramcoat Bright Red
Ceramcoat Golden Brown
Ceramcoat Black
Ceramcoat Metallic Bronze


Tuesday, July 16, 2013

Circle Template

This is one of those tools that might sit in the drawer most of the time but on the occasions when I do use it I am so glad I spent a couple of dollars to get it. They are usually with the drawing supplies in the craft store and with the drafting supplies at the office store. I know they come in different sizes, mine has circles from 1/16” up to 1” in diameter. I know that some of them have way more sizes and some have less. I find this one to be the most useful of all the ones I have had over the years.

How do I use it you ask? Well, beyond the most obvious of using the template as it is designed to be used, to draw perfect circles of the desired size. I also use it to size everything from dowels to button and just about anything else that is round. I also use it to create the rim on paper plates. 


Sunday, July 14, 2013

Dollhouse Miniature Lighthouse


This week we are going to make another type of lighthouse that can decorate either your 1/12th scale dollhouse or your 1/6th scale (Barbie size) house. Since this is a decorative item the scale is not so exact so that is why this will fit in both scales. I have even made this project up as a gift for a friend that collects Lighthouse themed items that really isn't into miniatures, she loved it and it is in her display case with other lighthouses of all sizes.

The base that I used under this project for the video is one of those little wooden shapes that come in the big bags. I think they are labeled with the name “Woodsies” and come in many shapes. I like the ovals for this because it gives enough space around our lighthouse to do a bit of landscaping. There are many other options for the base I have also used polymer clay to replicate a piece of stone (like marble or granite) and that looks really nice too. Use your imagination and make a base that will fit in with the spot you want it to fit. Speaking of this do be aware of the size of your base, the one I used is about 2” by almost 1” so it will take up a large display area in the 1/12th scale dollhouse.

I use one of the white pegs from the board game Battleship, we have the game and it has lots more little pegs than ever are needed. I do often see bags of different game pieces like this at garage/yard sales and thrift stores they are a treasure trove for the miniaturist so if you see them try to get them. Many game pieces will work as decorative items with very little work.

The other items I used today were:

Paint, a dark brown, white, blue and black. The exact colors really aren't important use what you have and/or love.

Clear pony bead
small piece of balsa wood
bell cap (jewelery finding)
red eyelet
sand
small rocks
moss/foam mixture (loose foliage mix from the model rr store)
model railroad turf
glue (I used G-S Hypo Cement, tacky and Elmers)


Thursday, July 11, 2013

Dollhouse Miniature Clock


This for Trash to Treasure Thursday I show you how to make a really simple clock for the wall of your dollhouse or roombox.

The base for the clock is a simple flat button, the kind with the holes through the button not the kind with the shank to sew it on. You will need to choose a button with at least a small raised edge around it. Without the raised edge the clear coating that represents the “glass” that covers the print out would not stay put.

So you need to choose your button and there are a multitude of choices of buttons to use. Go to the fabric store if you don't have any on hand and you will find lots. Another source of buttons if you don't have any on hand is to ask your friends and family that sew. Most of the time it seems that I end up buying more buttons that I need because of the way they are packaged. Buttons also come in all sizes making this a project that spans scales easily especially since wall clocks in our real world come in so many sizes. You can easily make a bunch of these in many sizes and shapes at one time and have them on hand for many projects.

Next determine how big the area inside the raised rim on your button is. I used a circle template but you can just as easily use a ruler. Now look for a clock face. I went to the internet and did an image search for “clock face” I came up with pages of them. I decided to go simple for the video but if you find an interesting one go for it. Anything that fits your sense of style.

Now copy the image from the internet and place it onto a word type document. Then re-size the image to size you need (based on the measurements you just took). I like to print off several and adjust the size a bit on them so if I was off a bit on my measurement I will still get something I can use. Print your sheet of clock faces.

Now carefully cut out and follow the steps in the video to finish.

You can quickly fill an entire clock shop with this little project.


Tuesday, July 9, 2013

Small Scissors

This week for Tools of the Trade Tuesday I thought I would tell you a bit about some of the small scissors that I like to use.

I have 2 main pairs of tiny scissors a pair with straight blades and a pair with curved blades.

The straight bladed pair are actually sold for embroidery and I bought my current pair at Walmart for under $10. I love them, the fact that they are made to look like the Victorian style Bird Scissors is just a perk. I actually picked them for several reasons other than the look. I was looking for a pair of scissors with short blades (the cutting area of the blade is only about 7/8” long), I needed them to be as slim as possible and to come to a very sharp point at the tip. These are mainly used as paper scissors, if I was doing a lot of doll dressing I would go buy a separate pair just for fabric. If you do much work with printies or other fiddly little paper items for your dollhouse I do recommend that you look for a pair of tiny scissors. It is amazing what how much easier things are with when you are using a good sharp pair of scissors that are sized to the job.

The second pair of scissors I want to talk about are my curved ones. These are an even better buy at around $5 last time I looked. By the way stay away from the really cheap ones and go the middle of the price range on these. I also use these for cutting paper and I can use them with the curve pointing toward what I am cutting or away from it depending on the area I am cutting. They have an even smaller cutting area on the blades (between ½” and ¾”) and again come to a very sharp point to get into really tight areas in my mini cutting projects. 


Sunday, July 7, 2013

Dollhouse Miniature Sleeping Bag


Since summer is here I know a lot of you are going to go camping and I figure the dolls in the dollhouse might enjoy a camping trip too. I thought I would help them out and make some sleeping bags for our project this week.

I used a sewing machine for this project but if you don't have one you could do this with hand sewing or possibly by gluing the seams.

I had to dig out an old one I had glued into a display to help me remember how I make these since it has been a couple of years since I last made them.

The main part of the sleeping bag is made up of 2 pieces of fabric each cut 6” by 6 ½” and a filler piece of either quilt batting or fleece cut 5 ½” by 6”. You will also need 2 pieces of narrow elastic (1/8”) that are 4 ½” long.

After sewing you will need to have something to act as a zipper. I used DMC floss in a metallic gold color. You could certainly use a different color if you want you zipper to be a different color. This is cut about 24” long to give plenty to work with.

Now I talked about making this in 1/6th scale on the video. I am pretty sure that Barbie and Ken and the rest of the gang enjoy camping too so here are the changes.

Cut the fabric pieces 12” by 13”. Cut the filler piece 11” by 12”. For the elastic I would cut that about 8”.

For the “zipper” I think I would look for an 1/8” wide ribbon or braid, I know it comes in gold and many colors. You will have to be very careful to not twist the ribbon like I was able to get away with on the embroidery floss, you will have to glue the flat side together and then be much more careful when gluing it onto the sleeping bag. You will need about 40” of the ribbon I think. Try it against the bag before you cut to be sure.

I first came up with this design for a swap on one of my groups years ago. We were doing a camping swap and I wanted the bags to be able to be used rolled up or staged with a doll sleeping it them since I had no idea what the different people were going to be doing. I found several directions out there for bags either one way or the other but not that could be displayed either way. So I ended up combining the directions that I found to make one bag that can be displayed either way. 


Friday, July 5, 2013

Three Years!!!!!

I want to take a few minutes of your time to say thank you once again for reading and watching what I have to say. We have now officially reached the third anniversary of that very first Youtube video (picture tour of The Harrison) that I was just sure no one would ever watch. I am absolutely blown away by the response that all of you have had over the years. So many of you watch the videos and read the blog and of course all the likes on Facebook too. Thank you from the bottom of my heart. You have no idea how much your support of what I do means to me.

I want to try to make this post a yearly tradition of looking both back and forward. I hope you will give me a few minutes to do just that.

I am not planning any huge changes for the next year just trying to improve on what is already being done.

One thing I am going launch with this blog is something that I am hoping to grow over the next few months. I've shown all of you many projects over the years, now it is your turn. From time to time I want to post a challenge for all of you. In these challenges I will post a photo of an item that is (hopefully) easy for everyone to find, most of the time it will be something that would normally end up in the trash. I will give you a period of time to make something out of that item and then you will send me a photo via e-mail of what you made. At the end of the set period of time I will post a blog (and maybe a video slide show) of those pictures. This first time it is just for fun. If this gets enough of of positive feedback I will maybe offer some kind of small prize for future challenges, we will see.

I am at this point just going to call this the “T2T Challenge” maybe we need to put our heads together and come up with a better name for it too?

Anyway, for the very first T2T Challenge I want you to use one of these lids.


I got mine from a bottle of dish washing soap and I noticed that most of the bottles of dish soap had the same type of lid. To qualify you need to use one of these lids to make something for your 1/12th scale dollhouse. It can be anything for that scale. You have 1 month to complete the challenge and to send me a photo at my email (joannesminis@gmail.com) these photos must be sent as a jpeg attachment, subject should be something like "t2t challenge", and must arrive in my email no later than midnight (Pacific Time) Monday August 5, 2013. I will send you an email acknowledging receipt of your picture. I will then post a blog (and maybe a video) sometime within the following week.

Good luck everyone and Thank You again for being here!


Thursday, July 4, 2013

1/6th Scale Pet Dish


Okay I debated about presenting this project for a couple of weeks simply because it is too large for the normal scale that you all expect from me. In the end I decided it was just too cute and too easy to pass up. Also I know that some of my regular viewers/readers are very into this scale. I am pretty sure that Barbie and the Monster High dolls are similar in size. I am not sure what other dolls are this scale. I have actually only seen the Monster High dolls on the internet. Will this project work with Littlest Pet Shop? I really don't know, I don't have any to try, so you all will have to let me know.

This project couldn't be easier just take the lids off the contact lens case and you have one of those double bowls that people use for their dogs or cats. You also get the bonus of turning the lids into bowls too. So if you don't wear contacts ask your friends that do. I know that the case is supposed to be changed regularly so the supply is out there. Also because they need to be changed out if you don't want to wait or don't have anyone to beg for one they are cheap. I sometimes get them at the dollar store and most stores that have eye drops and contact lens products have them almost that cheap too.

Now that Barbie has some pet dishes what about food and water?

Well, the water is easy just use any product that will dry clear. That could be glue (if it is a white glue be sure to add it in thin layers so it dries clear all the way to the bottom), clear glass paint (again thin layers) clear nail polish, and they even sell fake water for fake flowers that should work too.

For the food you can use a variety of things. You could make some out of clay (either a polymer clay and bake it out of the dish and then glue in or an air dry clay), small bits of aquarium gravel, the possibilities are endless.


Be sure to check back on the blog tomorrow (July 5, 2013) for a special post and an announcement!


Tuesday, July 2, 2013

Angled Mirror

Remember that dental pick I talked about last week? Well another tool is normally packaged with it that I find to be fairly useful too. What you ask? The angled mirror that is designed to let you see the into the crevasses of your mouth is also the perfect shape to let you see into some of those awkward corners when you are building a dollhouse. I used mine so many times when building my big dollhouse, the Harrison. It was the perfect thing for seeing into the areas like the window wells and under the roof area. Mind you it is still difficult to see those places but the little angled mirror does help a lot. In that house I ended up running some of my electrical system up through the bay windows on the side of the house (after I had assembled everything) I had a horrid time trying to see into those little areas to slide the electric wires and tape until I remembered that I had one of these little mirrors from the package that my treasured dental pick came from. I thought it might be useful someday but when I bought it I had no idea when or for what. I think I had pictured more using the mirror in the dollhouse not to help construct it. So if you do go to the dollar store and get one of these dental kits to use the pick like I told you about before I have just let you know that you aren't getting one tool for that $1 but at least 2. Yeah another time I will tell about some of the other things that come in that same package still for just a buck! Does that mean we have more money to spend on minis since we just saved so much on the tools? LOL


Be sure to check back on the blog on Friday (July 5, 2013) for a special post and announcement!!!