I
have been working on a display piece for the last month or so. More
about that in a later blog post.
Today
I thought I would talk about a portion of the project. For the scene
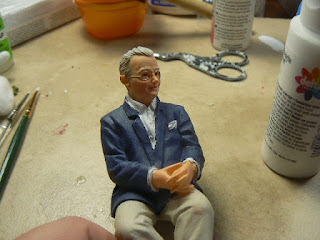
I am making I needed an elderly gentleman that could sit in a chair.
I also needed him to be wearing a suit. I found a doll that was very
close at Miniatures.com (Charles #43020 ) he was practically perfect
except for one thing. Charles is a causal kind of guy. He is
dressed in a dark blue sport coat and beige slacks. I tried to
convince myself that this would work for my scene. The more I thought
about it and looked at him in my partially completed scene the more I
knew that he had to have a suit. I talked it over with some friends
online and they concurred that for this scene the sport coat had to
go.
I
have painted (and re-painted) many dolls and resin figures over the
years. I have my system down and it works really well for me. So I thought you might like to see how I do it in case you want to try to
attempt this yourself.
Now,
I do have to say the dolls that I have painted have held up but they
really aren't played with. I simply use them in scenes. So if you are
going to handle your doll I am not sure how well this will hold up to
constant handling.
My
first step to wipe down the doll with some rubbing alcohol on a
cotton ball. This removes surface dirt and oils that may be on it.
Don't skip this step because if you paint over the surface dirt and
oil your paint will come off very easily. I find the alcohol also
dries almost instantly so I can get right to work.
I
use good quality craft paint from the craft store. My preferred brand
is Delta Ceramcoat, but any good quality acrylic paint will work. As
important as any other step is choosing the right brush. Get some
tiny brushes in the best quality you can afford and take care of them
They will last a long time if you take care of them. Pick the right
size brush for the area you are painting. I used 3 brushes for
Charles (a #6 flat sable brush and a small round brush and a tiny
round brush- sorry the numbers have worn off the handles so I don't
know what size they are) Paint the doll in small areas and allow the
paint to dry thoroughly before you come back to do more. Just be sure
to wash those brushes.
Depending
on the type of doll and how it will be used, you may need to seal it with a matte or satin
finish brush on sealer. Since I am not going to be handling Charles
once he is glued into the scene and I only painted the clothing I am
not going to seal him this time. If I was going to handle him I would
have found some matte sealer for the fabric areas.
Here
are some before, during and after pictures of Charles.
 |
| before |
 | ||||
| first coat of white |
 | |
| first coat of dark blue |
 |
| Finished |
I
also recently re-painted the arms only on the doll I use to display
my mini foods. Since I wanted the skin of her arms to match the rest
of her I sealed her with a satin sealer. Here is a before and after
of her:
 |
| notice the marks on her arm |
 |
| much better now |

Oh Joanne, I must say you do excellent work...He looks fabulous. I have some dolls that look pretty sad looking I am going to try to paint them. You always come up with great ideas. Thank you and have a great day.
ReplyDeleteI have a few Loving Family dolls that have some marks or scratches, I may give painting them a try. Yours came out very nice, thanks for sharing how to do it.
ReplyDeleteGreat information--thanks for sharing this. It looks like you have a lot of good mini info on your blog. I'm so glad I found your blog today! xo Jennifer
ReplyDeleteHi Joanne,so beautiful miniatures in your blog,It's pleasure to visit it!!Miniregards from sunny Spain.
ReplyDeleteI am going to repaint a resin doll.. Mrs Sherwood! she's in my bakery thanks for all the tips!!
ReplyDelete