Check back often

Have you checked out all my blogs?


Dollhouse Minis: http://joannesminis.blogspot.com


18” Dolls: http://joannes18dolls.blogspot.com/


General Crafts: http://joannes-place.blogspot.com/


Cooking: http://joanne-kitchen.blogspot.com/


Also if for some reason I can't post I will try to give a head's up on the Facebook page so check there too.

Sunday, July 25, 2021

Building the Beachside Bungalow part 20


Watch the video here.


This week we are finishing up the wallpapering of the Beachside Bungalow by moving to the upstairs. This level is divided into 2 rooms and since the small one that will become the bathroom is so tiny I did that room completely off-camera. There is just no way I could get the camera positioned in a way that anything could be seen and still be able to work on it.


For this reason we spent our time on the main upstairs room which is ear-marked to be the bedroom. I did stray from my comfort zone on this room and used one of the patterned wallpapers from the set I showed you a while back. I did stick with the very subtle tan/white striped one. Normally I would have done this room also in just the white art paper to replicate painted drywall, or at most I would have normally chosen a sheet of that same paper in a color that would harmonize with the rest of the decor. Am I glad I did, sort of. The bigger question is am I happy with the paper I used and the answer to that question would be a big no. While I had no problems with the other two pieces I used from the set of papers (the accent wall downstairs and the bathroom) this piece proved to be much more fragile. It tore if I looked at it wrong once the paste was applied. 
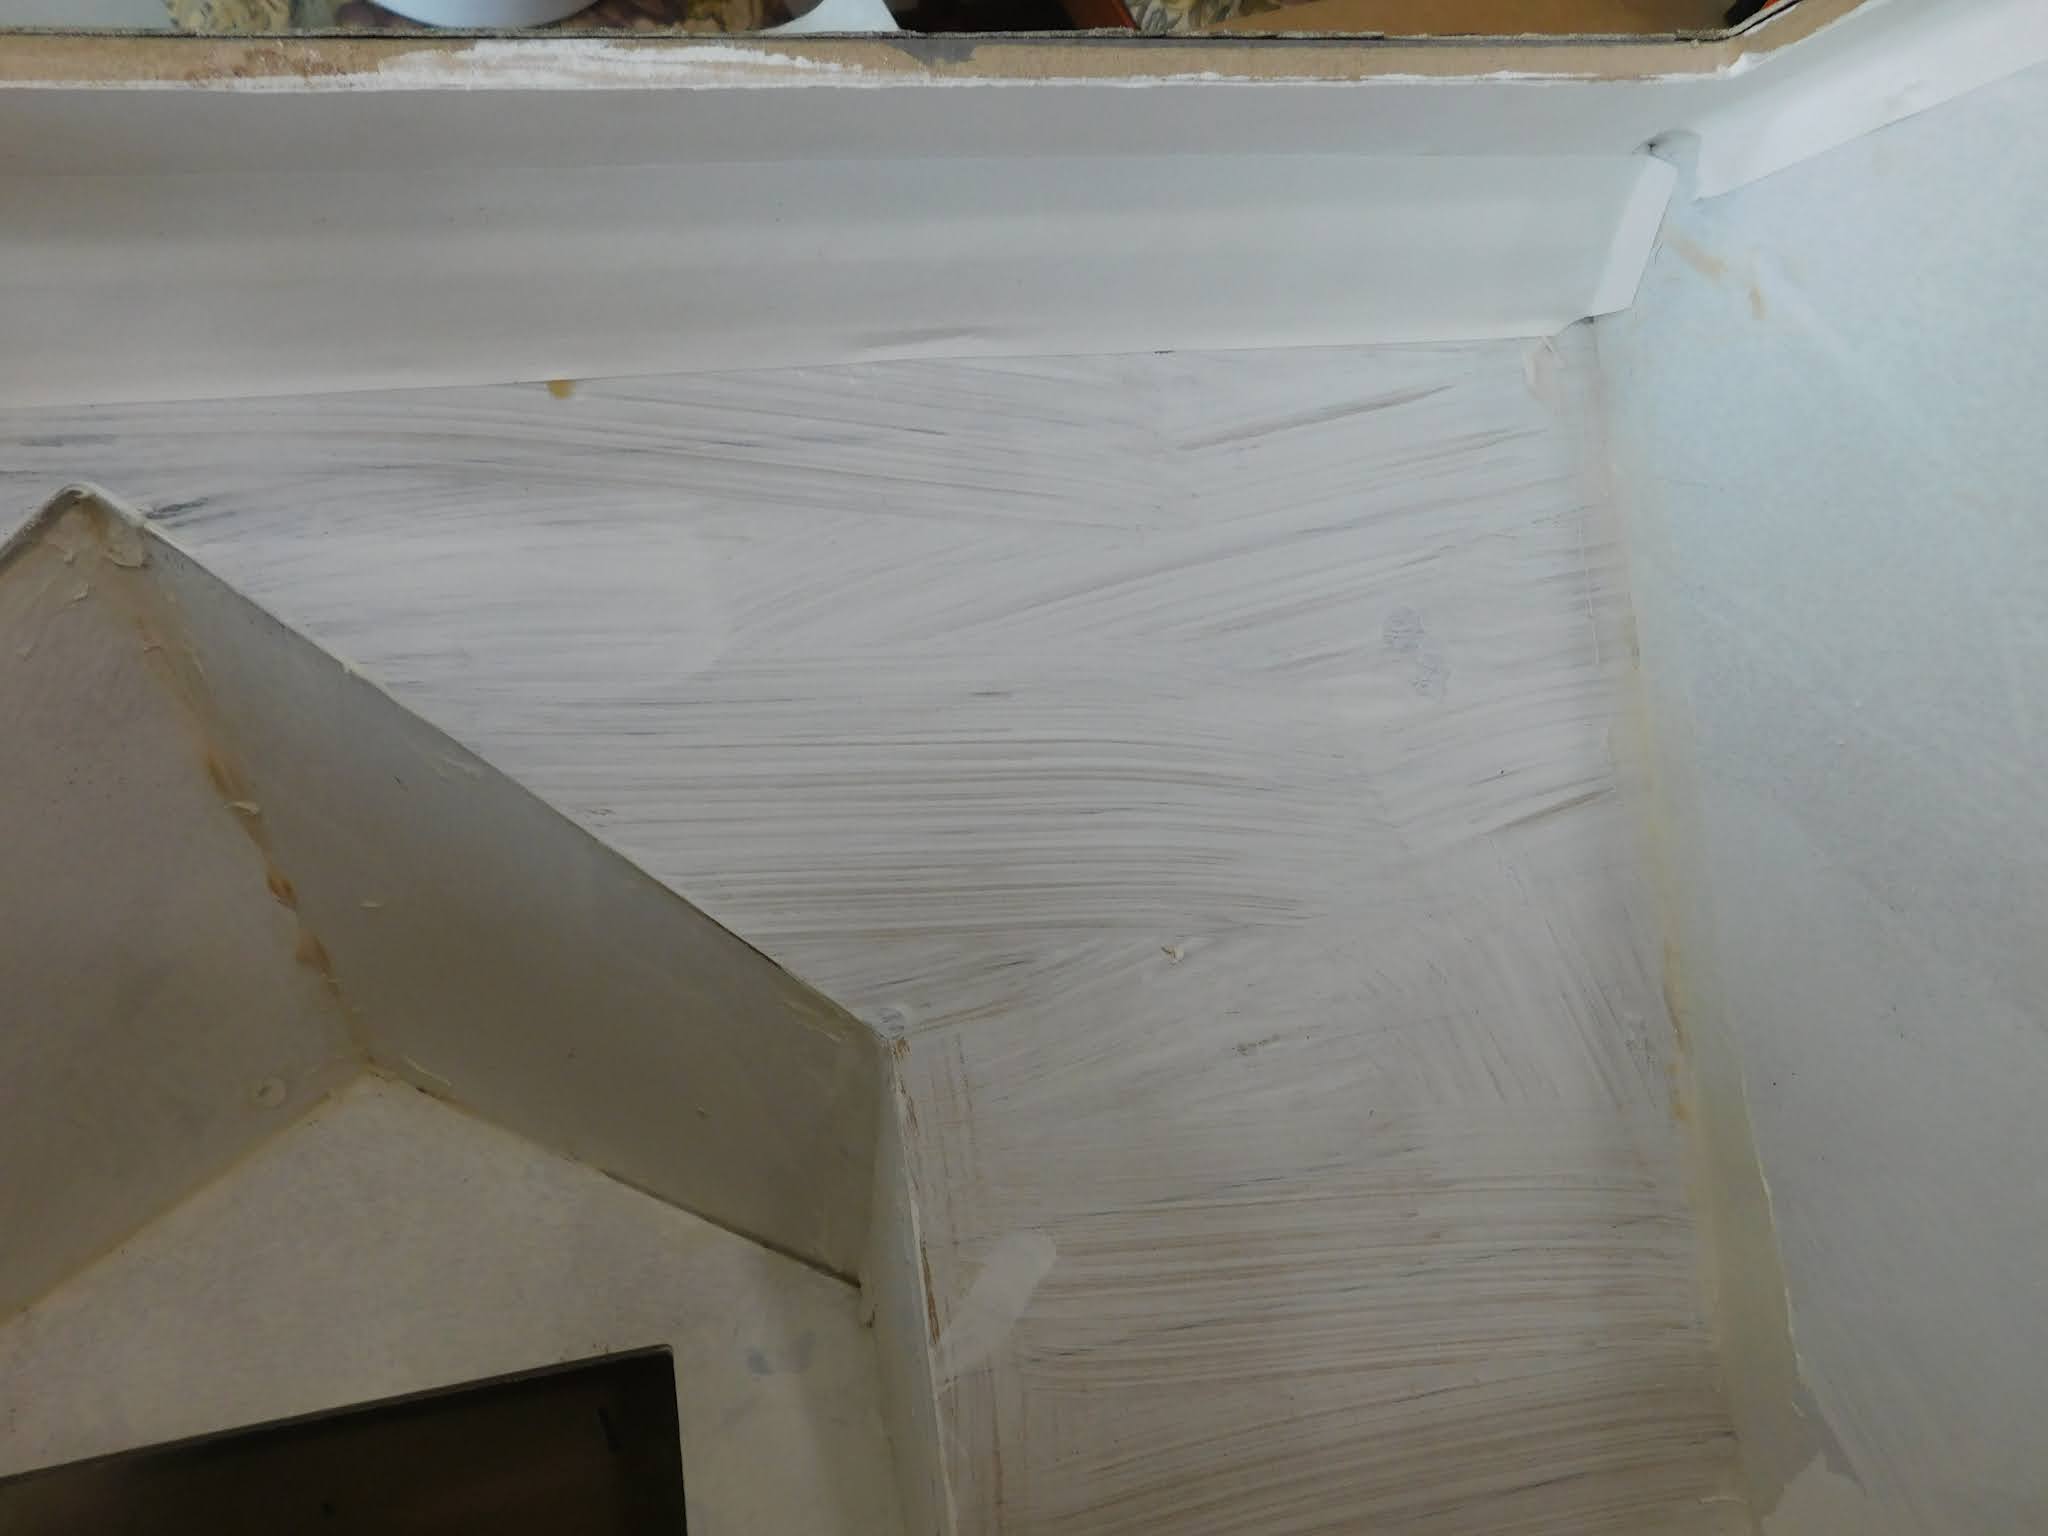
It also has some dark areas showing through that I am hoping will fade as the paste dries and cures. I am not sure what caused them but I have never run into them in other builds. I probably will leave the paper on the wall and just decorate over the spots if they remain. if you look closely at this photo you can see the dark spot next to my light.


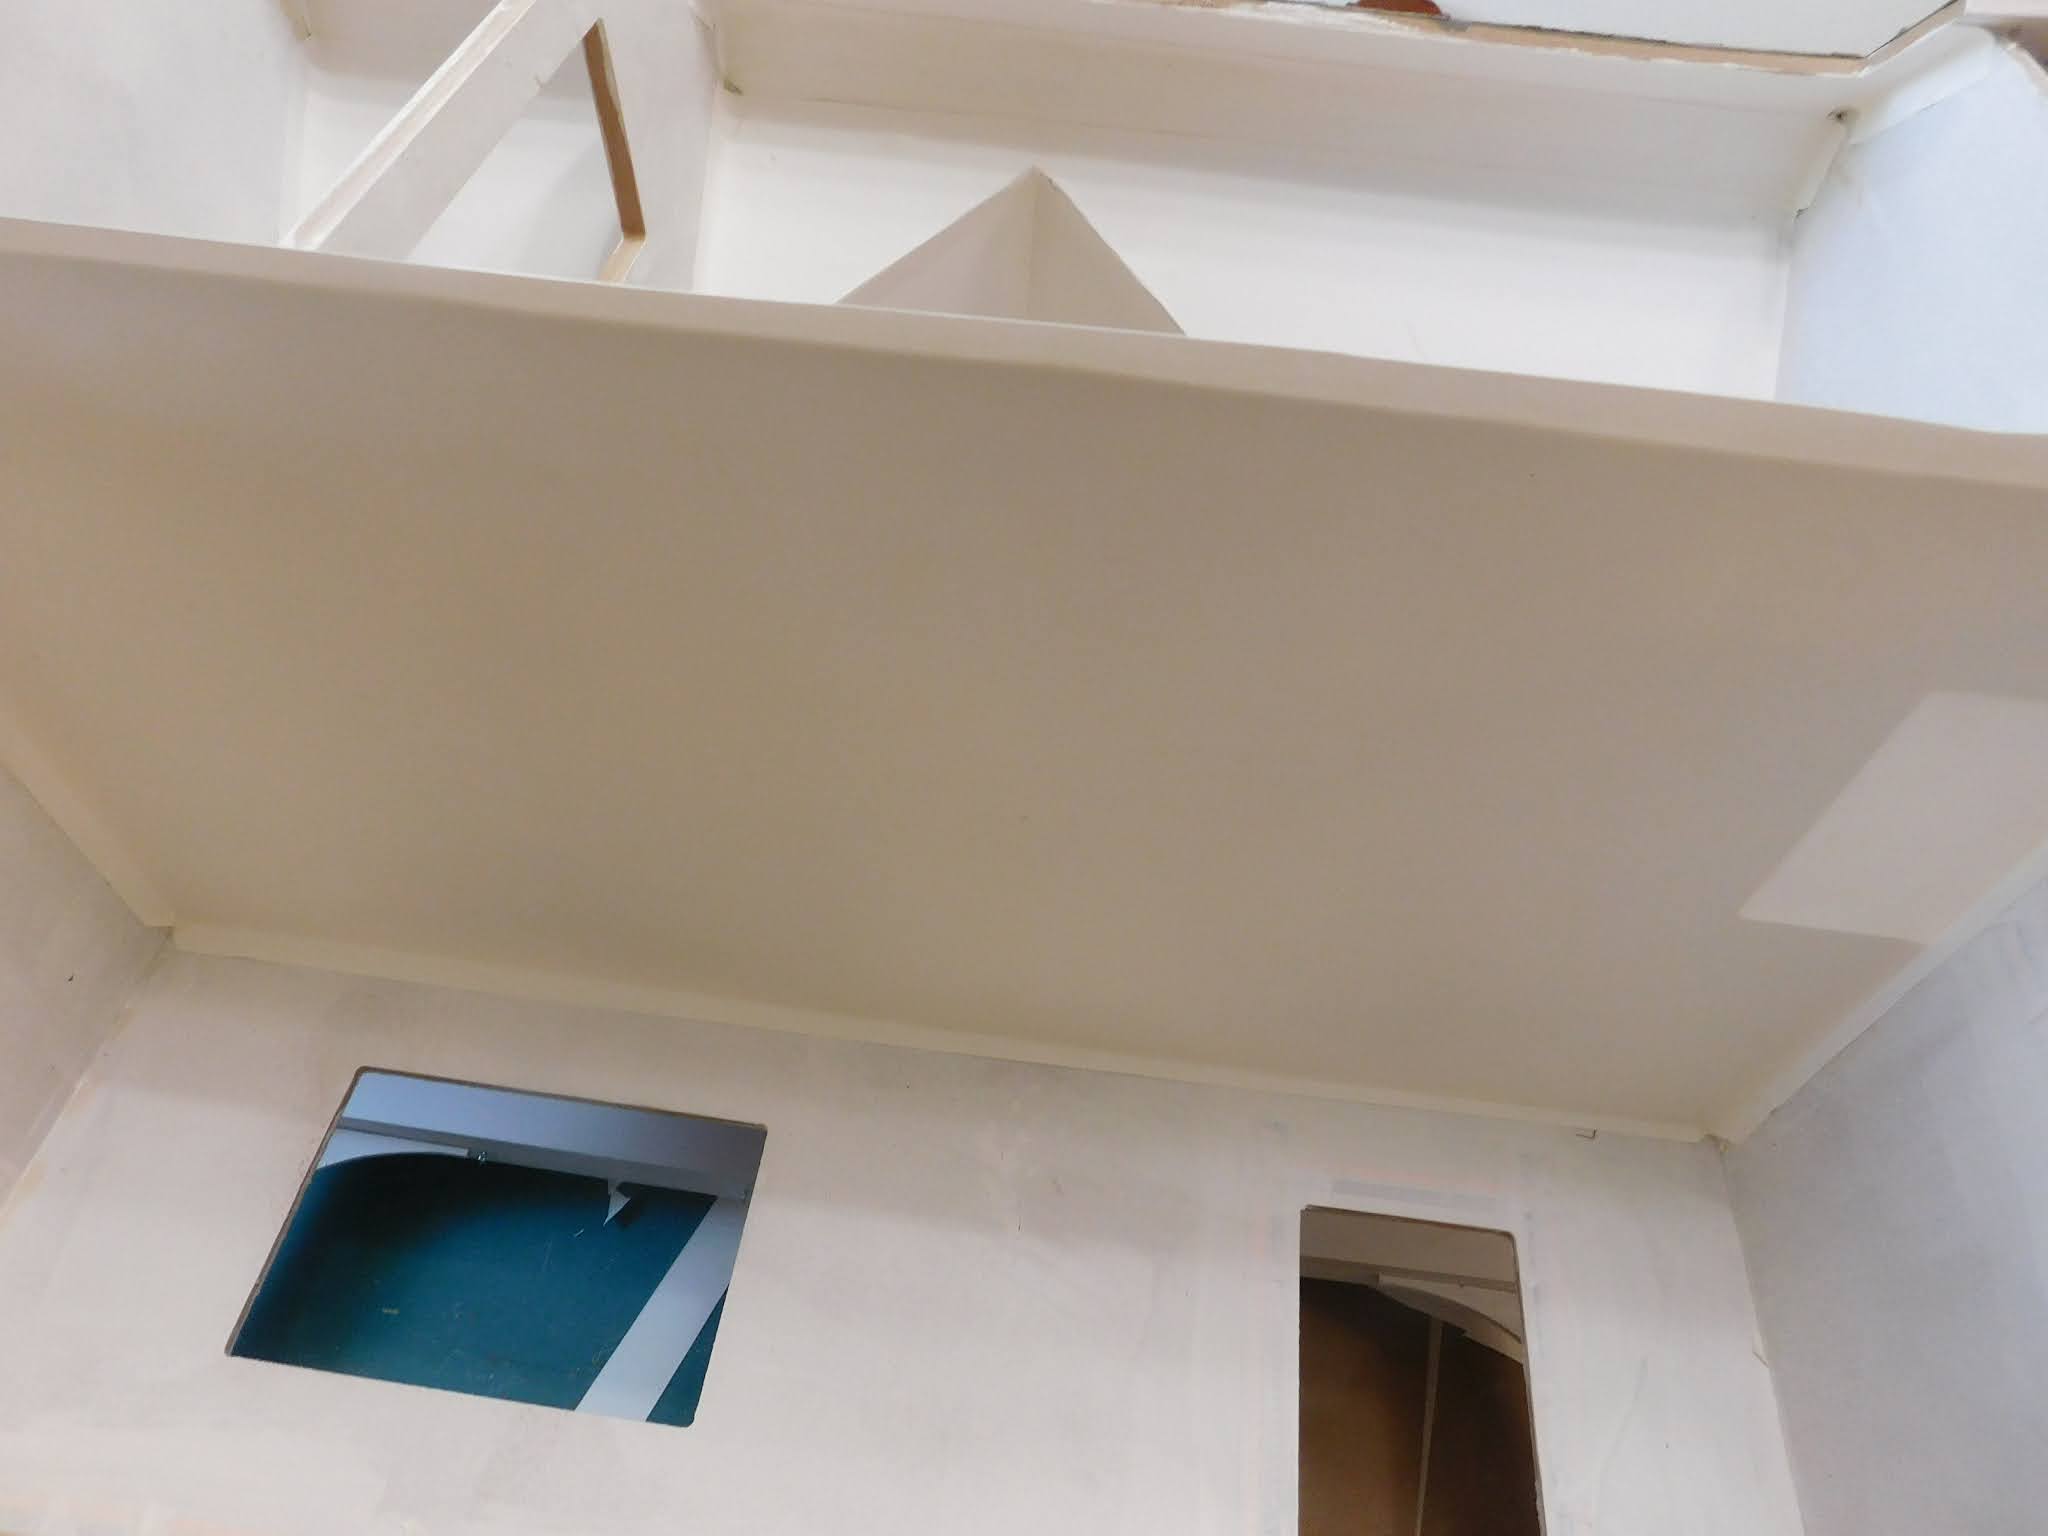
One of the reasons I chose this paper was the pattern was small enough that I didn't feel the need to match the pattern. All I needed to do was keep the stripes reasonably straight up and down. If I had chosen a pattern with a larger pattern if would have required a lot of matching especially in the dormer where it will be very visible. As it is if I am not happy with those seams I can just add a window treatment that extends to the side walls of the dormer.


The trickiest part of doing the wallpaper is to get the ceiling line straight and I am happy with that so that is good.


The one place that I needed to be really careful was in cutting the excess paper from the opening for the door between the 2 rooms. If you remember I wrapped the tape-wire around the wall in that location. I was very careful to work far away from that tape-wire so I am confident that all is still well on that front.

As with any wallpapering job in a dollhouse I spent the majority of my time creating patterns from scrap paper for the walls to facilitate cutting the paper. I much prefer this method to measuring each area. 

 So here is a look at those patterns so you can get a better idea of what they looked like. 


Next week I am planning to move onto putting some of the baseboard trim in place as well as the windows and doors.


As always I do want to sincerely thank all of you for watching my videos and reading my blog posts. It means so much to me that you are supporting me in this way. If I could ask you all to do just a bit more by subscribing to the channel and liking the videos and leaving comments. Those help more than you can imagine. Also if you could pass the links on to your friends I would appreciate it so much.


Tuesday, July 20, 2021

Tools to Roll Your Clay With


Watch the video here.


This week for the Tuesday video I thought I would talk a little bit about tools you can use to roll out your polymer clay with. Over the years I have posted a lot of polymer clay videos on this channel and I am thinking it is about time I start thinking about doing some more.


I haven't touched my clay in a very long time but the last couple of weeks I have been thinking it is time to dig it out and take stock of what clay I still have and what I need to stock up on. Then I can play with my clay again.


One of the most frequent questions I get on my clay videos relates to how to roll the clay out if you don't have a pasta machine. So this week I thought it was high time I addressed that topic.


Of course my first choice, especially if you are planning to do a lot of work with clay is a pasta machine. A real pasta machine not one of those contraptions they sell in the craft store that looks like a pasta machine and is sold for use with clay. Unless they have changed a lot in the last few years they really aren't worth it. Just shop garage sales and thrift stores, maybe check Facebook marketplace and look for a used pasta machine. They are so much sturdier and will last you a very long time.


Now if you are just starting out and want to purchase a less expensive option I would recommend one of the acrylic rollers that are sold right with the calys in the craft-store. You can find one here also. You will still need a small roller of some kind even with a pasta machine. These are well made and will last a long time and you will definitely get use it a lot.


Now for the free option, just check the recycling bin and find a straight sided glass bottle of some kind. I think the best ones either come filled with green olives or capers. This is how I started out and an added benefit is you also can use the bottle to store some of your tools for clay work also. The other bottle I show in the video held Kombucha and would also work very nicely. Just look for a bottle that is relatively straight (not curved) and fairly narrow. Be sure to remove all traces of the label and the glue that held the label and wash the bottle very well before using.


Now lets take a moment to mention a couple of things I don't recommend. First anything made of plastic. This is because raw polymer clay has a really bad habit of eating holes in plastic. Also I don't recommend using either a wooden rolling pin or a wood dowel, since both will leave marks in the clay from the wood grain.


As always I do want to sincerely thank all of you for watching my videos and reading my blog posts. It means so much to me that you are supporting me in this way. If I could ask you all to do just a bit more by subscribing to the channel and liking the videos and leaving comments. Those help more than you can imagine. Also if you could pass the links on to your friends I would appreciate it so much.


Sunday, July 18, 2021

Building the Beachside Bungalow part 19


Watch the video here.


This week my fresh jar of wallpaper paste got here so we can progress with applying the wallpaper to all the walls of the dollhouse. We are only doing the walls on the lower floor this week. We will move on to the top floor next time.


This is not really a hard job just a bit tedious and fiddly.


We still have the paper taped around the perimeter of the floors so that is a step that we don't have to worry about.


Probably the most difficult part of this week's video was decided which wallpaper I was going to use where. I finally settled on the white paper with the blue sail boats for the accent wall on the end where the kitchen will be. The rest of the walls on this floor will be the same white art paper we used on all the ceilings. I want the look of painted drywall for the most part on this level of the house with just the accent wall. We will use more of the patterned papers on the upper floor.


I am starting with the end walls and I wrap the paper around the corner just a bit. This will help to insure we won't have a gap at the corner. The paper needs to be cut to fit the wall floor to ceiling and have just about ¼” extra on the width to accommodate that wrap around to the back wall. Be sure to dry fit and get the size correct before you add your wallpaper paste.


Once you are sure you have the paper the correct size apply a coat of your wallpaper paste to both the back of the paper and the wall that you are covering. Try to be as neat as possible and not get any paste on the right side of any of the papers.


Once the paste is spread carefully apply the paper to the wall. Be extra careful if your paper has a one way design like the sail boats. We don't want any sailboats sailing upside down.


The paper will be very fragile once you get the paste on it so be very careful not to tear it.


Because we added the paste to both surfaces the paper will be able to slide a bit to get it placed correctly.


Once you have the paper where you want it you will need to use a flat object to work any bubbles and excess paste out from under the paper.


Now allow this wall to dry completely before you try to work on the wall next to it. Off camera at this point I also added the plain white paper to the wall at the opposite end of the dollhouse.


Once the paper on the side walls were dry I went on to the last wall. I did have to leave mine for several days since I ran out of paste just as I finished the two end walls.


The last wall is done exactly the same except it is cut to the exact size of the wall with no fold over at any of the edges. Don't cut out the holes for the door or window, we will do that later. When working the bubbles and extra paste out work them towards the openings for the door and window. 


Once this paper is completely dry we will need to cut out the openings for the door and window. This is easily done with a sharp knife. Be careful but it doesn't have to be perfect since the edges will be covered by trim later.


There are several reasons for not cutting the openings before putting the paper on the wall. The two most important are it is just plain easier to do it this way (less edges to line up) and the paper is already very fragile. Cutting large holes in it would make it even more fargile so the risk of tearing would be much higher.


Next time we will paper the walls in the bedroom on the upper level. Because of the tight space I will paper the bathroom off camera. I really don't see a way to get the camera where you would be able to see anything while I work on that room.


As always I do want to sincerely thank all of you for watching my videos and reading my blog posts. It means so much to me that you are supporting me in this way. If I could ask you all to do just a bit more by subscribing to the channel and liking the videos and leaving comments. Those help more than you can imagine. Also if you could pass the links on to your friends I would appreciate it so much.


Tuesday, July 13, 2021

July Miniature Haul


Watch the video here.


Since I ran out of wallpaper glue at a really bad time as far as filming goes I had to quickly do an online order of more and I got just a few other things. I thought I might as well show you all what those things were since we will be working with them soon in the dollhouse build.


So most importantly I got more of the wallpaper gel. I was almost completely out. I only got one more tub, I really hope it is enough to finish.


One of the other things I ordered was an interior door. I plan on adding this between the bedroom and the bathroom on the top floor. It is just a simple 6 panel door like you would find in a lot of American homes these days. I will be painting it off camera with the same white paint I've been using for the rest of the trim.


The other item was a bundle of 6 pieces of baseboard molding, this is the stuff that goes around the room at the bottom of the wall where it meets the floor. I was hoping to get a narrower version but this was all I could currently get to it will have to do. This one is about ½” tall and I was hoping for something a bit smaller. I will also be painting these off camera with the same white trim paint. I was a bit disappointed that one of the pieces has a rather large dent in it. I am hoping I can work around the dent when putting the trim into the house.


Of course after I had completed my order I remember several more things I was planning order. I had not bothered to make a list so I can only blame myself. I will just have to get those items next time.


As always I do want to sincerely thank all of you for watching my videos and reading my blog posts. It means so much to me that you are supporting me in this way. If I could ask you all to do just a bit more by subscribing to the channel and liking the videos and leaving comments. Those help more than you can imagine. Also if you could pass the links on to your friends I would appreciate it so much.


Sunday, July 11, 2021

Dollar Tree Furniture Flip-Dresser


Watch the video here.


This week we are taking a short break from the Beachside Bungalow and doing another flip of a piece of Dollar Tree Dollhouse furniture. I had been thinking that I wanted to move these furniture flips to Sundays instead of having them on Tuesday because they tend to run a bit longer than I want the Tuesday videos to. Then I got to a road block on the next video in the dollhouse building series, I ran out of wallpaper paste and my replacement took longer than expected to arrive. So a furniture flip it will be this week.


I am starting out with one of the tall dressers that Dollar Tree carries in their dollhouse furniture line. 


This one is surprisingly well sized for the dollhouse. As you can see in this picture. While I love the size and general shape, I am not crazy about the overall style of this piece. It looks very dated and is just not right for the vibe I am going for in this house. As you will see this is any easy change though.


I took my inspiration from a couple of dressers I had found while doing a search online as well as one I remember seeing some time ago at a craft fair.


The first step was to take the dresser apart. I was a little nervous about this after the bed last time. However, this piece like most of the Dollar Tree pieces came apart really easily. Just a quick shot of heat from my heat gun and the glue softened enough to pull it apart. I was able to disassemble it even further than I had hoped. Being able to remove the “drawers” made painting a lot easier and neater.


After removing the fake knobs I was left with some rather large holes to fill with spackle but that is a really easy task. A bit of filling and sanding and the piece was ready to paint.


I worked on the panel that represents the drawers first since that really is the focal point of the piece. I gave a base coat of the same light blue paint I have been using for a lot of the recent projects, (Slate Blue by Anita's) This was followed by a second coat of the same color then swiped with both the dark blue (Admiral Blue by Apple Barrel) and cream (Vanilla Cream by Anita's). 


The idea was to give a very abstract look of water. I think it turned out really well.


I then gathered up some odds and ends to use in the project. First some beads to use as the new feet of the dresser. These are wooden ones that are about ½” long. I have had them in my stash for so many years I have no idea where I got them. Use whatever beads you have, wood would be best but any type that can be painted will work. 


I also grabbed a handful of round toothpicks from the kitchen. I painted all of these as well as the top of the dresser with the same dark blue. I did paint more toothpicks and more beads than I needed so I could choose the best ones to use when I put everything back together.


For the case of the dresser I decided to mix the cream paint with some white to lighten it up a bit. I didn't want a stark white but I also didn't want a dark cream, I wanted something in between.


After all the paint was dry it was time to glue all the parts back together. This was a really easy task. Just take your time and let each step dry before you move onto the next. And be careful to line all the parts up.For the drawer pulls I cut the toothpicks to size (½” for the long drawers and about ¼” for the small ones) with my easy cutter. I did touch up the paint on the cut ends then when that was dry I glued the pulls into the centers of each drawer.


After all the glue was dry a quick coat of Satin Mod Podge was applied to the entire surface and once dry it is ready to place.


I love how this turned out and can't wait to be able to put it in the house. 


As always I do want to sincerely thank all of you for watching my videos and reading my blog posts. It means so much to me that you are supporting me in this way. If I could ask you all to do just a bit more by subscribing to the channel and liking the videos and leaving comments. Those help more than you can imagine. Also if you could pass the links on to your friends I would appreciate it so much.


Tuesday, July 6, 2021

Dollar Tree Furniture Flip-Couch


Watch the video here.


This week for the Tuesday video I am doing a flip of the Dollar Tree dollhouse bed. When I got it I had planned to just take it apart and make a doll bed. It sat on the end of my desk for a couple of weeks when I wasn't feeling too good and I was looking at it on a regular basis. One day it occurred to me how much the headboard and foot-board looked like the ends of a couch.... Hmmmmm I started to wonder and today's project just kind of happened.


I did end up making some changes in the process of the construction. Since I only had one of the beds and I really didn't want to go get another I just went with it and showed you the changes as they happened.


In the end I absolutely love how this turned out. It is exactly what I envisioned when I first got the idea.


The first stumbling block to this project was getting the ends off the bed. I have no idea what kind of glue they used but boy I wish I had some of it. It would not let go no matter what I threw at it. I decided that since I had filmed a lot of me trying to disassemble the stupid thing I might as well add it to the video in a sped up version for your enjoyment. In the end I took my saw to it and just cut it apart.


The next step was to make both pieces the same size, I cut the headboard portion with my saw and then sanded them even and straight. By taping the two pieces together I was able to make them the same size easily.


The legs are just craft sticks, you will need 4 cut at 2 ¼” each. Try to line them up so they are the same distance from the edges.


Once dry I added the seat portion, For this I used these Giant Craft Sticks from Walmart. I love these things, they are very handy to have around.


You will need 2 cut at 5 ½” for the seat and 1 cut at 5 ¼” for the back.


 I also used a couple of blocks from the Tumbling Tower game from Dollar Tree to act as spacers behind the back.


Once all the glue is dry I painted the couch frame first with Admiral Blue then with a coat of Vanilla Cream. These are the same colors I used for the coffee table a while back as well as in several other projects for the dollhouse. I am not sure what happened to the video clips of me painting this, they are no where to be found on my computer or my camera. 


The couch frame will also need a good coat of Satin Mod Podge to seal it.


Now we need to cut some foam-core to act as the cushions for the couch. I cut 4 at 5” by 1 ¾”. Then glue them together in pairs to create 2 cushions.


I used 2 layers of fabric to cover the pieces. The first is just some cheap white fabric, this is there to create a little softness and help to hide the fact the cushions are just foam-core. 


Then the outside layer is a piece of cotton fabric that has been in my stash for several years. I had originally purchased it to use in the Harrison dollhouse. It is the perfect look for our Coastal Farmhouse style I am going for in the dollhouse.


For the white fabric cut 2 pieces 8” by 4 ½” and glue them on like you are wrapping a package.


The outside “upholstery” fabric is cut 8” by 6” and glued on the same way.


I used some really strong double sided tape to attach the cushions to the frame and the couch is ready to use.


As always I do want to sincerely thank all of you for watching my videos and reading my blog posts. It means so much to me that you are supporting me in this way. If I could ask you all to do just a bit more by subscribing to the channel and liking the videos and leaving comments. Those help more than you can imagine. Also if you could pass the links on to your friends I would appreciate it so much.


Monday, July 5, 2021

Joanne's Minis YouTube Old Today!!


I wanted to post a short blog post to commemorate the fact that my YouTube channel is 11 years old today. Boy a lot has changed in that time.


I remember back then I was really truly surprised that anyone even watched my videos. Now on an average week about 12,000 of you watch something on my channel. That number still makes my head spin a bit.


I was absolutely amazed and so excited when I got my first subscriber that I didn't know! Now there are almost 16,000 of you out there and I have only met a handful of you. Again my brain has a bit of trouble wrapping itself around that concept.


I maintain I have the best fan base on all of YouTube, I know most creators say that but I do mean it. You are all the best. Over the years you have been so supportive of me no matter what has come up in my life.


My goal is to make the channel the best channel I can create for you. After all everything I do on the channel is for you, the person on the other side of the screen.


I take my tutorials very seriously. I do my best to show you the correct way to do things and to make sure I am modeling safe ways of doing things. I am not perfect and I do miss a few things but I am doing my best.


So with 11 years behind me what's next?


My first goal is to get the channel to 20,000 subscribers. That is one of my goals on my way to a higher goal of getting 100,000 subscribers. You see when you reach that level YouTube sends you a really cool piece of wall art and I want one!


I am working in several things behind the scenes that I hope will be of benefit you all of you. So be sure to watch for announcements in the future as I figure out a few things.


I do have a favor to ask of all of you- please press the like button and comment on the videos. I know you hear that from a lot of YouTube creators but that is because it is so important. That is how the computer system knows to suggest my videos to new people. That is one really small way for you to help me grow the subscriber base. Also if you could pass the links to the channel on to your friends that also like dollhouse miniatures that would be a huge help too.


If you have joined us over on Facebook and liked/followed the page if you would pass on the links/posts I share with you that would also help me out. All you have to do is hit that little “share” icon at the bottom of the posts. A few seconds for you could mean the world to me.


So from the bottom of my heart- a huge THANK YOU!!!

Sunday, July 4, 2021

Building the Beachside Bungalow part 18


Watch the video here.


This week we are putting up all of the ceiling paper in the dollhouse. When I do the interior finishes I like to start at the top and move down each wall. So first the ceiling gets finished then the walls then the floors. This way I can wrap around each area where 2 pieces of paper meet. In this case the lines between the ceiling areas and the areas where the ceiling and walls meet. This way we are insuring that the corner will be covered and we won't see the wood structure under the paper or a crack between the pieces of wood.


Before I started I did go through and did some filling with some Spackle and caulk. I used both and picked what seemed to be easier in each place.


Now some of you might be wondering why I am not just leaving the painted wood. After all this paper is supposed to replicate a plain painted ceiling. Just painting it would definitely be a lot easier and quicker. And if this was a house that was going to be played with by a small child I would do just that. But because I want this to look more realistic I need to create the look of a finished ceiling. (and next week finished walls) The wood that the house shell is made of is just not the correct texture or scale to look convincing. The art paper I am using for white painted drywall pulls off the trick of looking like painted drywall. It has just a light texture and in scale looks a lot like the texture we are all used to seeing in our real homes.


When I am working on the ceiling I start at the highest point, and also the point closest to the back of the house. In this case the area that is kind of hidden under the back roof 

piece. 


I then work forward toward the front of the house and down. This way any edges that are rolled over the edge of the surface will be covered by the piece of paper that goes next to it. We will be doing a very similar pattern with the wallpaper next time. The last pieces to go in will cover the edges next to them with a straight edge. The most finished looking area will be at the front of the house where you will see it more as you look at the interior of the dollhouse from the open back. If this sounds a bit confusing I think it will make more sense when we work on the wallpaper.


To make the more tricky cuts I like to make a pattern to use in cutting my papers. I use whatever paper I have on hand, this time I am using some of the Kraft paper I have for covering my table. I always have some odd pieces left at the end of the roll and they come in handy for all sorts of stuff. Instead of doing a lot of complicated measurements and drawing out a pattern for each piece, I use small pieces of paper that line up with the edges of the area I need the pattern for. By building it up in place from small pieces I can make a fairly accurate template (or pattern) easily. I have shown this method before on the channel and I am sure it will crop up in future videos also.


dry fit
As with pretty much everything else I dry fit the pieces before I apply the glue. That way I can make any adjustments before I have glue covering everything.


When working with larger areas with openings like the downstairs ceiling I like to cut one solid piece and cut the openings later. (like the stair opening this week) We will be handling the window openings the same way. I also prefer to cut the flush edge at the back after the installation also. So much easier than trying to line up multiple fiddly edges. 


When you applying papers, both ceiling and wallpaper you will probably have some bubbling while the paper is wet. Do your best to smooth out any air and any excess paste. Most of the other bubbling will shrink out as the paper dries. Do be sure to apply the paste to both the wood surface and the back of the paper. This way not only do you get better coverage of the paste but also you can gently slide the paper into place. Just be very gentle so you don't tear the paper.


just for fun


I have used over half the container of wallpaper gel that I purchased so I will be placing an order for more before the weekend. Hopefully it will arrive before I run out while putting up the wallpaper. I do like the product and I will probably do an actual review of it later on in the summer.


As always I do want to sincerely thank all of you for watching my videos and reading my blog posts. It means so much to me that you are supporting me in this way. If I could ask you all to do just a bit more by subscribing to the channel and liking the videos and leaving comments. Those help more than you can imagine. Also if you could pass the links on to your friends I would appreciate it so much.